Piksera LMS
Learning Management System with PHP Laravel
Thanks for choosing Piksera LMS.
- Version: 1.7
- Author: Piksera
- Created: 1 July, 2022
- Update: 15 April, 2024
If you have any questions that are beyond the scope of this help file, Please feel free to email via Support Center.
1. Getting Started
Before you begin, it's essential to determine the installation method that best suits your needs: local installation, server deployment, or cPanel installation. This separation helps streamline your understanding and directs you to the relevant section for guidance. Below, we outline the steps for each installation method:
Local Installation
If you're setting up Piksera LMS on your local machine for development or testing purposes, follow the instructions provided in the 'Local Installation' section.
This method allows you to run the LMS directly on your computer without the need for external hosting services.
Server Deployment
For those intending to deploy Piksera LMS on a remote server, refer to the 'Server Deployment' instructions.
cPanel Installatin
If you prefer utilizing cPanel hosting services for managing your web applications, consult the 'cPanel Installation' section.
This method simplifies the deployment process by leveraging the familiar interface and tools provided by cPanel.
Package Contents
- Piksera LMS Script — Contains the entire script of Piksera LMS, including all designs, assets, and features.
- 6-months of Support — You will receive 6 months of support from our dedicated support center. Our team is here to assist you with any technical issues you encounter.
- Documentation — Our documentation is continually updated with each new release, ensuring you have access to the latest information and instructions.
Details regarding contents and structure of Piksera LMS starts below.
Installation
Local Installation
Follow the steps below to install Piksera LMS locally or Server:
- Unzip the Piksera LMS package, as well as the inner script zip file. Then, open the script as a project in your preferred code editor. We recommend Visual Studio Code for optimal experience.
- Before running the script, ensure that you have Apache server and MySQL database installed on your local machine. You can easily set up these components by downloading XAMPP or similar software. Additionally, make sure PHP commands can be executed on your computer.
-
Visit localhost/phpmyadmin in your web browser, then create a new database and user for connecting to your Piksera LMS script.
-
php artisan serve- Run this command to start the script.
-
-
The script should run if you have:
-
php version- v8.1 and higher- Now visit the port you are running, it could be "http://127.0.0.1:8000/"
- It should redirect to /install, where you need to configure the database you created earlier.
-
After successful configuration with the database, you must run the database tables. There are three ways you can do it:
php artisan migrate- Migrates (installs) all required tables to the database.php artisan db:seed --class=UsersTableSeeder- This will create the admin user.
-
Cpanel Installation
Follow the steps below if you are installing on Cpanel:
- You can install on Shared or VPS Cpanel Hosting.
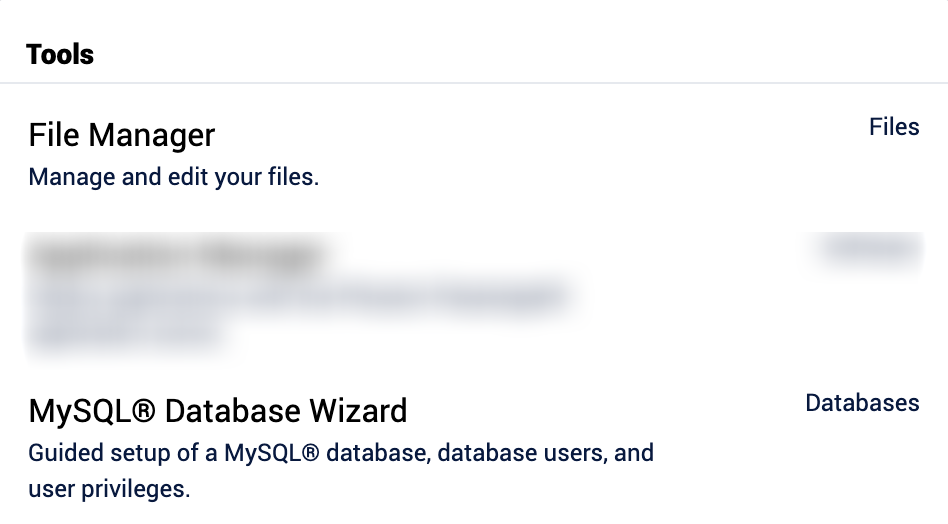
- Open you Cpanel Hosting, then open these two tools: PHP Databases Wizard & File Manager
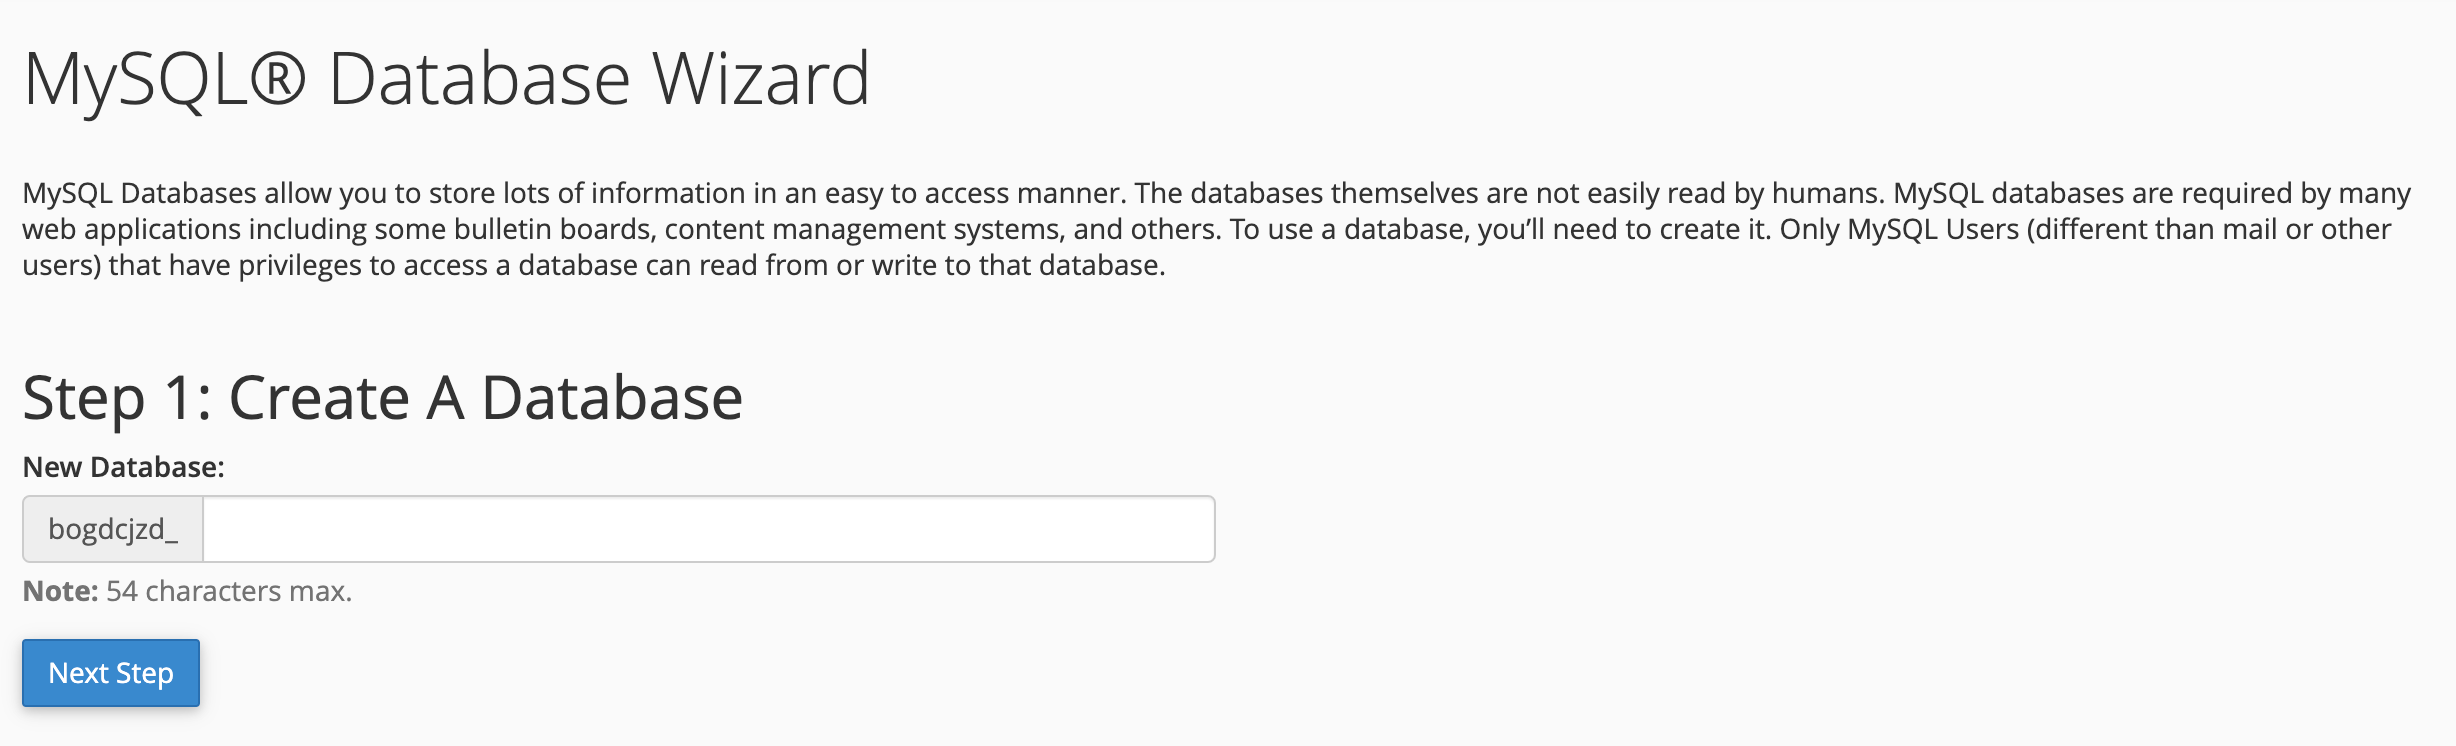
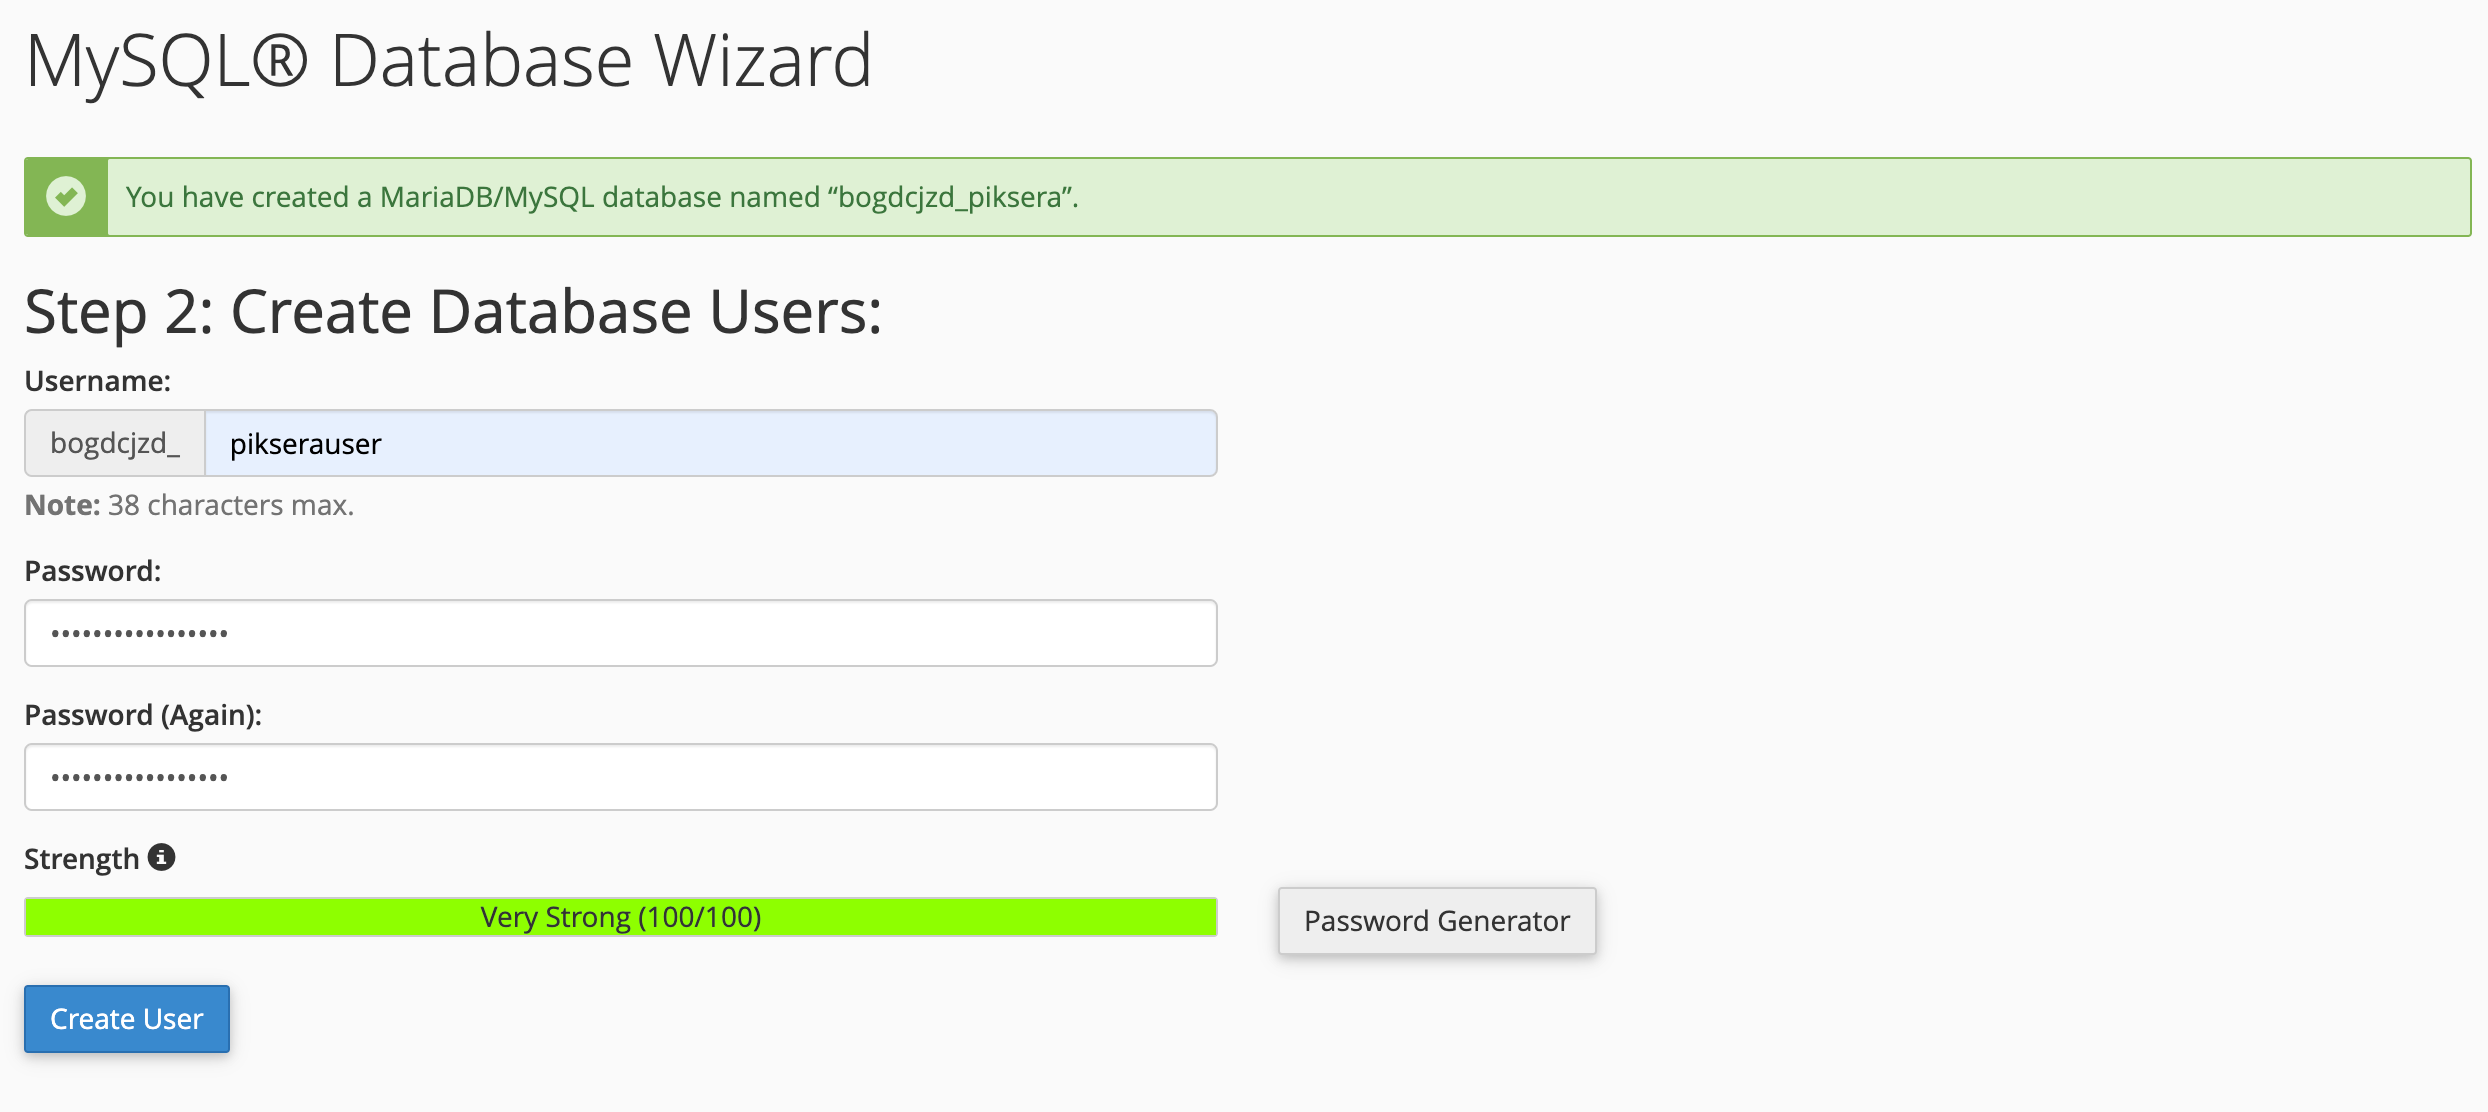
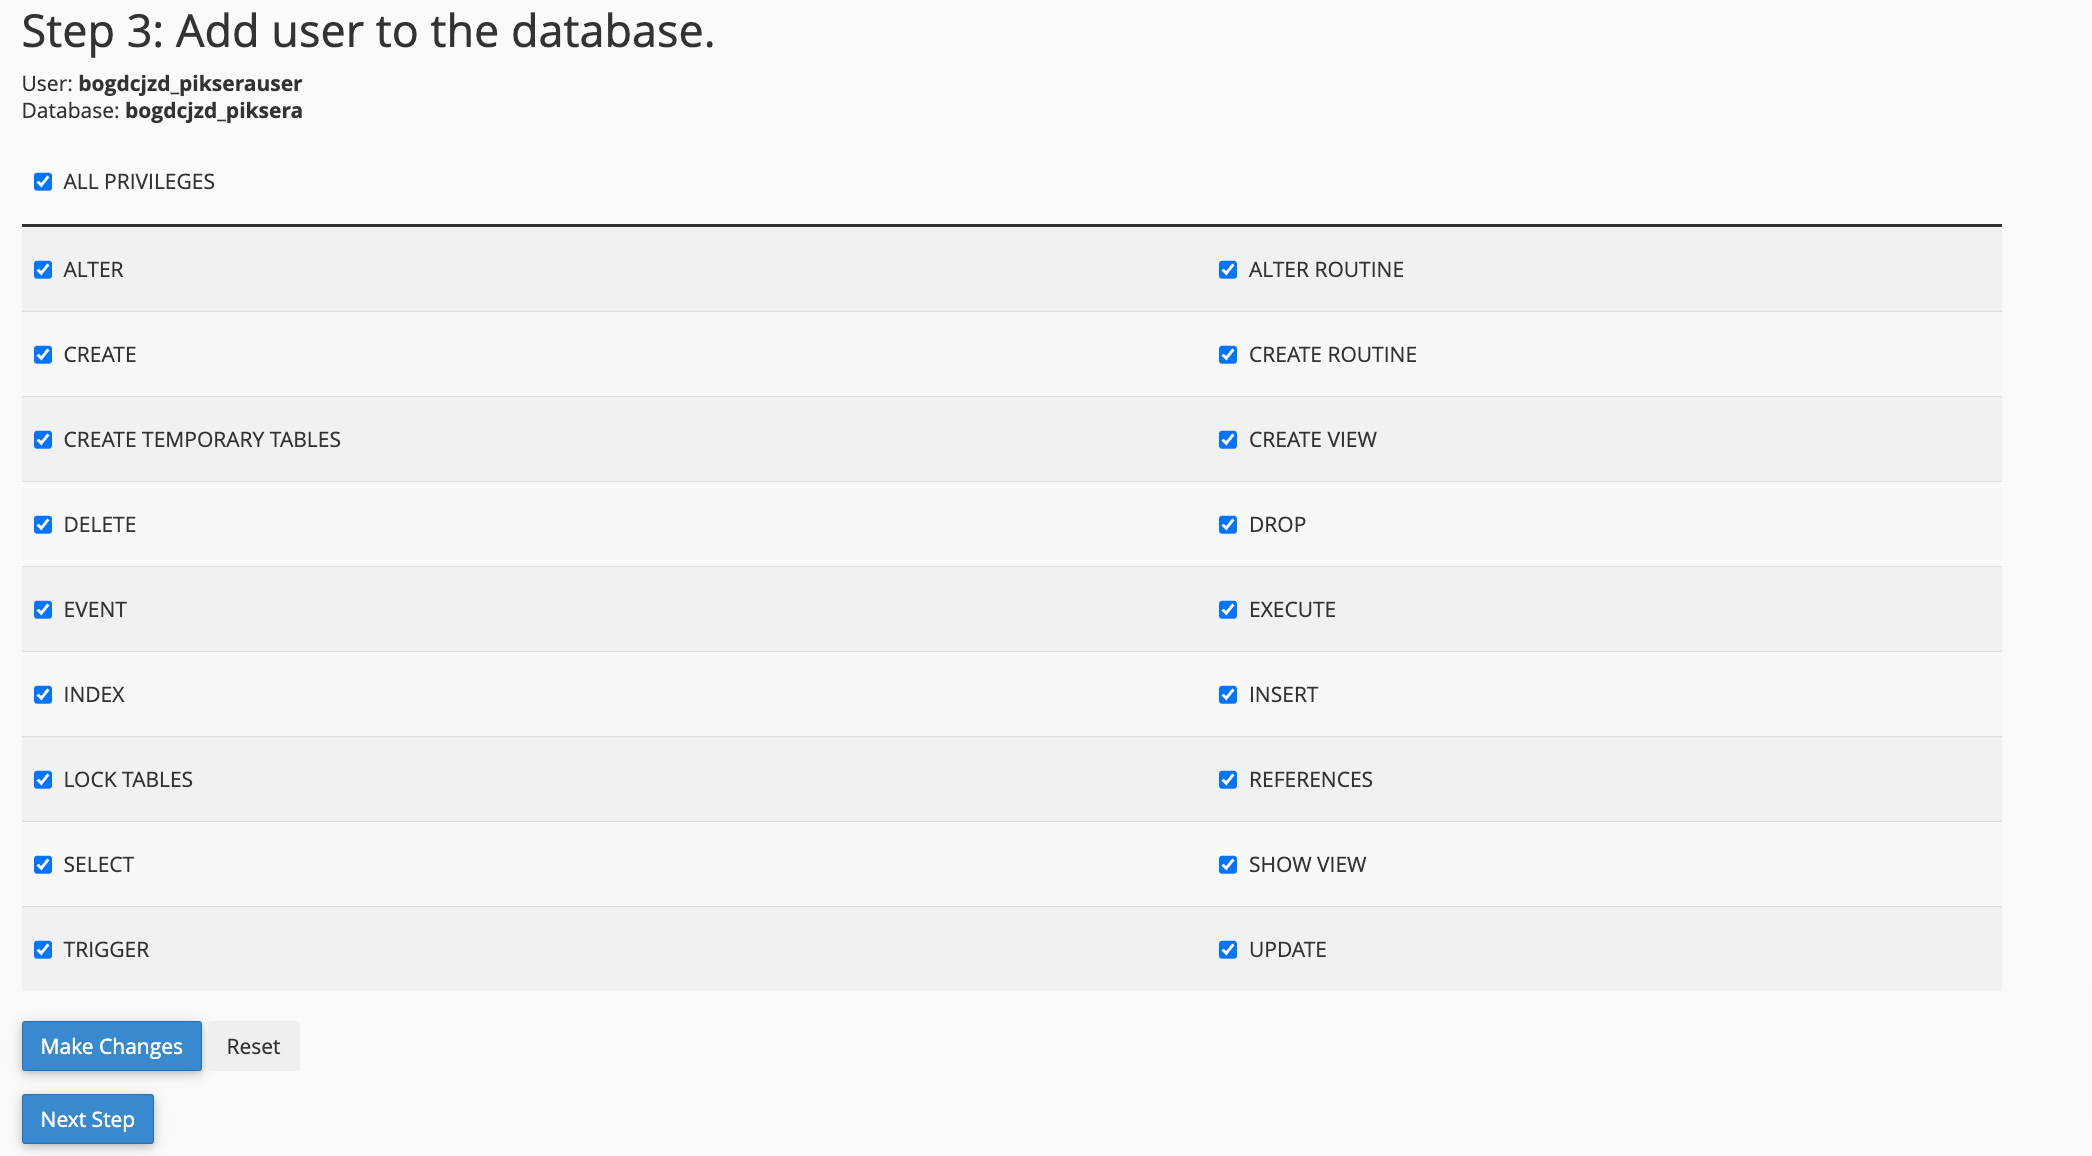
- On PHP Databases Wizard: Create a database for your LMS. Choose database, username and strong password. Then give all priviliges to the user.
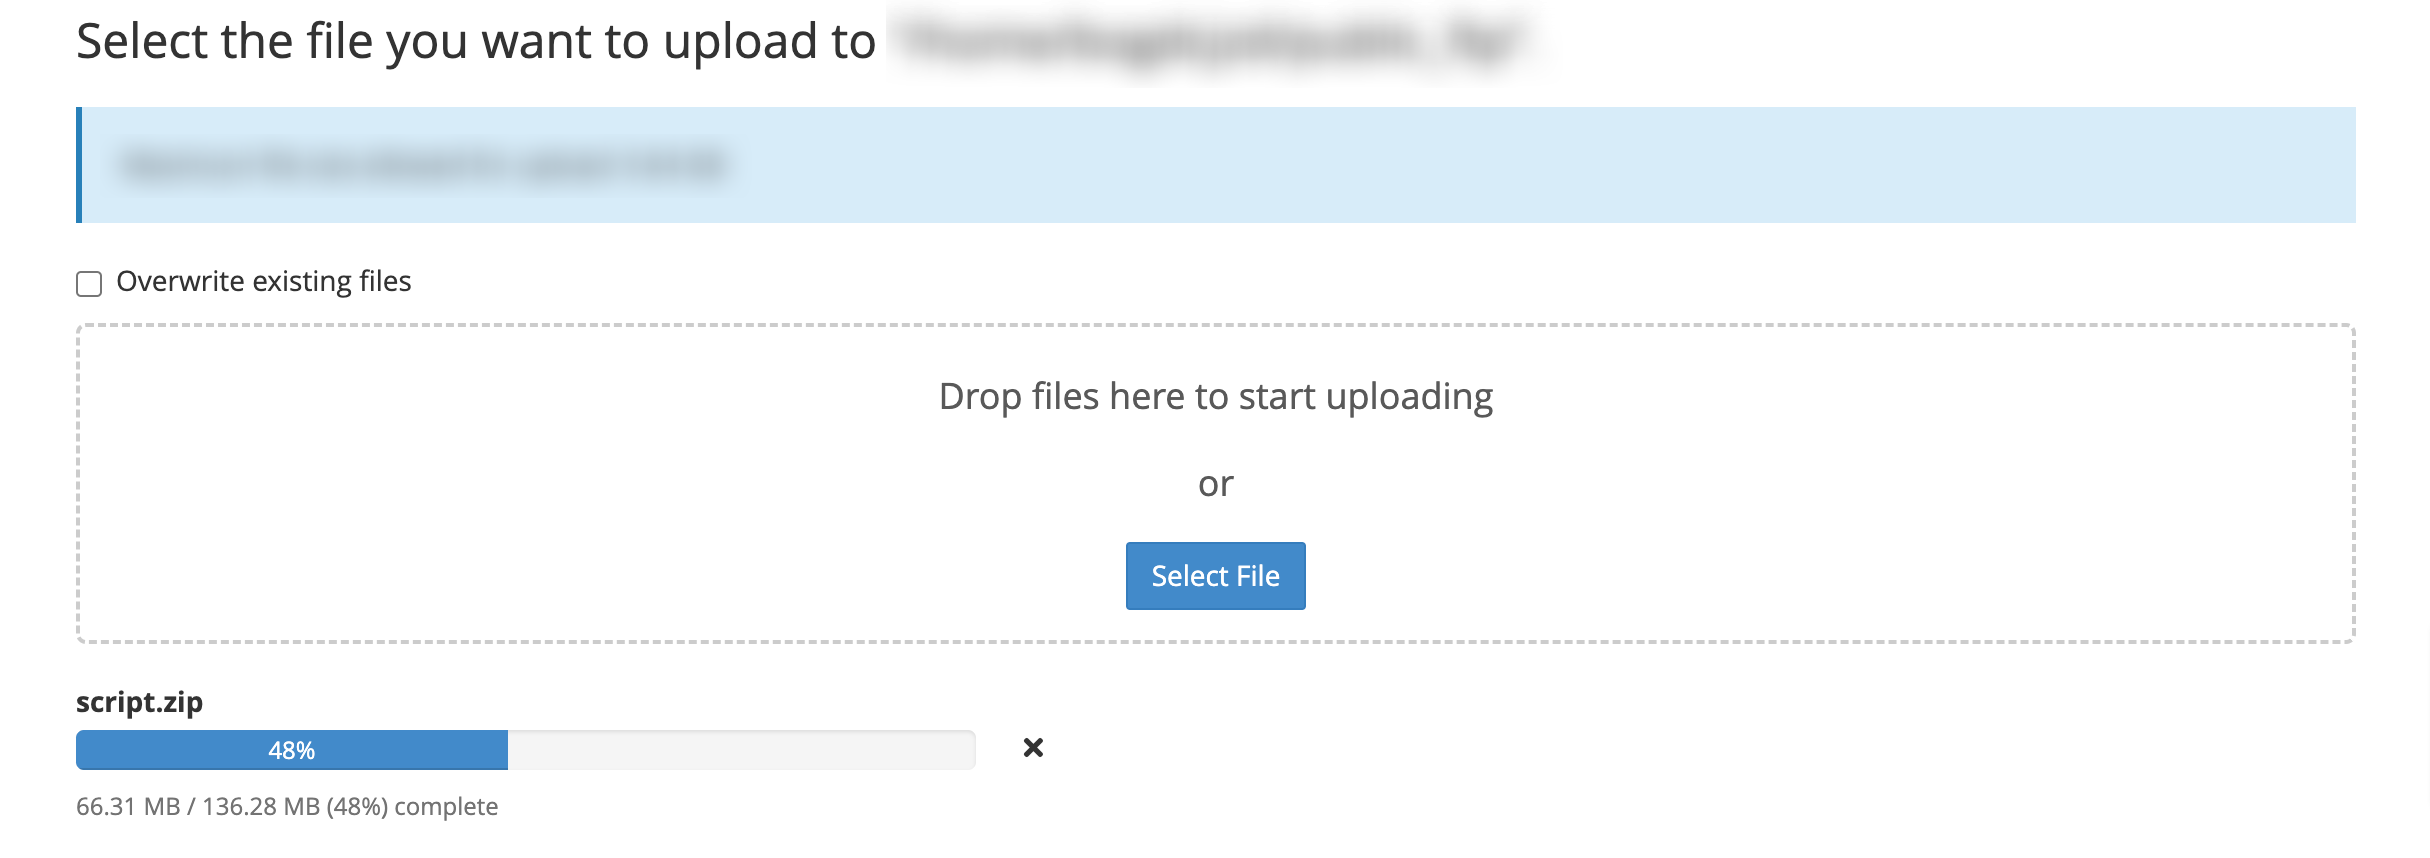
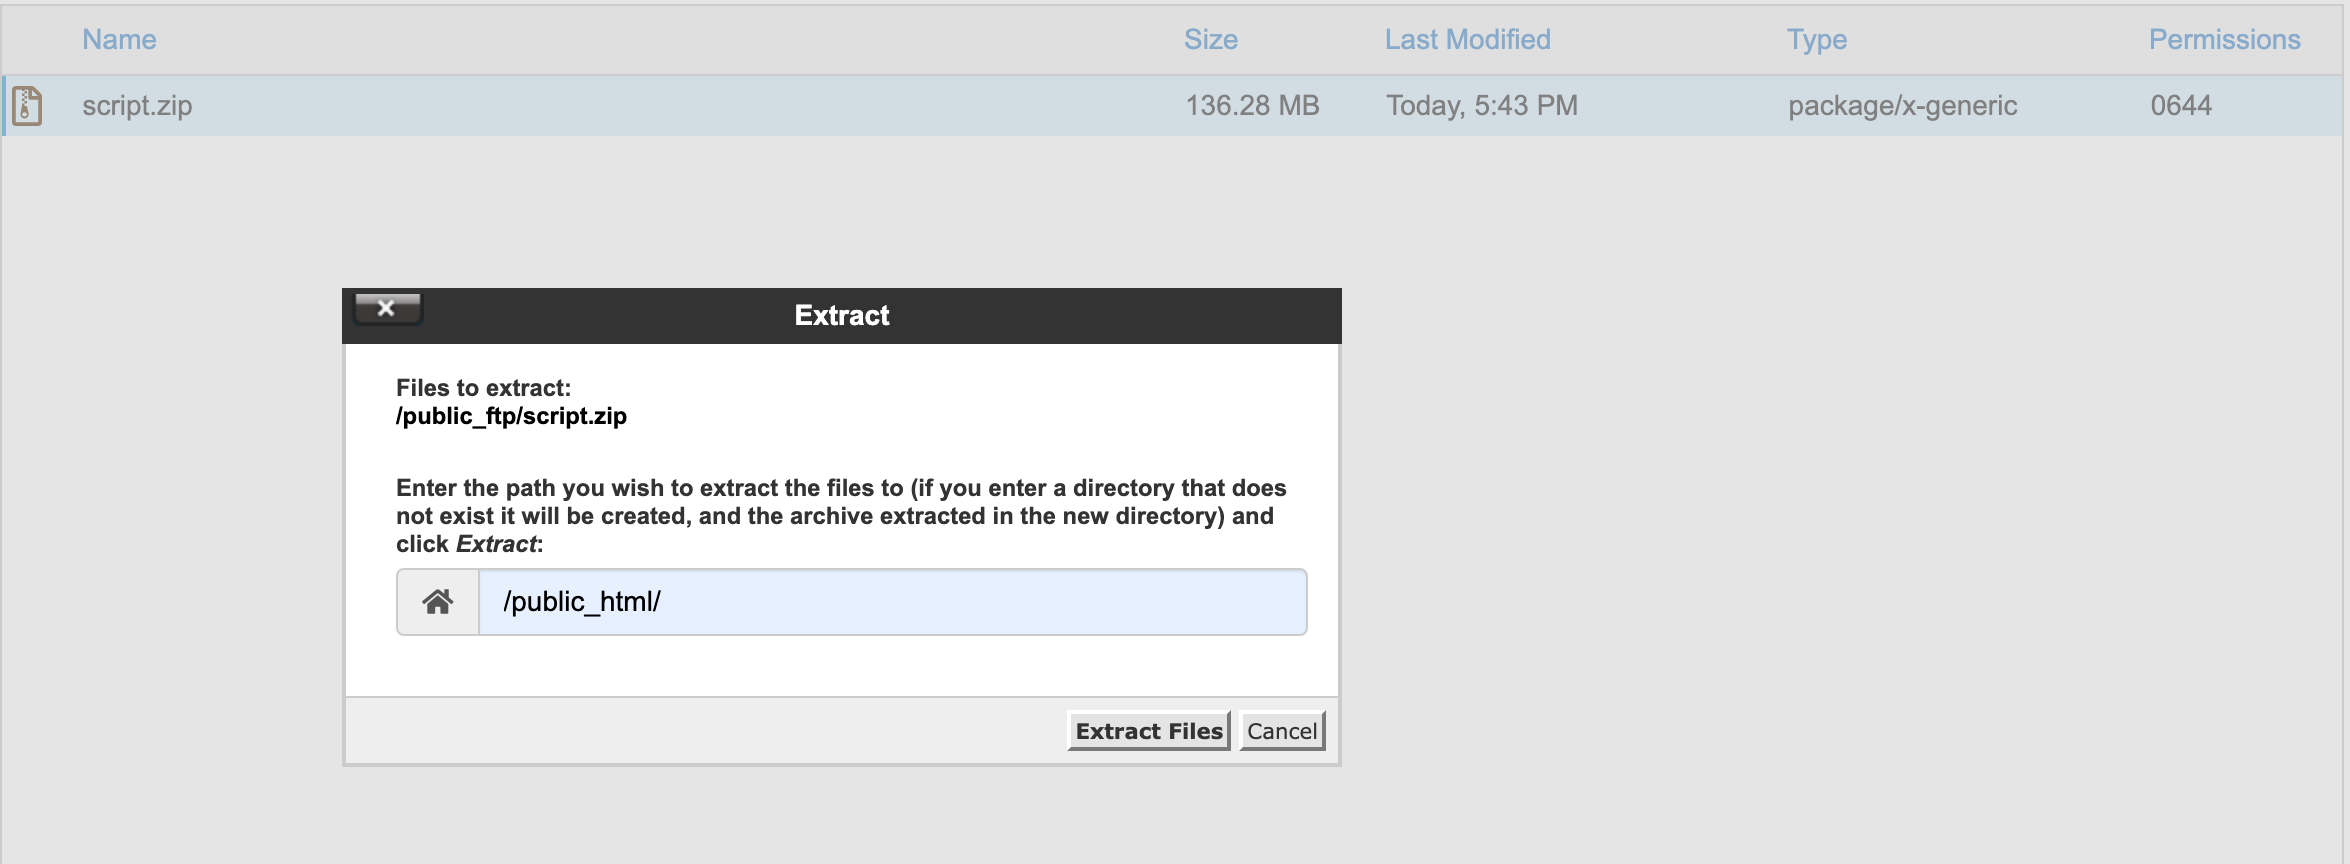
- On File Manager: Upload the script.zip inside the Piksera LMS package in File Manager.
- Extract the script.zip, after the action is done, it will create a folder PikseraLMS, that includes all folders and files of Piksera LMS. Move these files to your domain directory. It's sometimes (public_html) or your domain name folder.
- There is
htaccessfile in directory, rename it to.htaccessthis will give access the script to the public. - Now, Open your url (website.com) and it should redirect to /install page if you have installed the files correctly. These issues you may happend to face:
403 forbidden access to this resource on the server is denied!This mean the .htaccess file needs tweak, because your hosting is not letting access the public. Ask Support from you hosting provider.Piksera LMS requires php ^8.x ->You PHP version (x) does not satisfy that requirement.Open PHP selector/PHP tweak to upgrade your php version, or ask your hosting provider.- On succesfull /install page, fill the gaps to configure the system to the database. Put the created mysql database credentials.
- On succesfull connection it should lead to install/final page. Here you need to upload required tables to your system. Press migrate/seed button to upload the tables correctly. If doesnt work, upload database.sql to the database by opening phpmyadmin, then your just created table. Then press import, and then upload.

You will need these later
extracting/unzipping the package
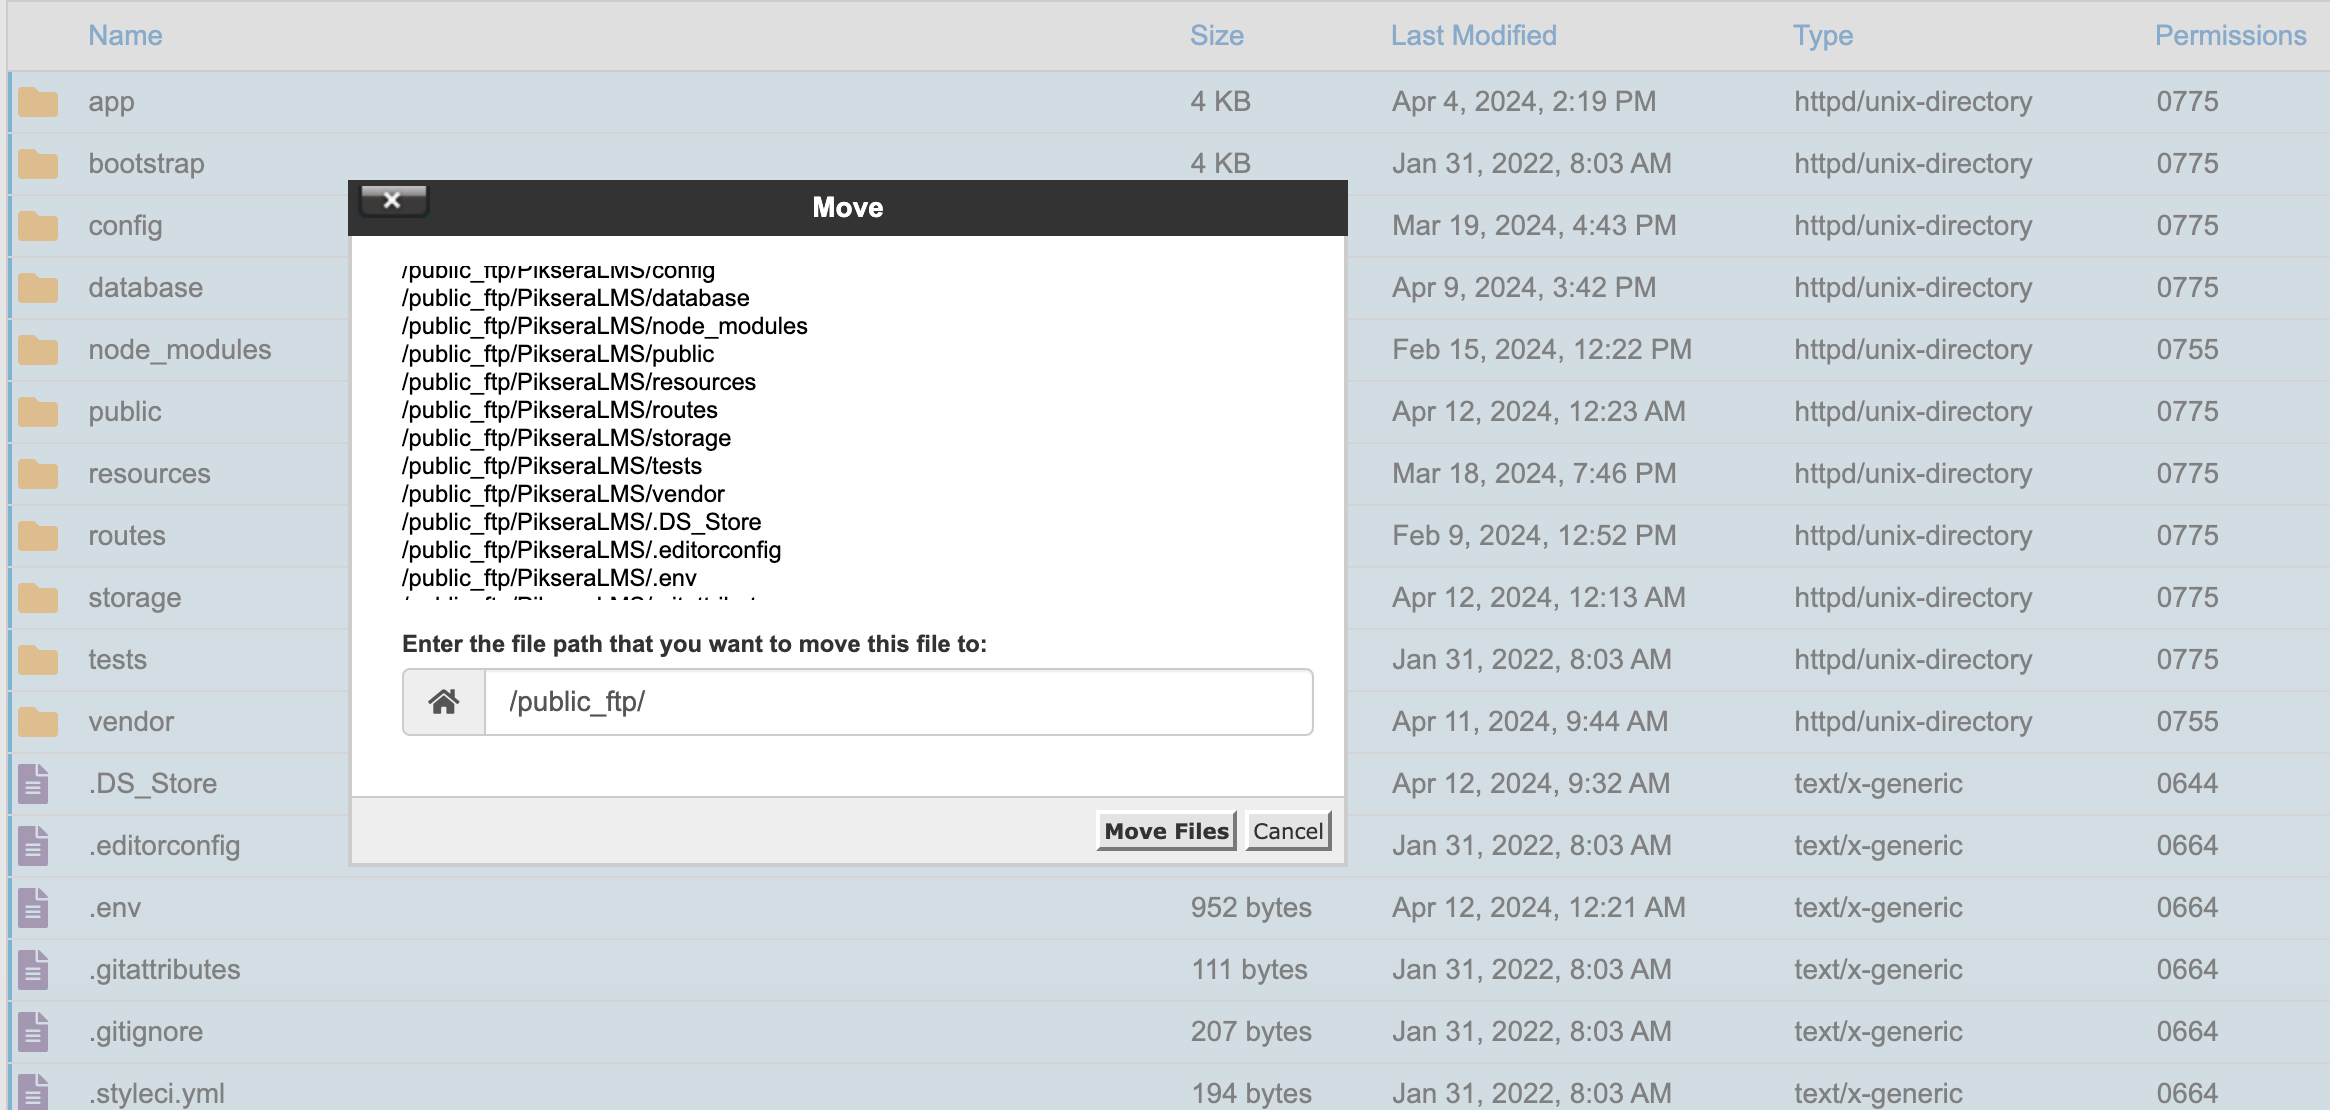
moving files from PikseraLMS package to the domain directory.

If you find this htaccess hard, ask your hosting provider to provide a htaccess file for you to support files on your domain.
Piksera LMS Structure
Piksera LMS follows a simple and easy to customize coding structure. Here is the sample for your reference:
The template is based on Bootstrap Framework
<!DOCTYPE html>
<html lang="en">
<head>

<!-- Your Title, Description, Stylesheets
============================================= -->

</head>

<body data-spy="scroll" data-target=".idocs-navigation" data-offset="125">

<!-- Document Wrapper
=============================== -->
<div id="main-wrapper">

  <!-- Header
  ============================ -->
  <header id="header" class="sticky-top">
   ......
  </header>
  <!-- Header End -->

  <!-- Content
  ============================ -->
  <div id="content" role="main">

    <!-- Sidebar Navigation
    ============================ -->
    <div class="idocs-navigation bg-light">
     .....
    </div>

    <!-- Docs Content
    ============================ -->
    <div class="idocs-content">
      <div class="container">
        .......
      </div>
    </div>
  </div>
  <!-- Content end -->

  <!-- Footer -->
  <footer id="footer" class="section bg-dark footer-text-light">
    <div class="container"> ...... </div>
  </footer>
  <!-- Footer end -->

</div>
<!-- Document Wrapper end -->

<!-- JavaScript -->
</body>
</html>
If you need more information, please visit bootstrap site: https://getbootstrap.com
Sass
We have added SASS .scss files in template. If you know how to use SASS you can change sass files and compile the css as well.
You can find sass file here - /assets/sass
Open the sass/_variables.scss and Edit the values according to your needs. If you need more Advanced Setup then you can Edit the Respective Files yourself which have been branched inside the same Folder. It is completely at your discretion only to include the Required .scss Files you need to minimize the amount of CSS & including only the Styles of the Blocks you need. This can be setup in your stylesheet.scss File.
Style
If you need to edit the styling of your site. You can simply edit these 3 styling for primaraly the theme style.
style.css- Primary Bootstrap basedcustom.css- Customcourse.css- Learning Style
You can edit these safely
Remember that if you edit on server, you may have to clean cache to see changes.
We have include a Custom CSS File in the css Folder so that you can better handle your Customizations for New Styles or
Overwriting Default Theme Styles. Simply add all your Custom CSS Codes in the css/custom.css File and link it in the Document <head> after the css/stylesheet.css Linking. Also make sure that this is the Last Linked CSS File in the Document <head> so that your Custom CSS Styles are Overwritten properly.
<head>
<!-- Stylesheet
============================== -->
<!-- Bootstrap -->
<link rel="stylesheet" type="text/css" href="assets/vendor/bootstrap/css/bootstrap.min.css" />
<!-- Font Awesome Icon -->
<link rel="stylesheet" type="text/css" href="assets/vendor/font-awesome/css/all.min.css" />
<!-- Magnific Popup -->
<link rel="stylesheet" type="text/css" href="assets/vendor/magnific-popup/magnific-popup.min.css" />
<!-- Highlight Syntax -->
<link rel="stylesheet" type="text/css" href="assets/vendor/highlight.js/styles/github.css" />
<!-- Custom Stylesheet -->
<link rel="stylesheet" type="text/css" href="assets/css/stylesheet.css" />

<!-- Here goes your custom.css
============================================= -->
<link rel="stylesheet" type="text/css" href="assets/css/custom.css" />
</head>
Theme Customization
Customizing your theme requires experience in HTML, CSS, and PHP, especially within the Laravel framework. If you need to extensively edit Piksera LMS 1.7 to suit your needs, consider checking out Piksera LMS 1.7 advanced version, which offers additional tools, drag-and-drop features, built-in AI, and more.
If you want to edit the texts in public and admin, they are all localized which means you can/must edit the language file to edit the text.
For example:
To edit home page names, and details, as per Piksera LMS 1.7, you need to open resources/lang/en/global.php or any language, then edit global.php translation. We have guidance on translation seprately, read the languages & lozalization.
If have experience on HTML/CSS or PHP, open /resources/views/sections then you can edit front sections.
Understanding Available Customization Options:
- There are admin panel tools available to assist you in making adjustments, such as selecting themes, courses, and more.
- If you need to customize and edit text, locate the file containing the text and make the desired changes. However, if you're not proficient in Laravel and PHP, proceed with caution.
- Editing HTML should not pose any issues, but modifying PHP strings or adding undefined strings may lead to errors. In such cases, it's recommended to seek professional support.
NoteYou can request Customization or View Piksera LMS Advanced Piksera Products
Logo Settings
The logo can be easily edited in the admin panel.
To do so, navigate to /admin/dashboard, then click on Piksera LMS in the sidebar menu, and select "Photos". From there, you can simply upload or paste the URL link of the logo.
Logo Light
The Logo Light option is intended for use when the light mode is enabled. It's recommended that the Logo Light has different colors than white, as the background is white.
Logo Dark
Choosing the Logo Dark option ensures visibility when dark mode is enabled by the user. Contrary to what the name suggests, the Logo Dark should actually feature light colors. Since everything else will be dark, your logo will stand out better with light colors.
Recommended/Default Logo Type and Size
We use .svg image type with dimensions of 506px x 106px. This size is ideal for the overall system design. While it's not mandatory to match these dimensions exactly, it's highly recommended.
Layout
Documentation and types for header, navbar, sidebar, footer
Header
Piksera LMS 1.7 offers different header types. We will go each one, one by one.:
Default Header

The Default Header offers a minimal and simple design, featuring:
- Logo Light and Logo Dark options
- Categories dropdown
- Menus
- Search bar (for searching courses only)
- Mini cart for collecting courses and subscription plans for checkout. The cart data is stored by session, not in the database.
- When logged out: "Create Account" and "Login" buttons
- When logged in: Profile dropdown with relevant links based on user type (e.g., admin, instructor, student)
For details on configuring the logo, please refer to the logo settings mentioned above.
The categories dropdown automatically populates with categories created by the admin.
Menu configuration details are provided separately below.
The search bar is specifically designed to search for courses.
Education Header

The Education Header offers beautiful header and a unqiue topbar:
Topbar
- Visit Time: Displays the opening hours, showing the opening days and time.
- Call Us: Provides a phone number for users to call.
- Language Dropdown: Allows users to switch between different languages.
- Social Media Links: Links to various social media platforms.
The details are localization locked. You need to edit language file to edit the details.
Header
- Logo: The website's logo, with both light and dark mode options.
- Responsive Navbar Toggler: Button for toggling the responsive navbar menu.
- Main Navbar: Contains navigation links to different sections of the website.
- Nav Search: Includes a search input field for searching within the website.
- Profile: Allows users to access their profile with options to edit, adjust settings, seek help, or sign out.
Academy Header

Header
Logo Section
This section contains two images inside an anchor tag, each image corresponding to a different mode (light and dark). It's likely used for branding purposes and provides users with a visual identifier for the website.
Responsive Navbar Toggler
This is a button used to toggle the visibility of the navbar items on smaller screens. It uses Bootstrap's collapse functionality.
Main Navbar
This section contains the main navigation menu items. It includes a search form, membership, courses, and instructors links. Each link may have additional dropdown menus with sub-items.
Login/Registration Section
This section is only visible on smaller screens (d-lg-none). It provides buttons for users to log in or register for an account.
Cart Button
This button allows users to access their shopping cart. It also includes a badge indicating the number of items in the cart.
Language Selector
This dropdown menu allows users to select their preferred language for the website. This language dropdown needs to enabled on LMS settings
Profile Dropdown
This section includes a dropdown menu for user profile-related actions. It contains links such as admin panel, dashboard, enrolled courses, profile settings, and sign out. It also includes options for toggling between light and dark mode.
Category Navigation Link
This section contains links to different categories of content. It includes a button for toggling the visibility of the category links on smaller screens.
Course Header

Header
Logo and Navigation
Inside the header, there's a nav element with classes navbar and navbar-expand-xl. This section contains the site logo and navigation links.
Site Logo
The logo is contained within an a element with the class navbar-brand. It includes an image with two different sources for light and dark modes.
Responsive Navbar Toggler
This is a button element used for toggling the collapsed state of the navbar on smaller screens.
Navigation Links
Navigation links are contained within an unordered list (ul) with the class navbar-nav. These links include dropdown menus for categories and language selection.
Search Bar
A search form (form) is included for searching content. It contains an input field and a search button.
Cart Dropdown Menu
This section includes a button for the cart (button) and a dropdown menu for displaying cart items.
Language Dropdown Menu
Another dropdown menu is included for language selection.
Profile Dropdown Menu
This section includes an avatar image and a dropdown menu for user profile options like dashboard, settings, and sign out. It also includes options for switching between light and dark modes.
Menus
Menus can be added from admin panel. Locate to the admin/dashboard and then open Piksera LMS options, visit the menu settings on the sidebar.
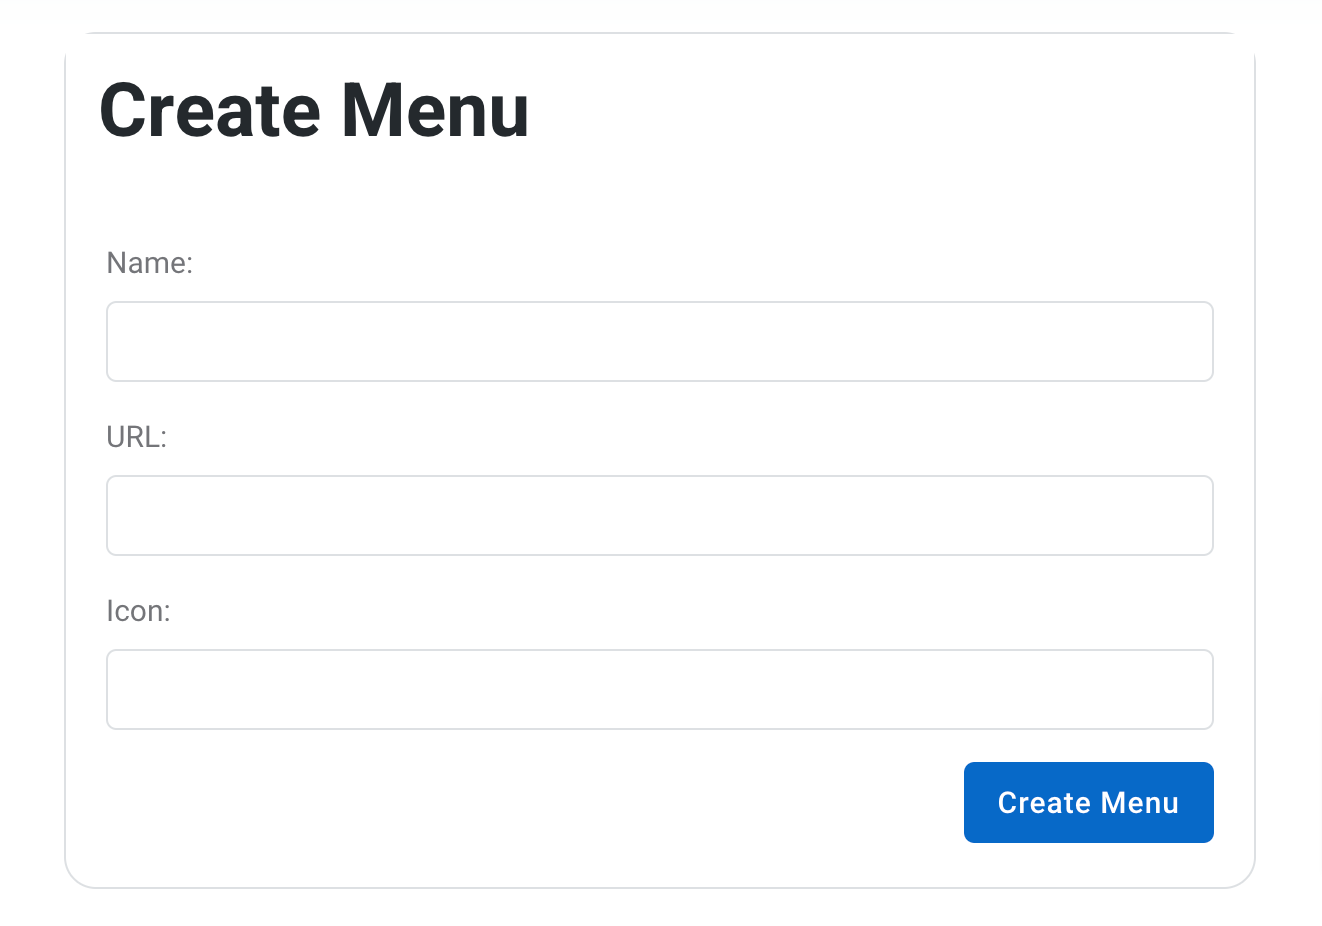
Then create a new menu.
When creating menu, you need to add menu title (required), the url of the link (required) and then icon (optional). After creating a new link to the menu, it will be visible on main menu.
After creating more of one links, you can sort order the links by holding on top of the link and moving upper and lower.

Footer
There are two types of footers. Default, Academy and Course themes have the same footer with same texts, links and logo, they have different background-colors.
The footer contains several components aimed at providing important information and enhancing user experience. Let's break down its components:
Copyright Text:
- This section displays copyright information about the website or application.
- It includes the copyright symbol, the year (2024), and the company name (Piksera).
- It also includes a link to the company's website, which likely redirects to the homepage.
Language Selector:
- The language selector allows users to choose their preferred language for the website or application.
- It consists of a dropdown menu containing various language options.
- Each language option is represented by its respective flag and language name.
- Upon selection, the language may change, providing a localized experience for users.
Footer Links:
- This section includes additional links relevant to the website or application.
- It contains links to the terms of use and privacy policy pages.
- These links are essential for users to understand the terms and conditions and privacy practices of the platform.
The footer serves as a valuable component of the website or application interface by providing essential information, offering language customization options, and facilitating navigation through relevant links. It contributes to a better user experience and helps users find relevant information easily.
Education Footer
On Education Footer, the footer is minimal and beautiful. Its unqiue and elegant.
Logo and Description:
- The footer contains a logo image and a brief description of the website or application.
- The logo represents the brand or identity of the platform, providing visual recognition for users.
- The description provides information about the platform's purpose, focusing on education centers and learners.
Navigation Links:
- It includes a set of navigation links for easy access to various sections of the website or application.
- The links are typically about, terms, privacy, career, contact us, and cookies.
- These links help users navigate to important pages or sections of the platform.
Social Media Buttons:
- The footer features social media buttons that allow users to connect with the platform's social media accounts.
- Each button is associated with a specific social media platform such as Facebook, Instagram, Twitter, and LinkedIn.
- These buttons facilitate social engagement and help users stay updated with the platform's activities.
Bottom Footer Link:
- At the bottom of the footer, there is a copyright notice along with the year (2024) and the name of the platform (Piksera LMS).
- It also includes a reference to the website development company (Piksera) with a link to their website.
- This section provides attribution for the platform and acknowledges the development team.
Main Layout
The main content goes inside these main dividers.
<!-- **************** MAIN CONTENT START **************** -->
    <main>
      here goes the code content
    </main>
    <!-- **************** MAIN CONTENT END **************** -->
Public Design
Under the public section we will explore the home, courses, contact, blogs, blog details
Home Designs
Piksera LMS 1.7 comes with 4 different home designs. Each one is unique and beautiful.
Home Default
The <main> section of the home page contains several components aimed at showcasing the platform's features, offerings, and user testimonials. Let's break down each part:
Main Banner Section:
- Description: This section introduces the platform with a headline, a brief description of its purpose, and key selling points presented as bullet points.
- Features:
- Headline with description
- Bullet points highlighting key features
- Call-to-action button for user registration
- Usefulness: This section provides a clear overview of what the platform offers and encourages users to take action by registering.
Counter Section:
- Description: This section displays counters showing the number of online courses, expert tutors, online students, and certified courses.
- Features:
- Counters with icons representing different metrics
- Each counter has a brief description
- Usefulness: It gives users a sense of the platform's scale and credibility by showcasing the number of courses, tutors, students, and certified courses available.
Popular Courses Section:
- Description: This section highlights a specific course and encourages users to become instructors.
- Features:
- Course title and description
- Call-to-action button for becoming an instructor
- Usefulness: It promotes user engagement by encouraging them to contribute as instructors, thereby enriching the platform's content.
Tiny Slider:
- Description: A carousel/slider displaying images, likely showcasing different aspects of the platform or featured content.
- Features:
- Images displayed in a slider format
- Navigation arrows for users to browse through the images
- Usefulness: It visually engages users and provides additional visual content about the platform.
Trending Courses Section:
- Description: This section showcases trending courses available on the platform.
- Features:
- Displays trending courses in a slider format
- Course cards with titles and images
- Usefulness: It helps users discover popular courses and encourages them to explore further.
Review Section:
- Description: This section features user testimonials and reviews about the platform.
- Features:
- Testimonials with avatars, quotes, and ratings
- Display of average rating based on user reviews
- Usefulness: It builds trust and credibility by showcasing positive feedback from users.
Overall, the <main> section effectively presents the platform's features, offerings, and user testimonials to engage visitors and encourage them to explore further or take action, such as registering or exploring courses.
Home Education
Section with Background Image (Hero Section):
This section (<section>) has a background image set via inline CSS. It contains various elements like a background overlay, SVG decorations, a container (<div class="container">), a row (<div class="row">), and content inside columns (<div class="col-sm-10 col-lg-8 col-xl-6">). Content includes badges, a title, paragraphs, and buttons.
Slider Section:
This section (<section>) includes a container with a row, column, and a nested tiny-slider div. The slider contains images or other content, possibly for showcasing courses or featured items.
Trending Courses Section:
Another section (<section>) with a container and a row. It starts with a title and description, followed by a grid layout (<div class="row g-4">) of course cards. Each card (<div class="card p-2 shadow h-100">) contains course details like an image, title, badge, and price.
Flexible Learning Section:
Similar to the hero section, it has a container with a row and two columns. One column contains text content, and the other contains an image with a play button for a video link.
New Courses Section:
This section showcases new courses available. It contains a title and a slider (<div class="tiny-slider">) with course cards.
Review and Mentor List Section:
Divided into two columns, this section includes a review card and a list of mentors. The review card has a quote, rating, and reviewer information. The mentor list includes avatars and information about verified mentors.
Rating Section:
It's a single column section that likely contains information about ratings. The example provided seems incomplete as it ends abruptly with an opening div tag.
Each section serves a specific purpose like introducing the platform, showcasing courses, testimonials, and highlighting mentors. The structure is designed to provide a visually appealing and informative browsing experience for users.
Home Academy
Header Section:
- This part includes the main content of the page. It consists of:
- A call-to-action badge ("Get started with Piksera").
- A title ("Develop the skillset your Bright Future").
- A brief description of the platform.
- A search bar to find courses.
- Counters for online courses and universities.
Left Content Section:
- It contains information about the platform, such as the number of online courses and universities available.
- Each piece of information is accompanied by an icon.
Right Content Section:
- It includes:
- An SVG decoration.
- A bell icon.
- Information about a live Java Development class.
- Information about student reviews.
- An image.
Slider Section:
- This section contains a slider with thumbnails of courses.
Trending Courses Section:
- This section displays trending courses with information about the course, instructor, badges, date, rating, and duration.
New Courses Section:
- Similar to the trending courses section, but it displays new courses.
Call to Action Section:
- Encourages users to become instructors.
Popular Courses Section:
- A promotional section for becoming an instructor.
Reviews Section:
- Displays reviews from users.
Overall, the page is designed to attract potential learners and instructors to the platform by showcasing its features, courses, and user reviews.
Home Course
Hero Section:
- This section contains the main title and a brief description of the website.
- It also includes a search bar for finding courses.
Category Section:
- This section displays different categories of courses available on the platform.
- Each category is represented by an icon and a link.
Featured Courses Section:
- Here, featured courses are displayed with their titles, descriptions, categories, and whether they are free or paid.
- Users can also add courses to their cart from this section.
Instructor Section:
- This encourages users to become instructors on the platform.
- It provides a brief description and a call-to-action button for those interested.
Trending Courses Section:
- Similar to the featured courses section, this section displays trending courses along with their titles, descriptions, ratings, and whether they are free or paid.
Call-to-Action Section:
- This section encourages users to sign up for free.
- It highlights the benefits of signing up and provides a button for registration.
Courses Page Structure
This courses page is designed for an online learning management system (LMS). View the look
Page Banner:
- The page starts with a banner section containing the title "Courses" and a breadcrumb navigation indicating the path to the current page.
Filter Bar:
- Below the banner, there's a filter bar allowing users to refine their course search.
- It includes options for filtering by keyword, category, price level, difficulty level, and ratings.
- Each filter option is implemented as a dropdown menu or input field.
Course Display Section:
- Following the filter bar, there's a section for displaying the courses.
- Each course is represented as a card with an image, title, description, badges indicating the difficulty level, and additional information such as price and number of lectures.
- Users can also add courses to their wishlist using the heart icon button.
Pagination:
- Although not visible in the provided code snippet, there's likely a pagination component to navigate through multiple pages of courses if there are many available.
Overall, courses page provides a user-friendly interface for browsing and selecting courses based on various criteria. It offers a clean design with clear navigation and filtering options, making it easier for users to find relevant courses.
Contact Page

-
Header Section:
- Title: "Contact us"
- Heading: "We're here to help!"
-
Contact Info Boxes:
- Three contact info boxes are displayed, each containing:
- Title (e.g., "Customer Support", "Contact Address", "Main Office Address")
- List of contact information:
- Address
- Phone number
- Email ID
-
Contact Form Section:
- Title: "Let's talk"
- Description: "To request a quote or want to meet up for coffee, contact us directly or fill out the form and we will get back to you promptly"
- Form Fields:
- Name (required)
- Email address (required)
- Phone number
- Subject (required)
- Message (required)
- Button: "Send Message"
-
Social Media Buttons:
- Follow us on various social media platforms:
- Dribbble
-
Map Section:
- Embeds a Google Map displaying the location
- Additional information:
- Height: 500px
- Style: Grayscale
- Rounded corners
This contact page effectively provides multiple means of communication for users, including direct contact information, a contact form, and social media links, along with a visual representation of the location via Google Maps.
Memberships/Subcsriptions

The pricing packages are dynamic. After admin creates the plans in /admin/subscription packages will load in this pricing page
Pricing Packages
-
Page Banner and Title:
- The section starts with a page banner and a title "Affordable Pricing Packages."
- A brief description follows the title.
-
Switch:
- There is a switch that likely toggles between monthly and yearly pricing options. However, the switch implementation is incomplete, and this feature will be added soon.
-
Pricing Items:
- Each pricing item represents a subscription package.
- Each item consists of:
- A title (e.g., "Profissional," "Basic," "Premium").
- Pricing information ($ amount per month/year).
- Features included in the plan, listed as bullet points.
- Add to Cart and Details buttons, allowing users to select a plan or view its details.
-
Form Submission:
- The "Add to Cart" buttons are part of forms that likely submit the selected plan to a backend service for processing.
- Each form includes hidden input fields for the plan ID and a CSRF token for security.
-
FAQ Section:
- Following the pricing section, there's an FAQ section with placeholders for frequently asked questions and their answers.
Overall, subscription pricing options, allowing users to compare plans and select the one that best fits their needs.
Course Types
There are 4 course types with each one having unique and beautiful design.
Advance
Minimal
Classic
Module
Instructors
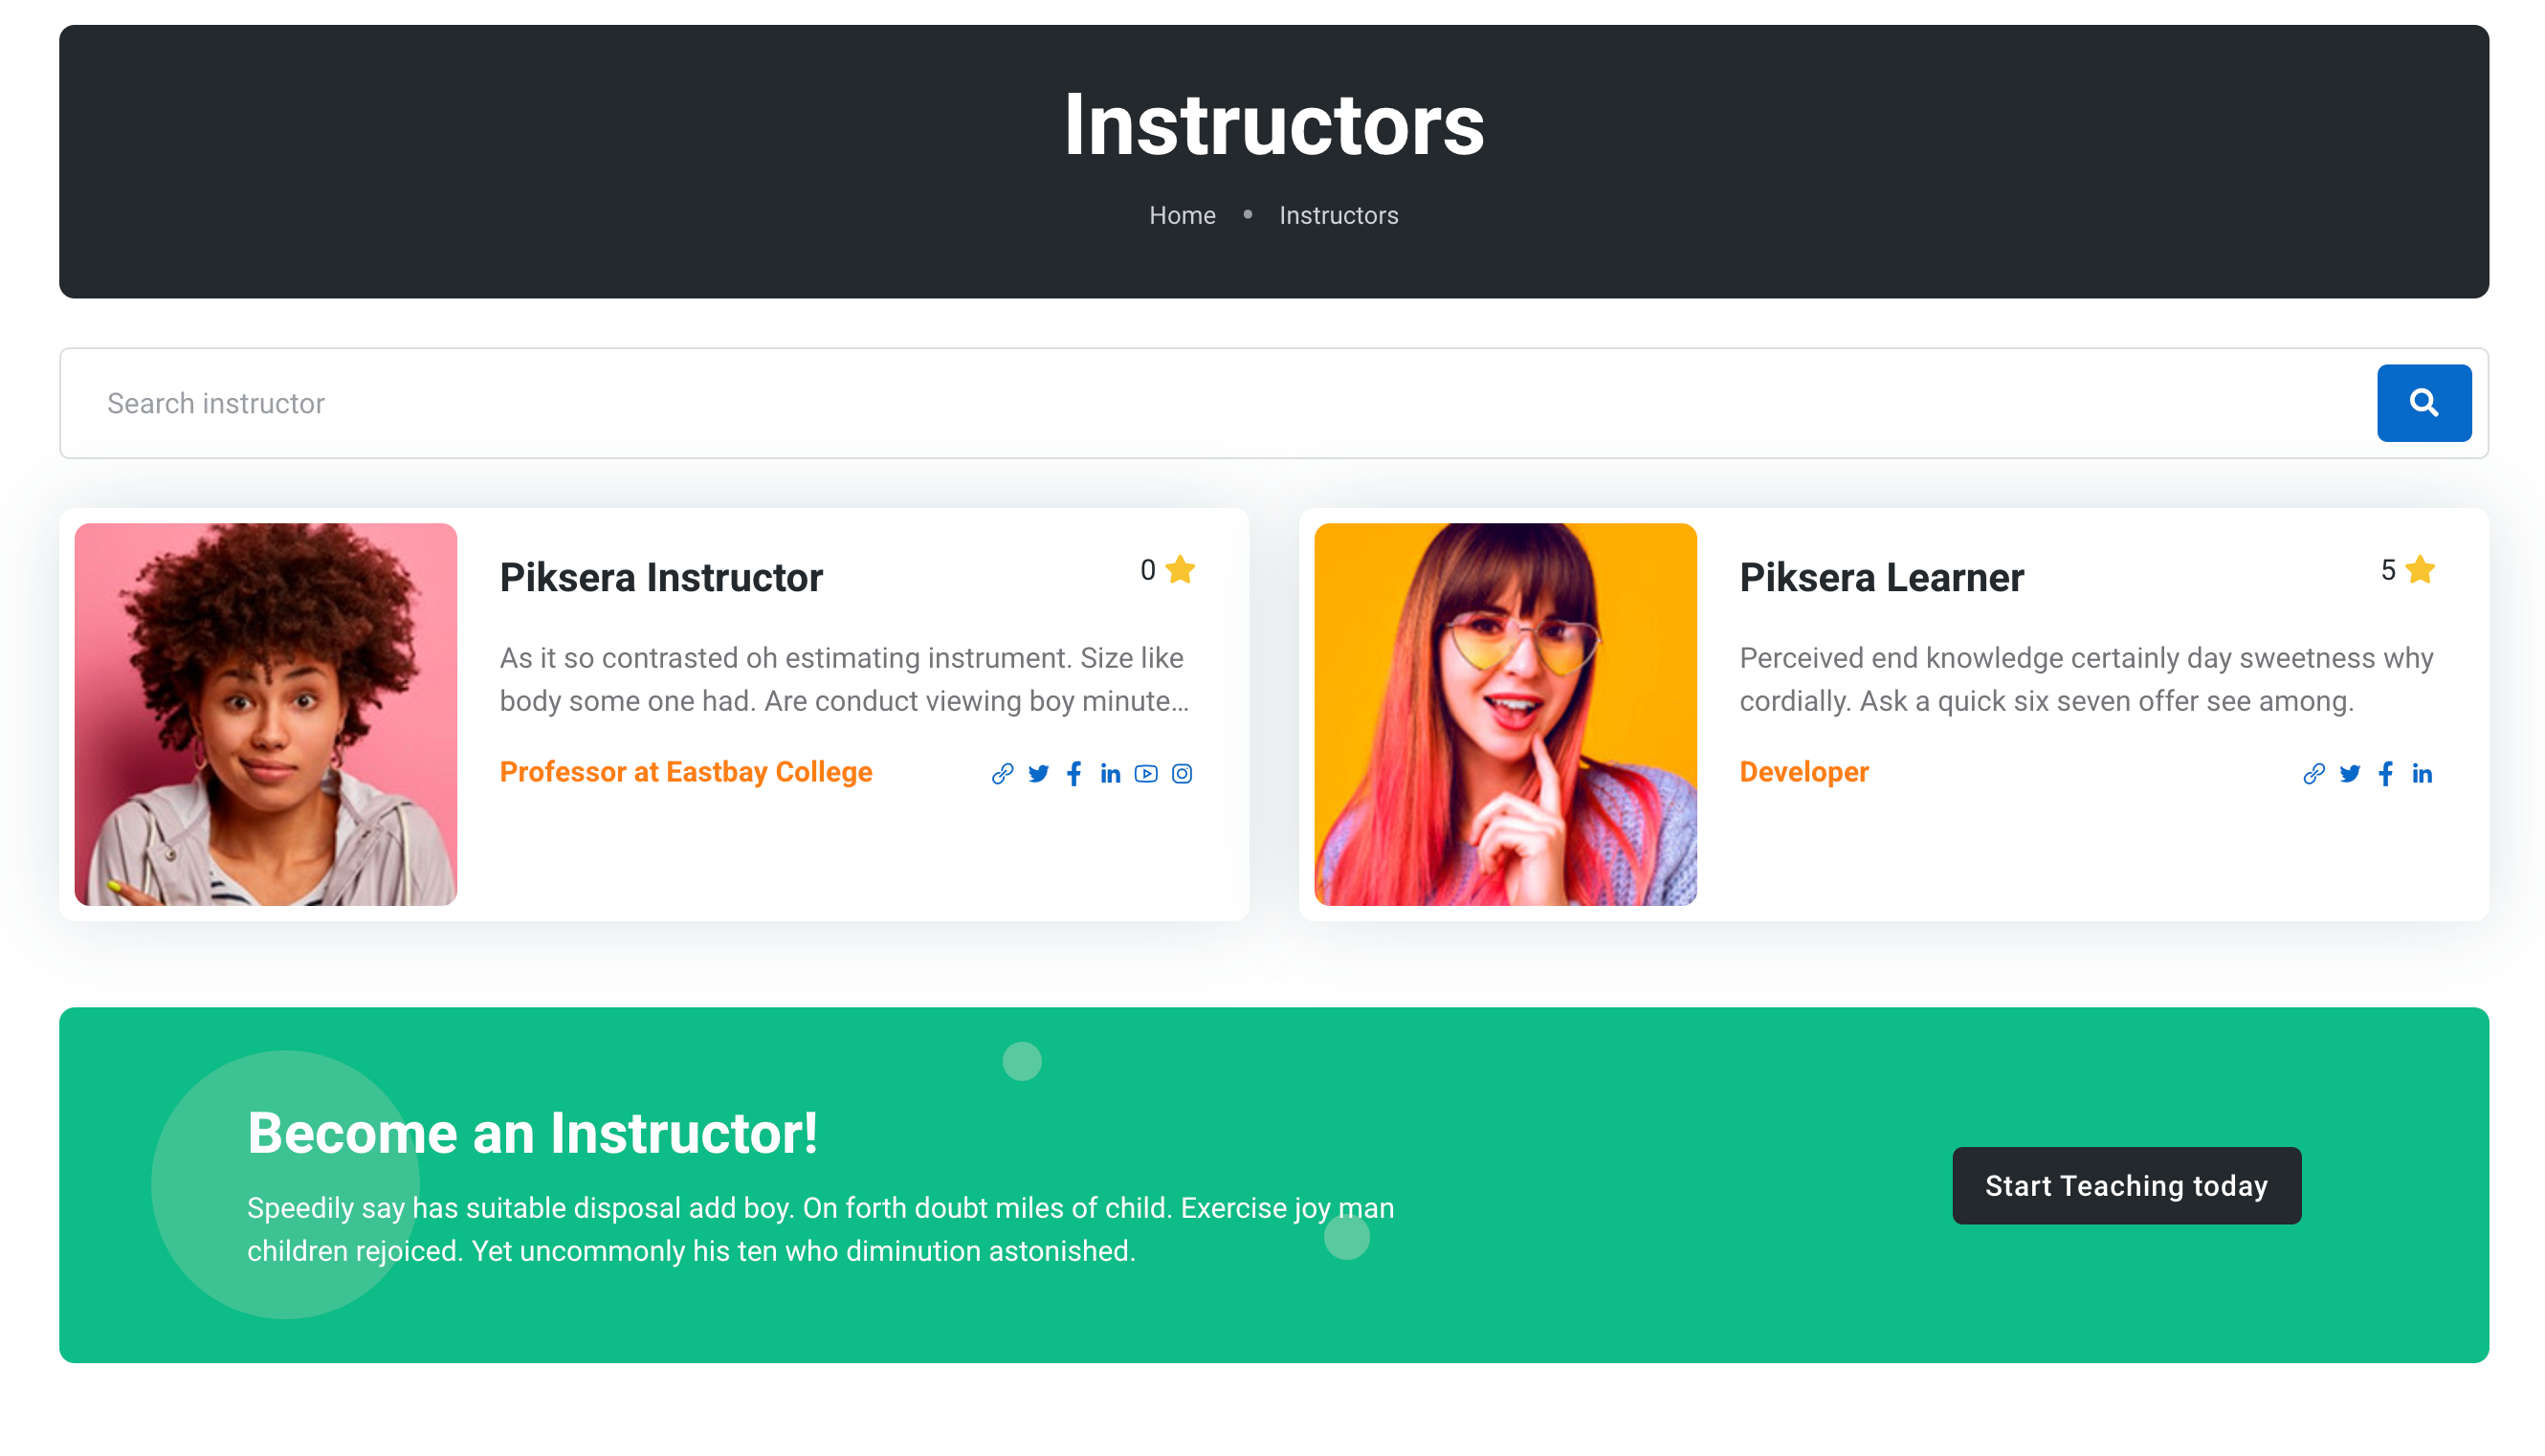
There are 4 course types with each one having unique and beautiful design.
-
Page Banner Section:
- This section sets up the banner at the top of the page, with a dark background, a title ("Instructors"), and a breadcrumb navigation indicating the path to this page.
-
Inner Part Section:
- This section contains the main content of the page, including a search bar to filter instructors and a list of instructor cards.
-
Search Bar:
- A search bar is provided to allow users to search for instructors by name.
-
Instructor List:
- Each instructor is displayed as a card within a row.
- Each card includes the instructor's image, name, rating, description, position, and links to their social media profiles.
- The instructor's image is displayed on the left side of the card, and their details are displayed on the right side.
- Details include the instructor's name, rating, brief description, position, and links to their social media profiles.
-
Action Box Section:
- This section encourages users to become instructors themselves.
- It provides a brief description and a call-to-action button ("Start Teaching today").
Overall, this layout effectively presents information about instructors, allowing users to search for specific instructors and learn more about them. The design is clean and structured, making it easy for users to navigate and interact with the content.
Admin Tools
Piksera LMS gives admin tools to edit, create and manage many things. We are developing new ways every update to make it easy and no to require clients any code knowledge. On this documentation we will go through major tools, as the admin panel has too many tools.
Admin dashboard
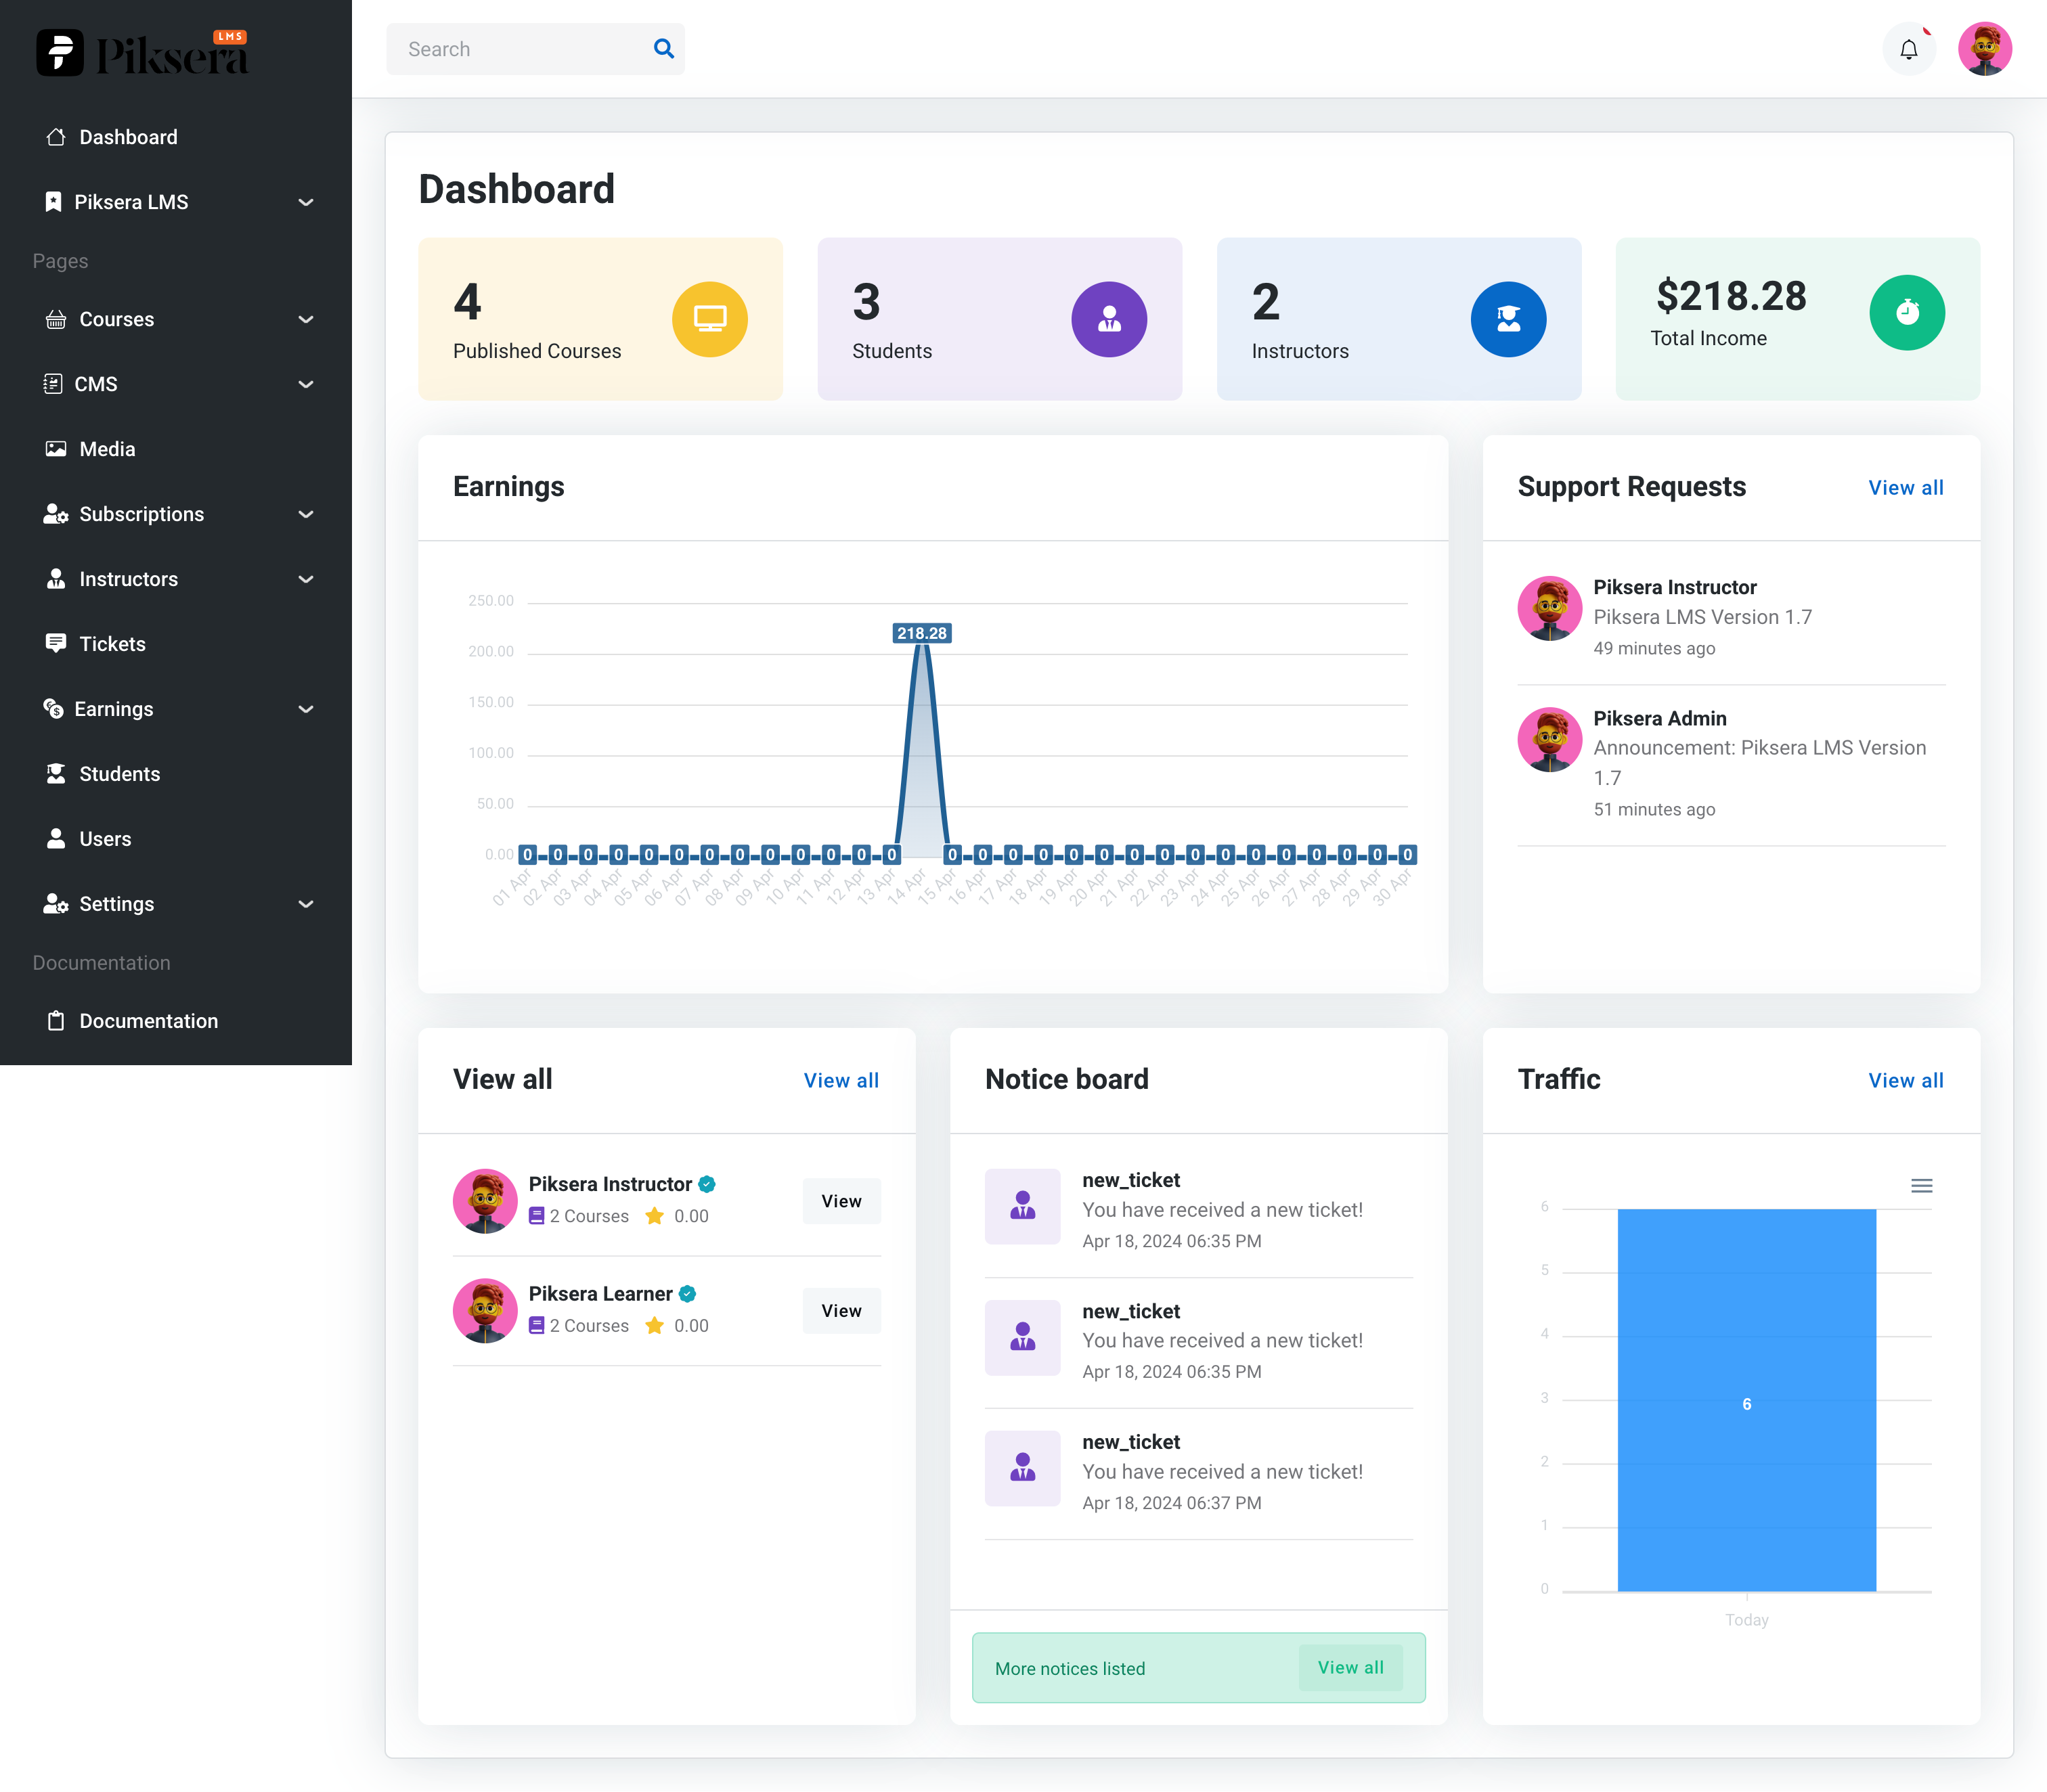
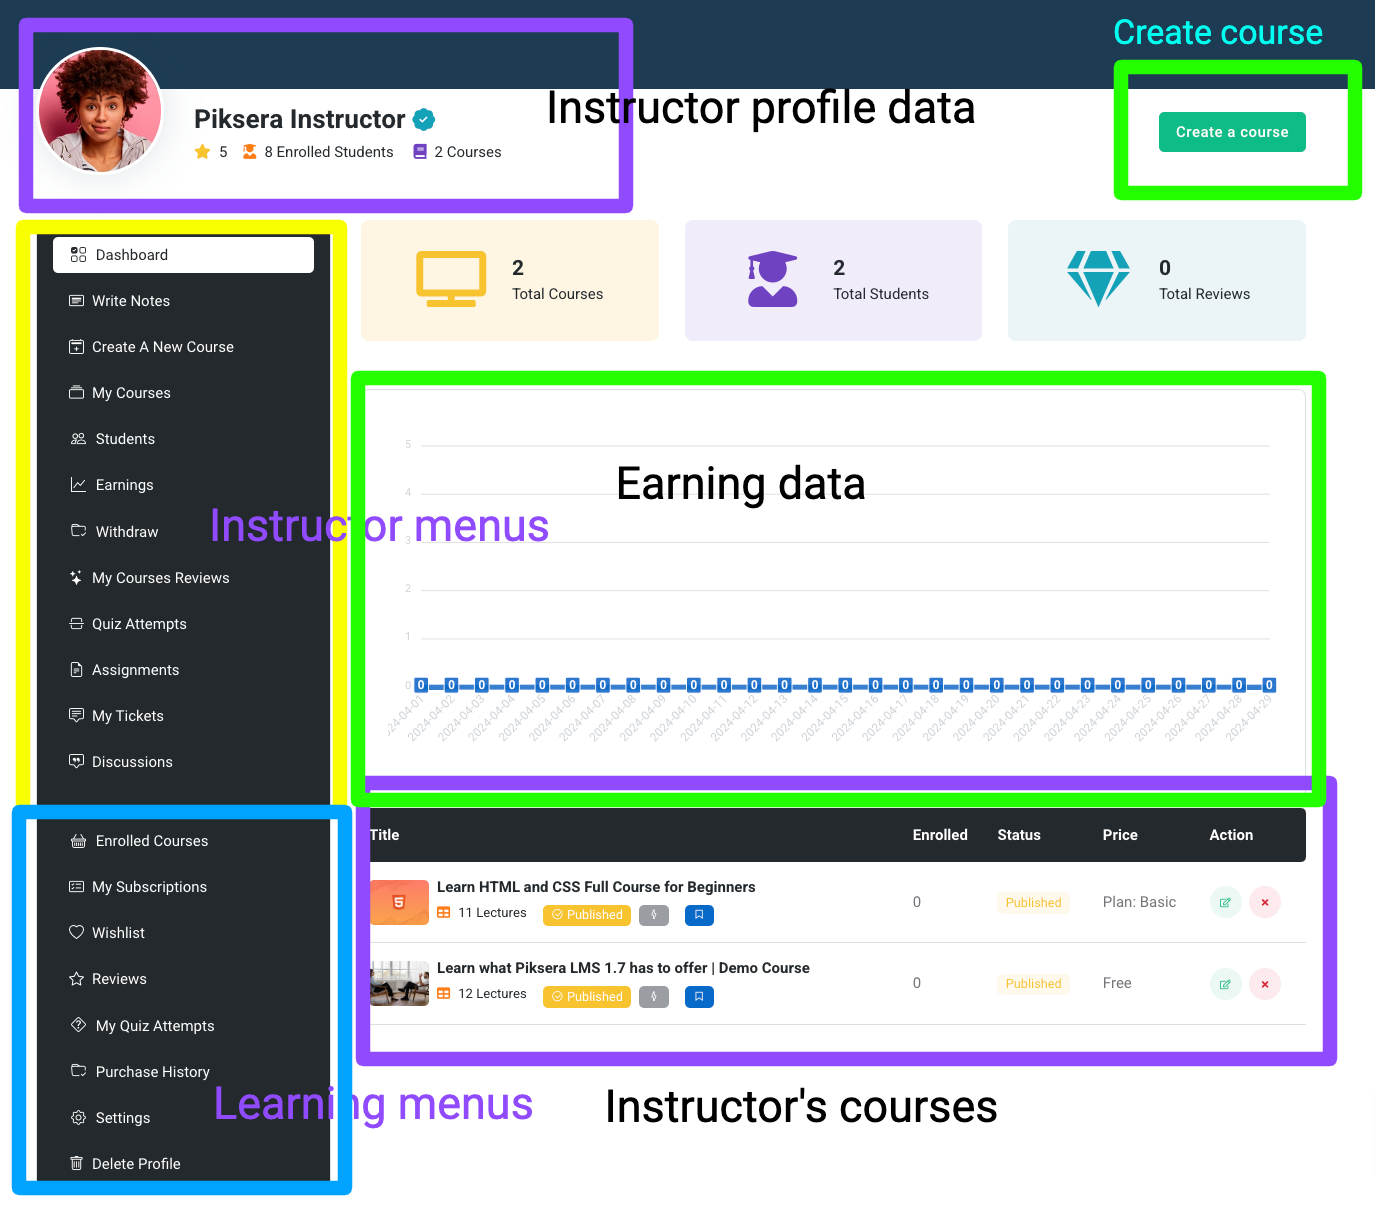
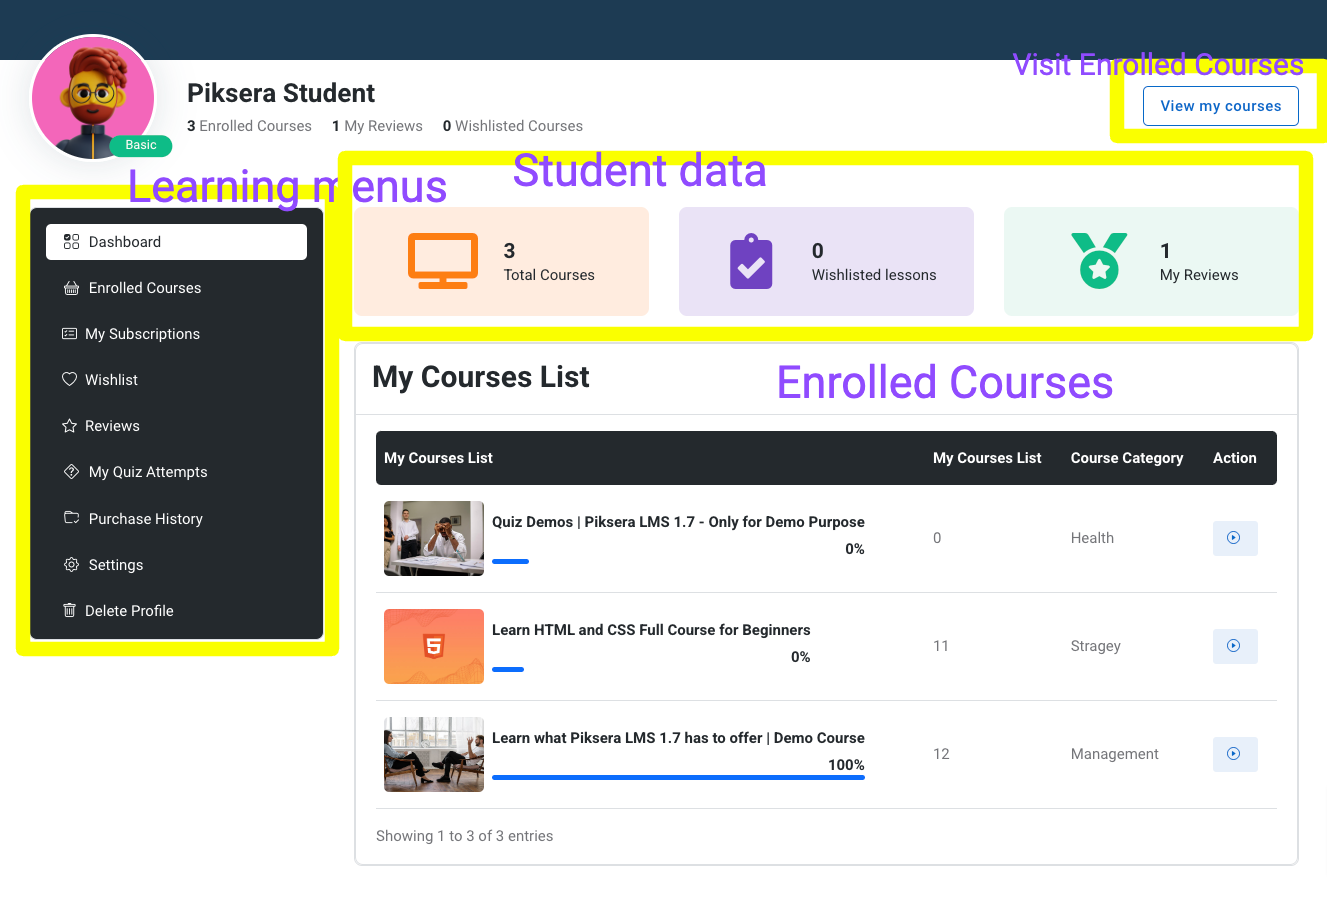
Includes statics from published courses, students, earnings and instructors.
Also gives preview about the chart of the income, support requests, traffic and all users
Piksera LMS settings

Piksera LMS settings focuses on giving the theme options which enables many features. We will open each one's guide through.
LMS Options
You can enable one of the fourth theme options [Default, Education, Academy or Course]. We have guided the differencies between each theme on Home section. Each one is unique at home, header and footer.
More Options
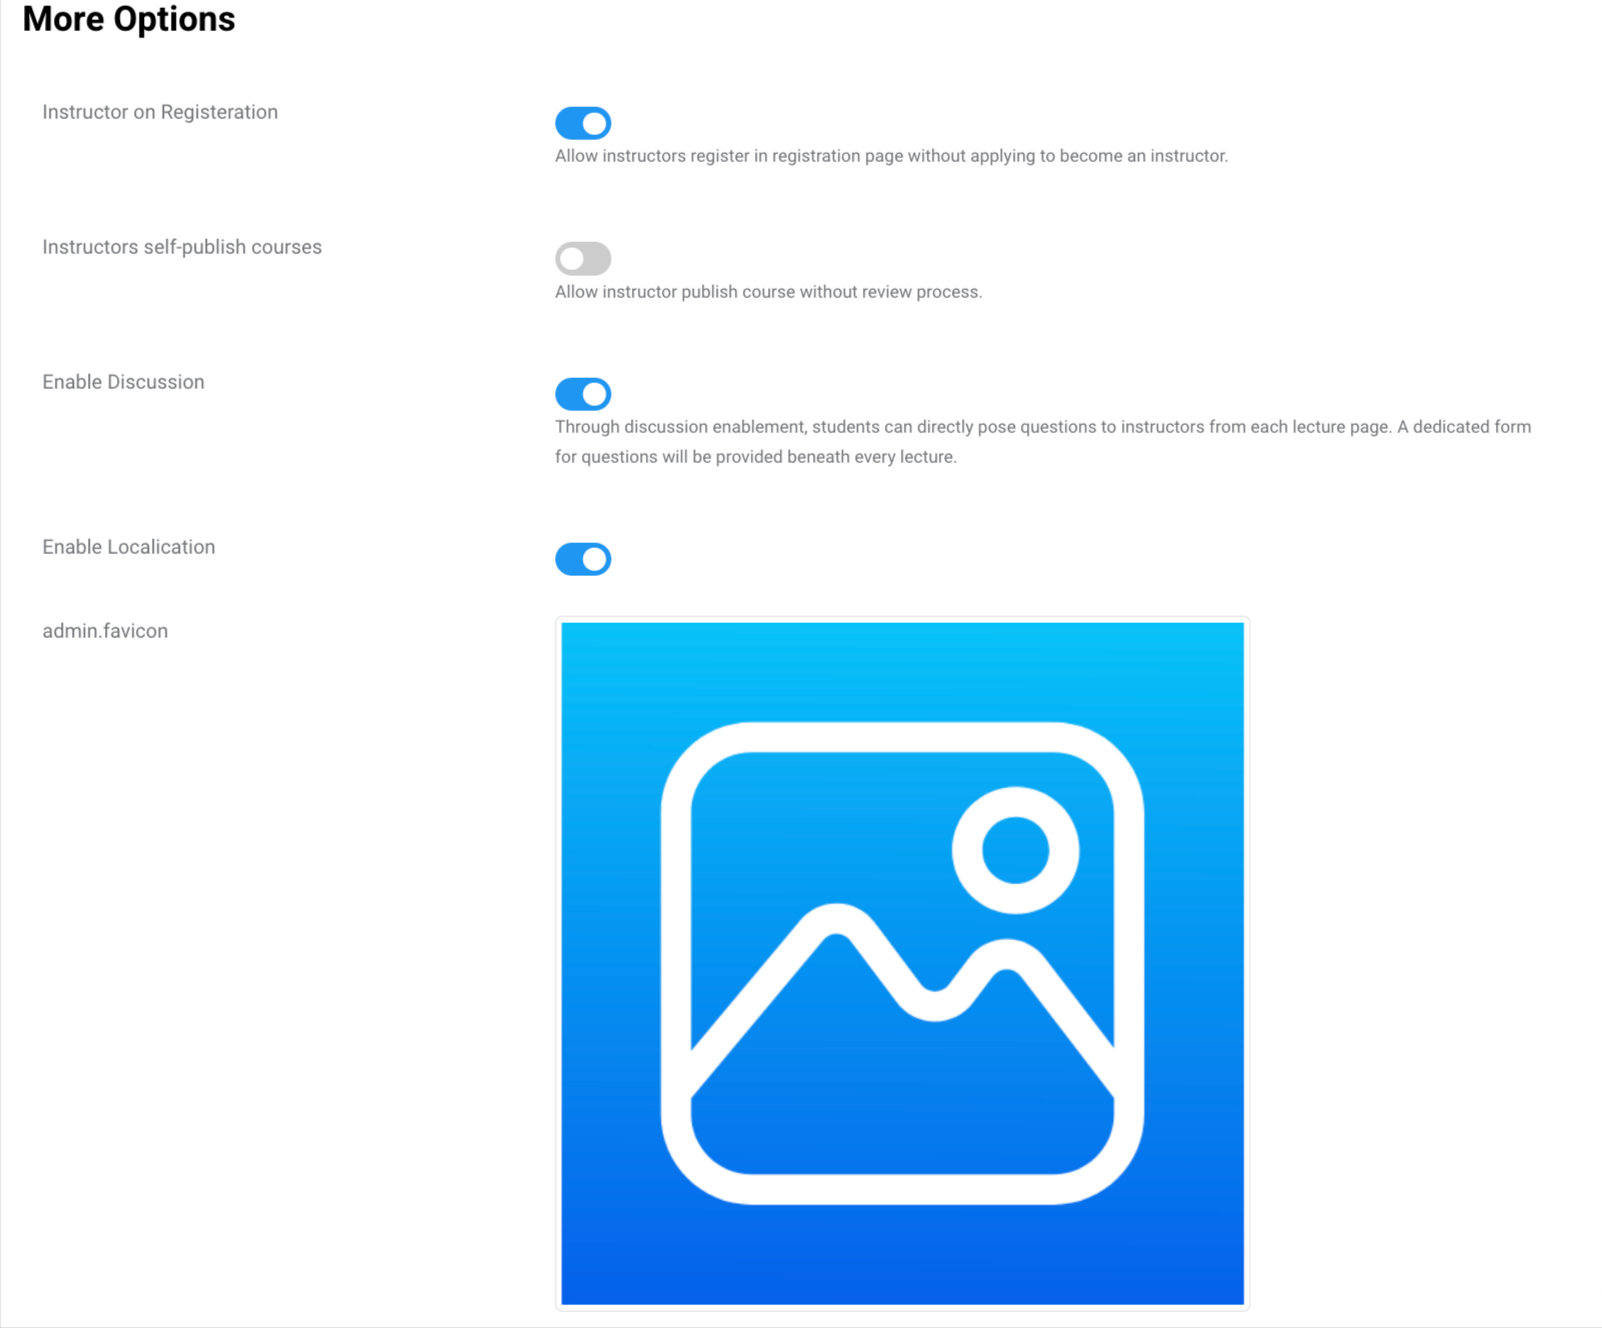
Instructor on Registeration
Allow instructors register in registration page without applying to become an instructor.
Instructors self-publish courses
Allow instructor publish course without review process.
Enable Discussion
Through discussion enablement, students can directly pose questions to instructors from each lecture page. A dedicated form for questions will be provided beneath every lecture.
Enable Localication
After enabling this localization, both on headers and footer will appear toggle for users to choose their preferred language. If you want to change default language on your system, open general settings.
Default pages

Choose default page for privacy, terms, about and how to page. These links will be registered on system, and then users on public will be guided to view them.
Cookie Settings
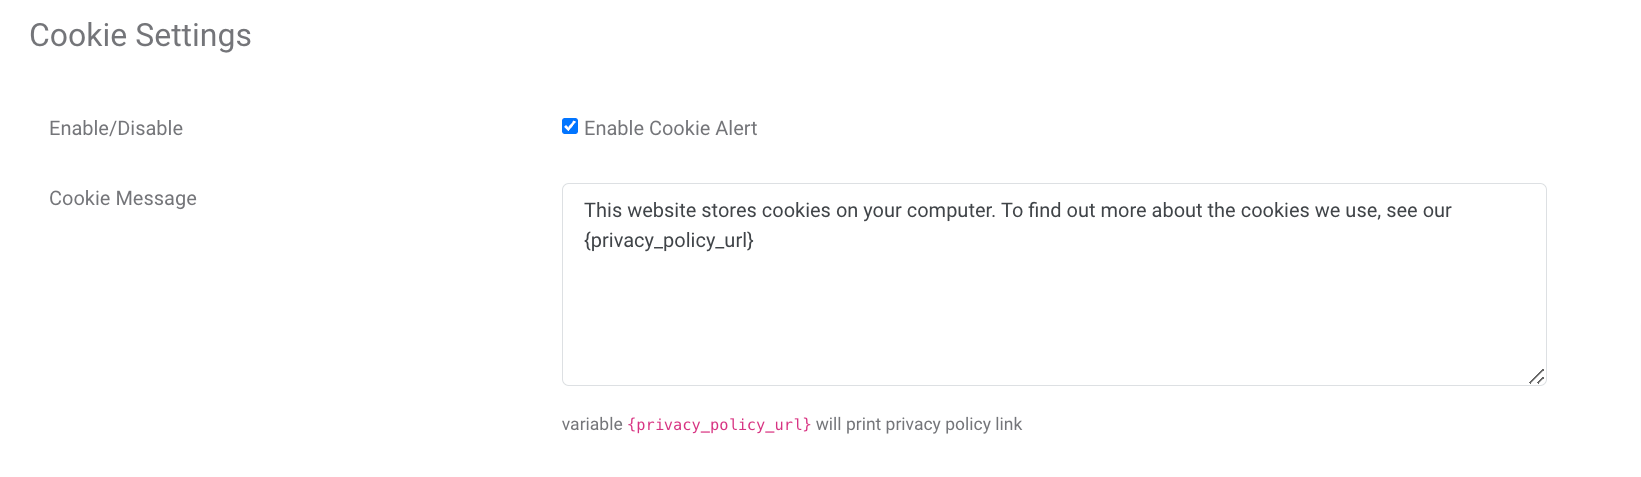
By enabling the cookie setting, it will add a popup message on all new devices. Remember the cookie message is locked with session as it will popup only when a new session is created.
Popup message: On popup textarea you can write any message you love. by using {privacy_policy_url} variable, will print privacy policy link you added on default pages settings.
Ads settings

When enabled sidebar or banner ads, they appear on home pages and articles. The ads are written in html format. If you are using google adsense, you may have to follow google own instructions.
Menus
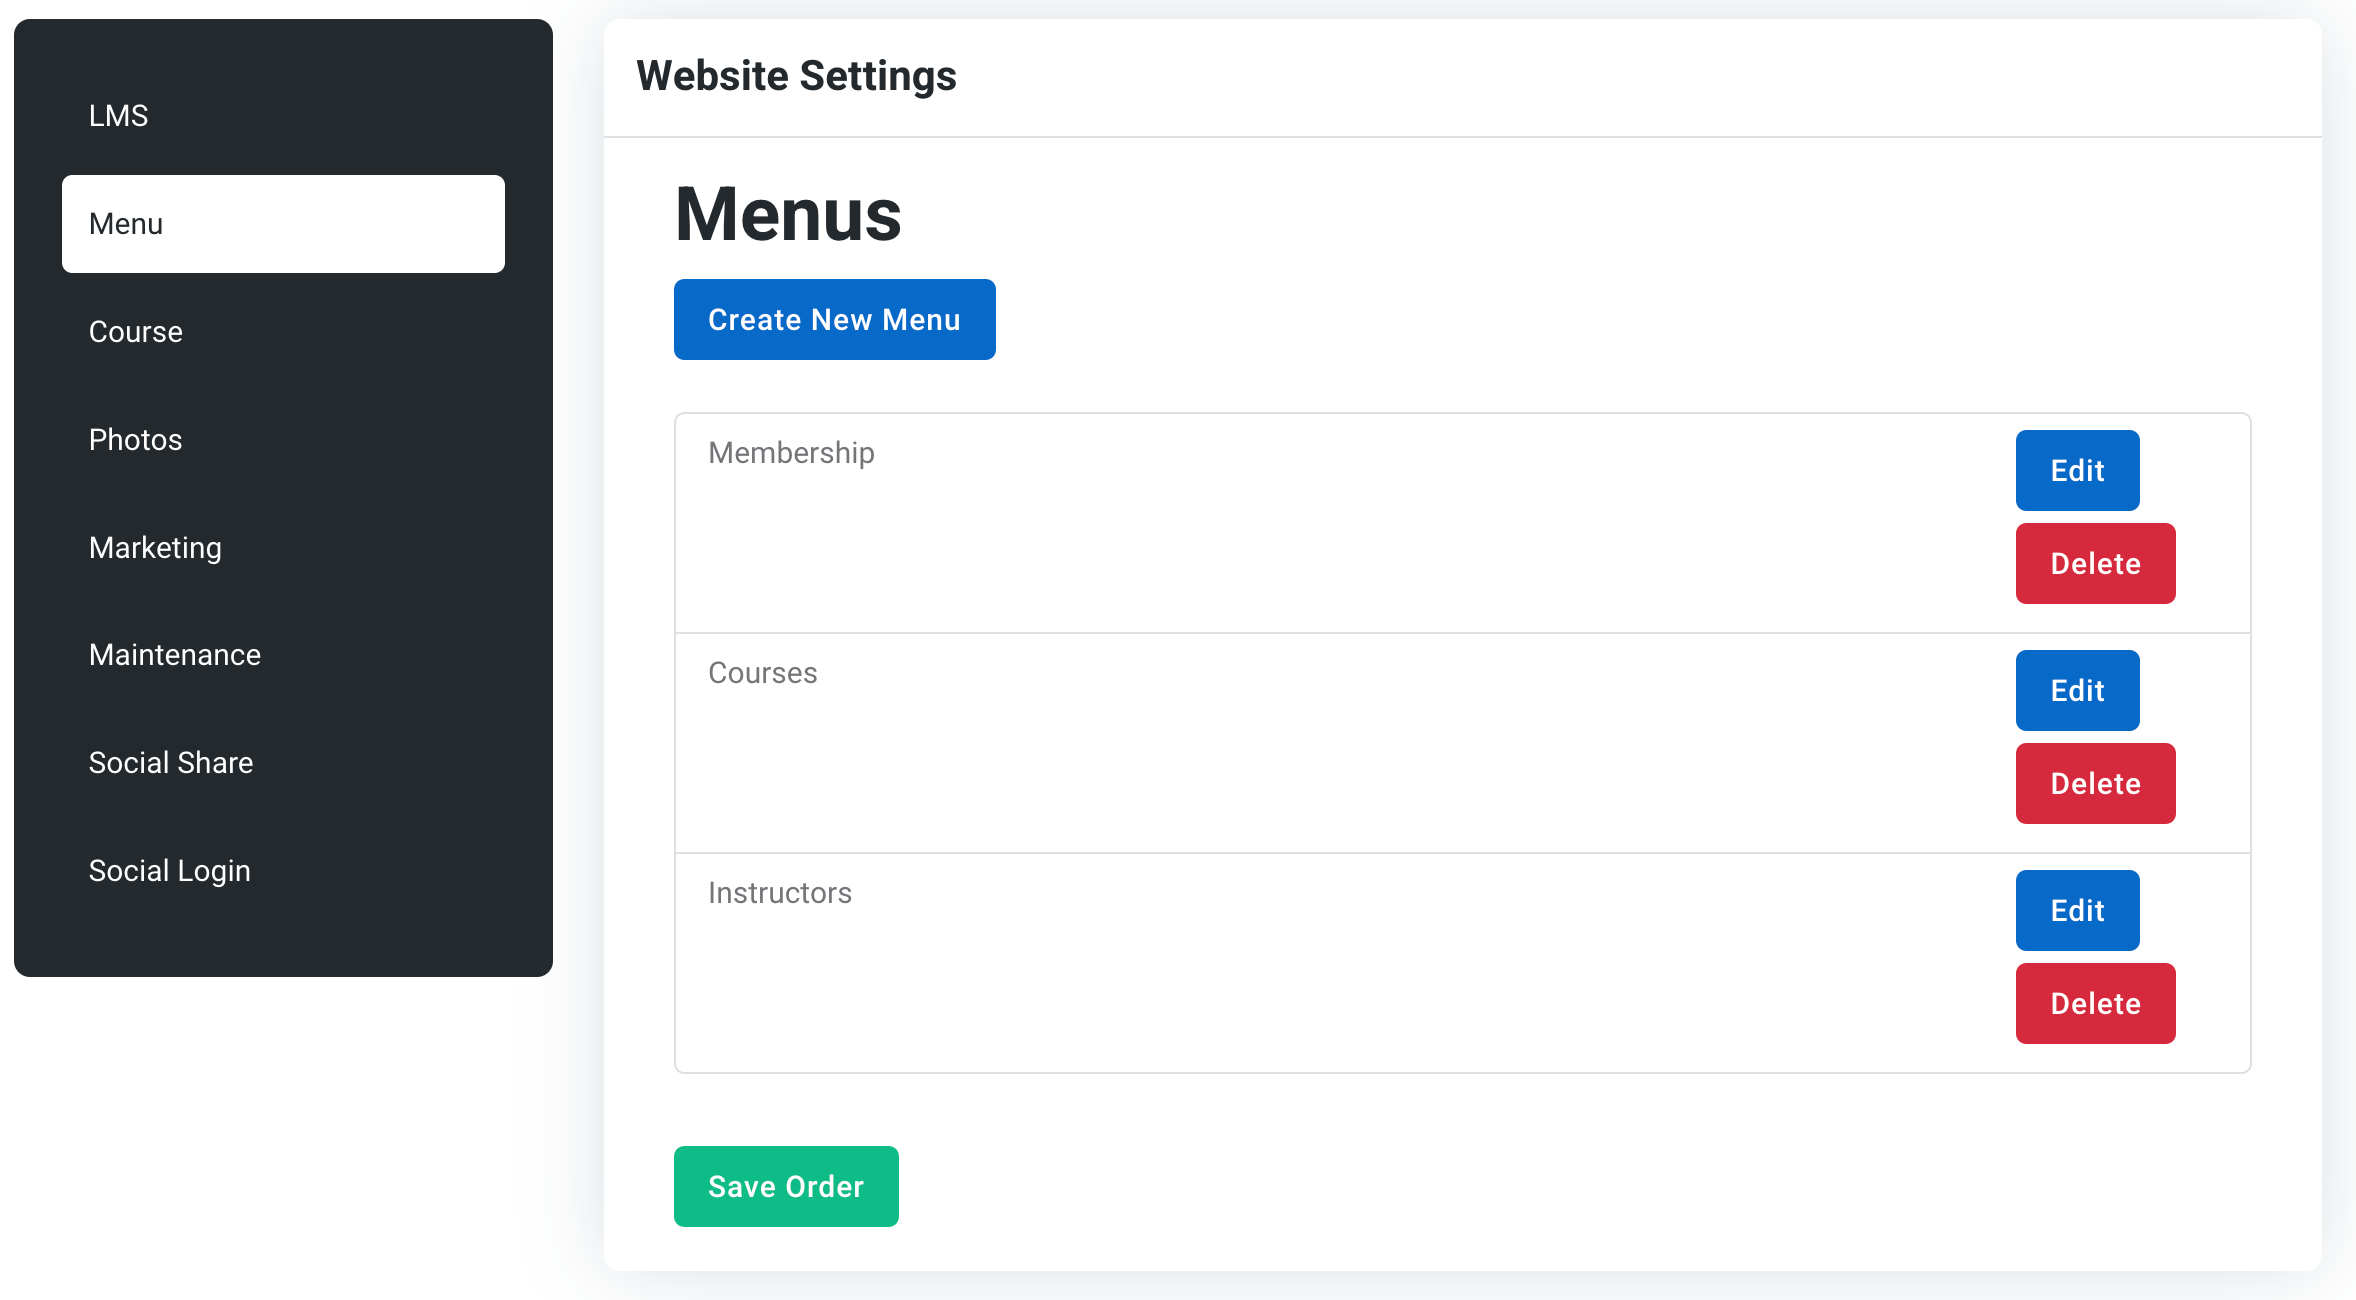
On menu, you can create new links to the header or edit existing ones, also drag them to move them different positions to the navbar.
Adding link
Press create a new menu, to add new one. Then fill the form. Firstly the title is required, then give the page slug or href link, and as an optional give an icon.
When you are done, view the public site and they will appear
Course Typs
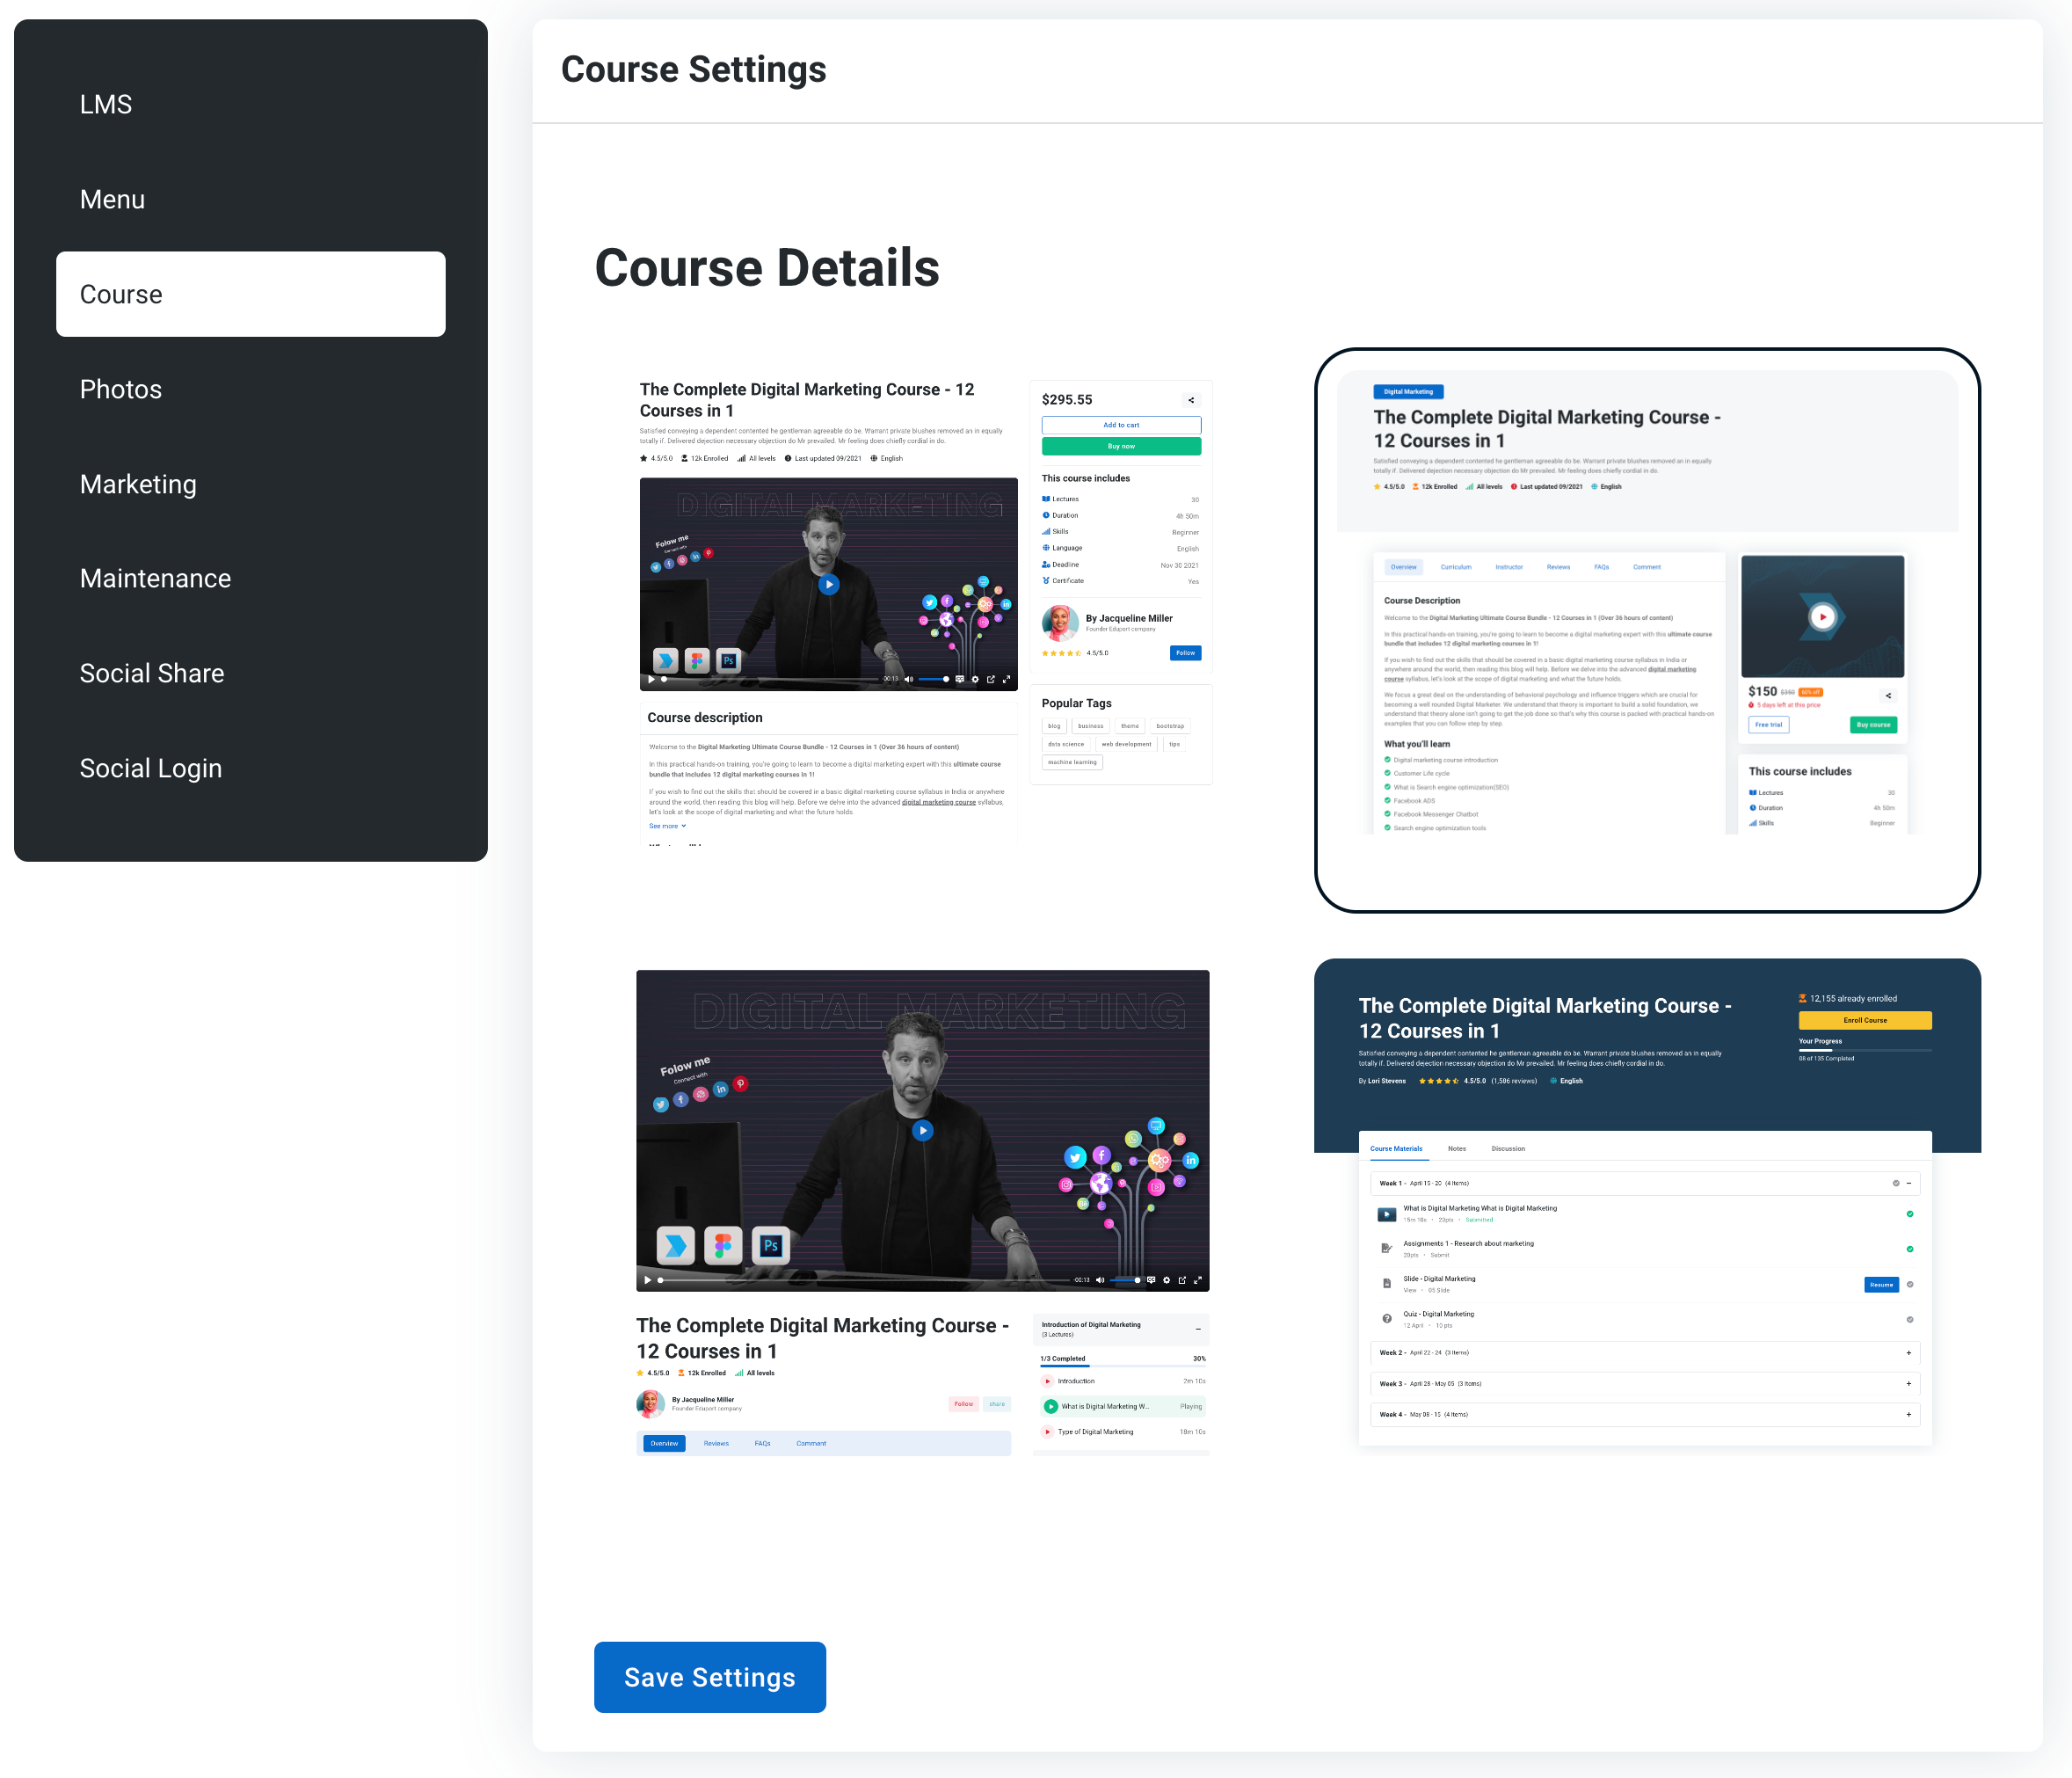
Courses types bring modern designs on single course page. Choose yours.
Photo settings
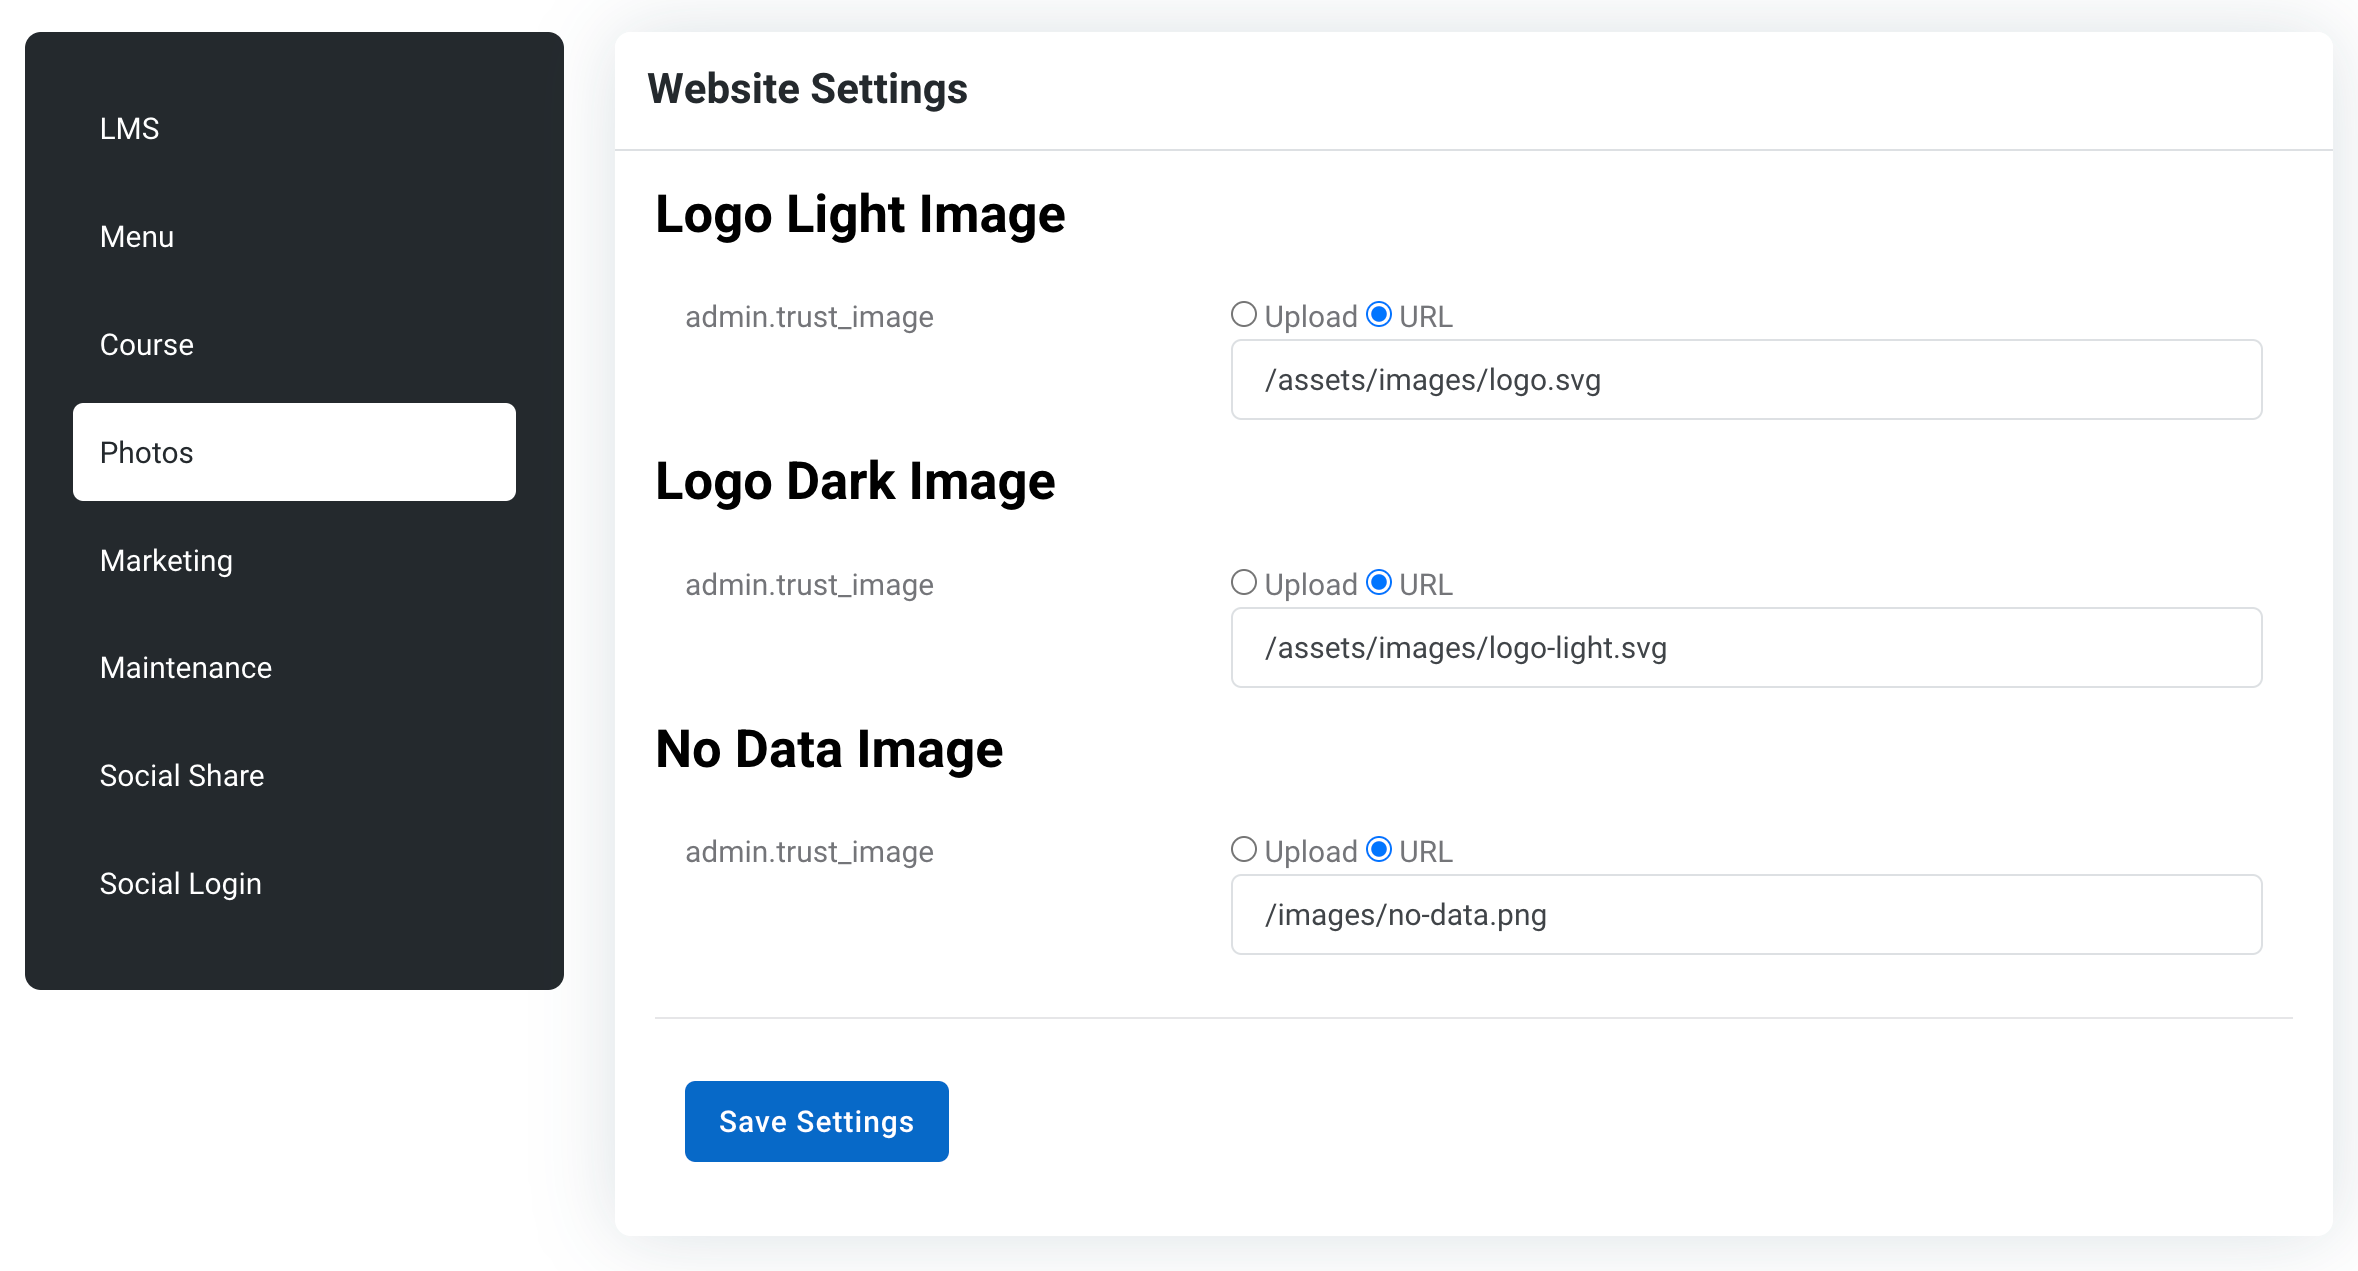
Image settings currently give you to choose the logos, and no data pages images. You can upload image or paste URL link.
Marketing settings
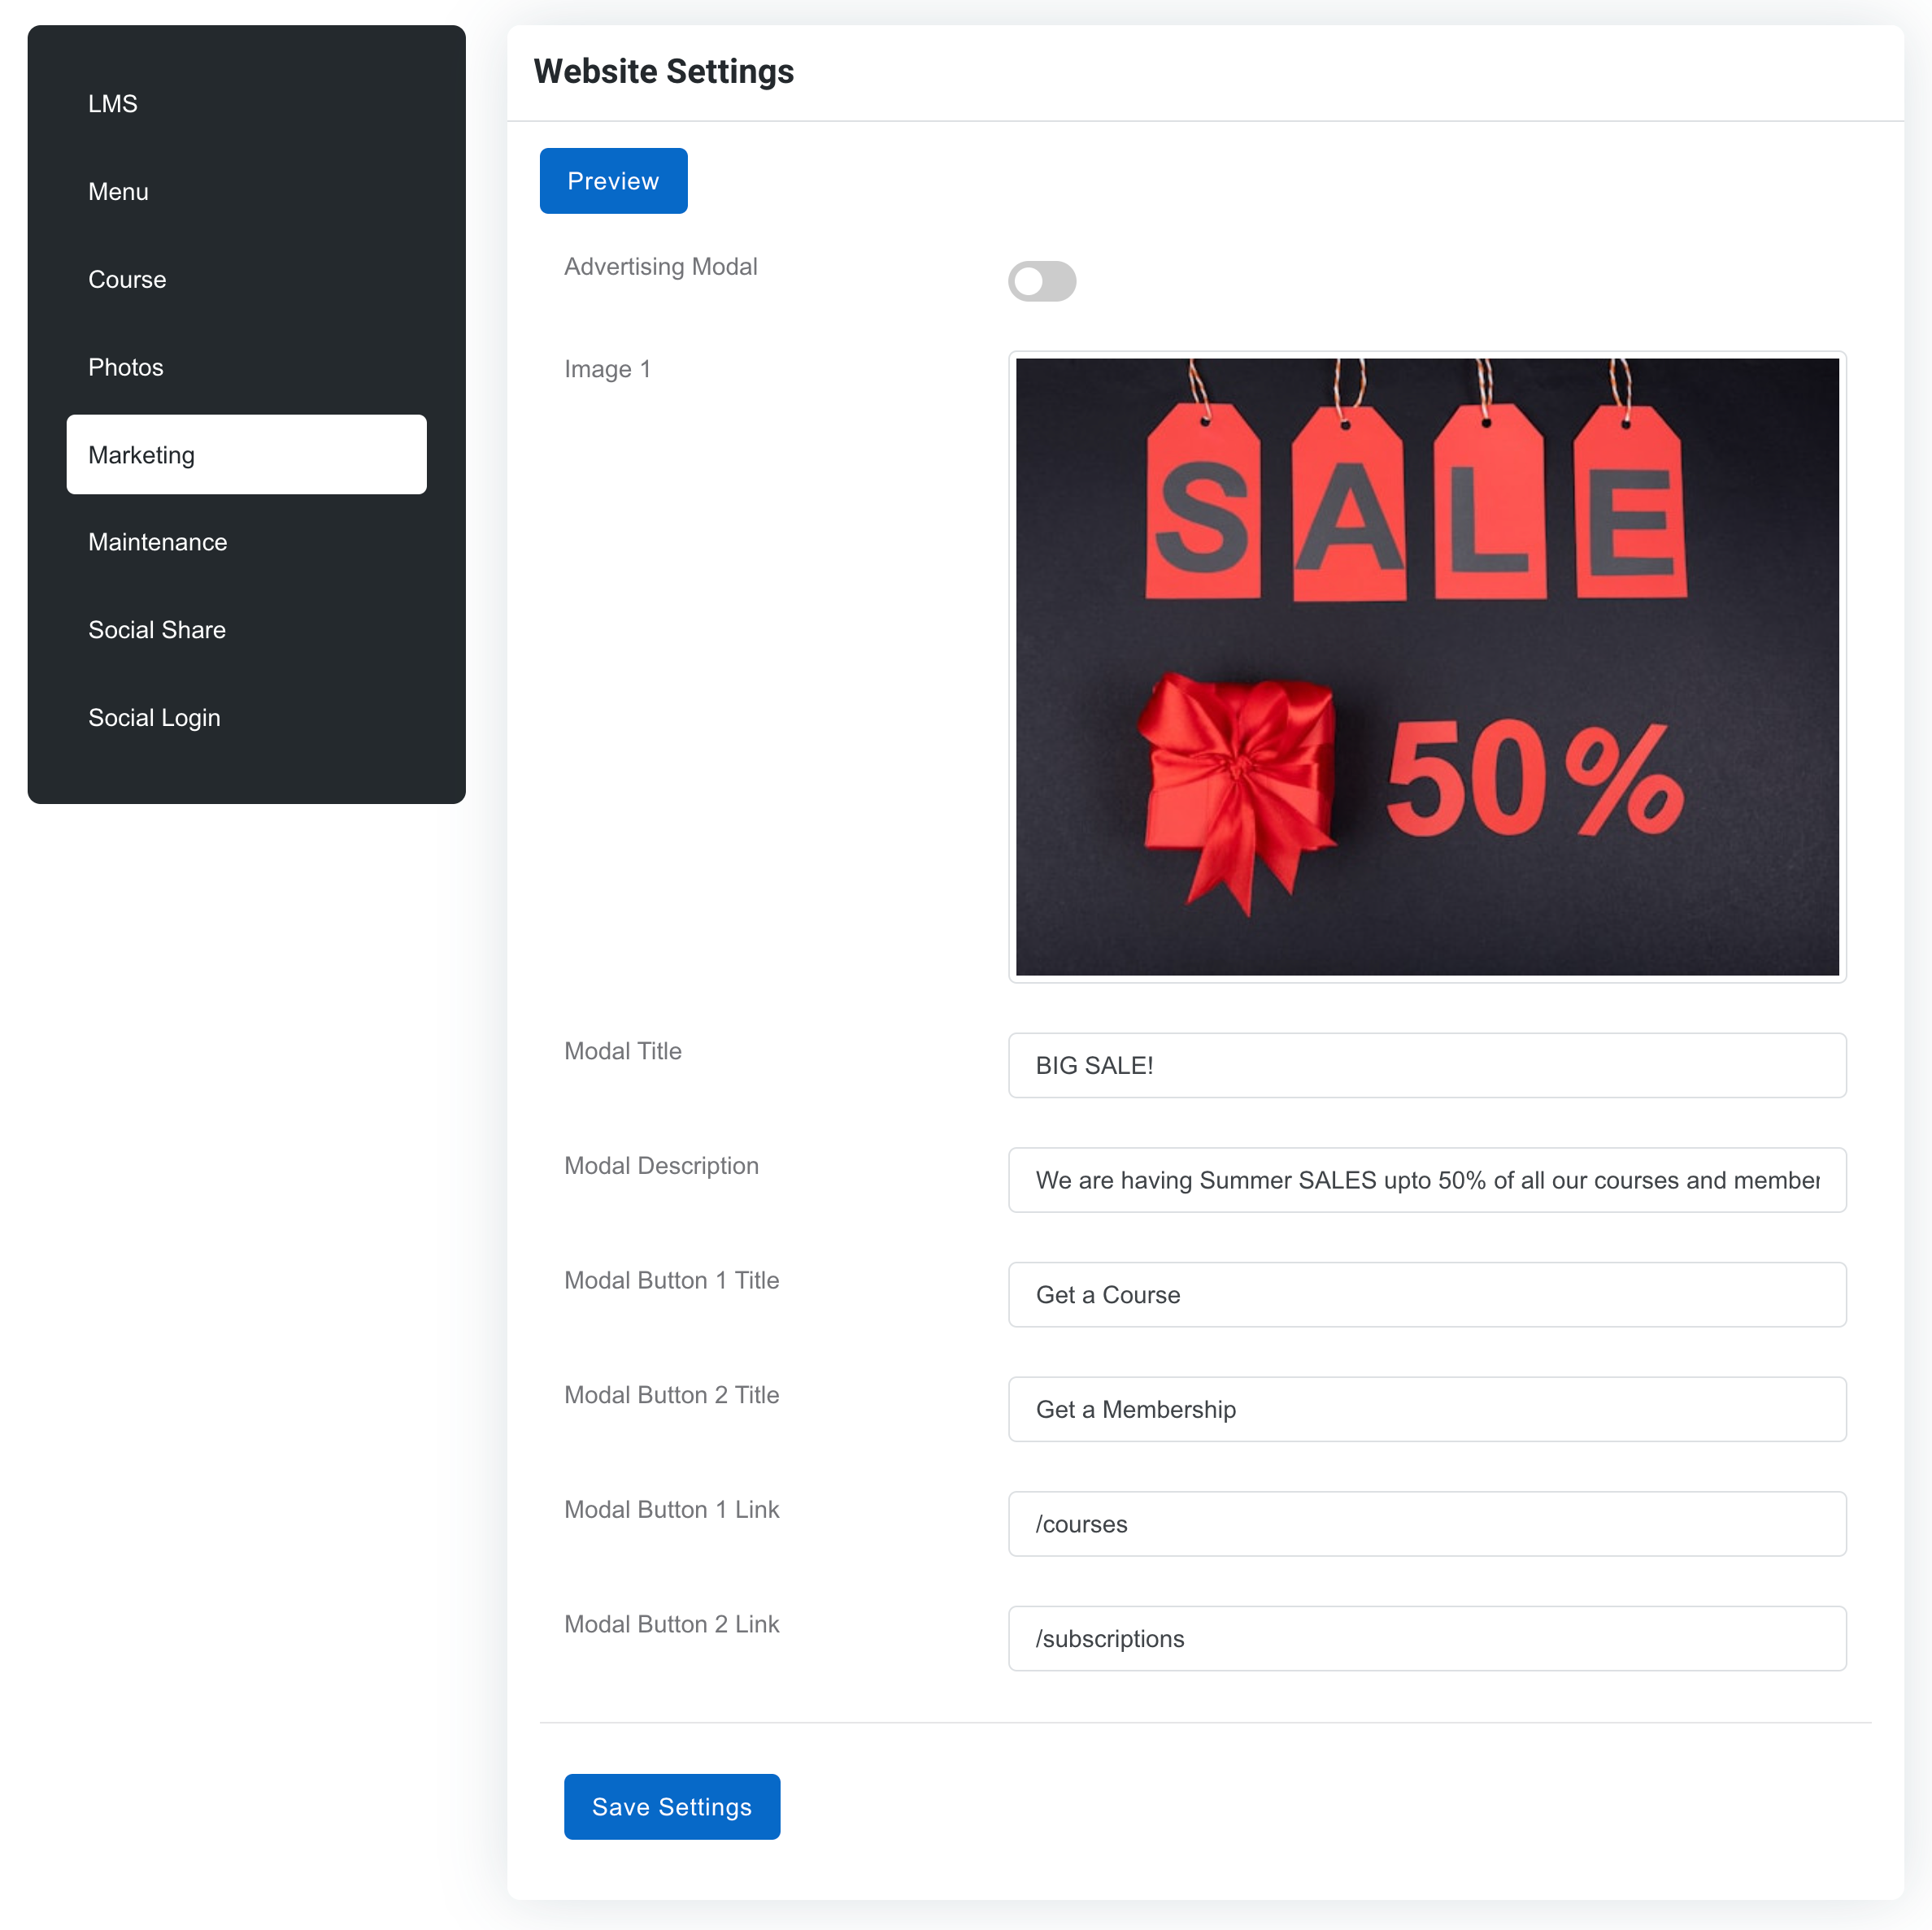
You can use marketing popup to get clicks for your courses or products. The popup can be previewed before enabling, and the popup will be visible once per new session.
Maintenance mode
If you want to close down all pages, exept the admin dashboard and dashboard tools, you can do now. By enabling the Maintenance mode, users cannot view public pages.
Social share
Social share are the social media of your company data we will use on them visible, so users can visit
Social login
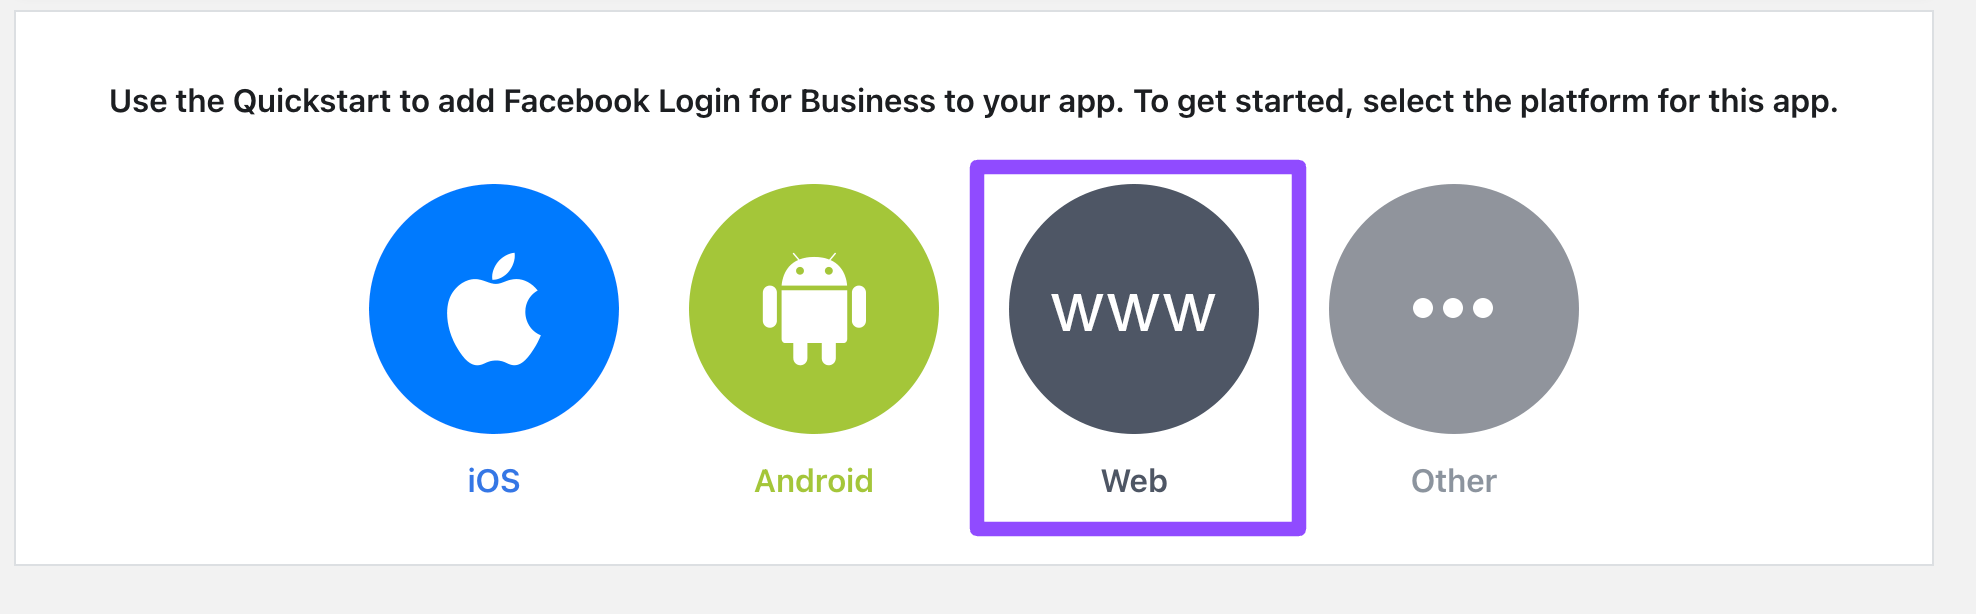
Facbook login
Loggin with Facebook can make your LMS registration 10x faster because many students and instructors already have Facbook accounts. Read Facebook guide
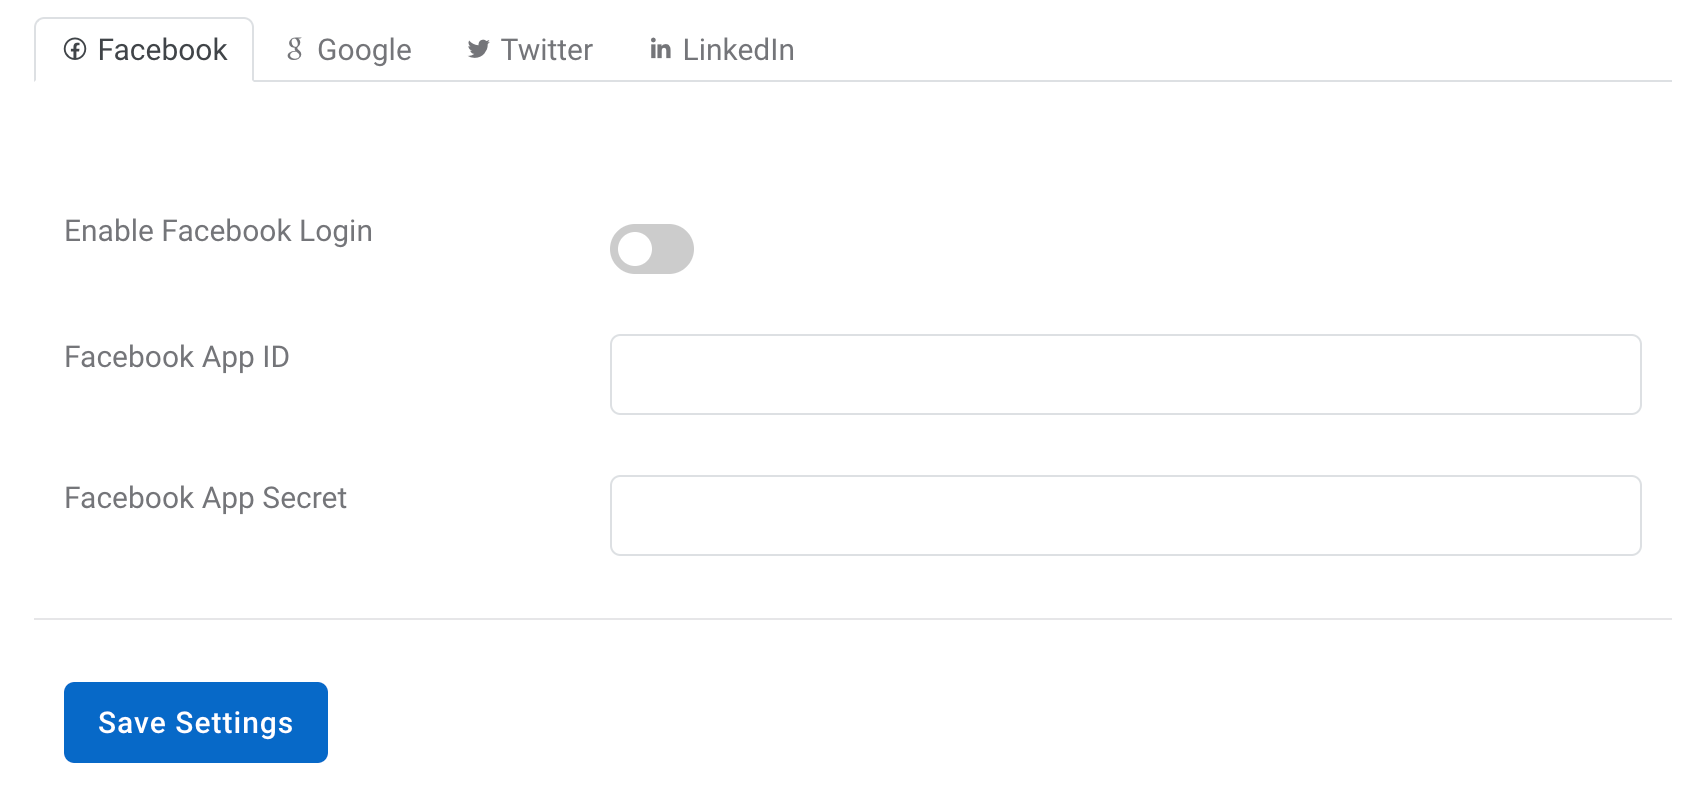
You need to enable facebook login
- Then get the Facebook App ID and Facebook App Secret from Meta Developers account
New Apps: Follow the new Facebook instructions
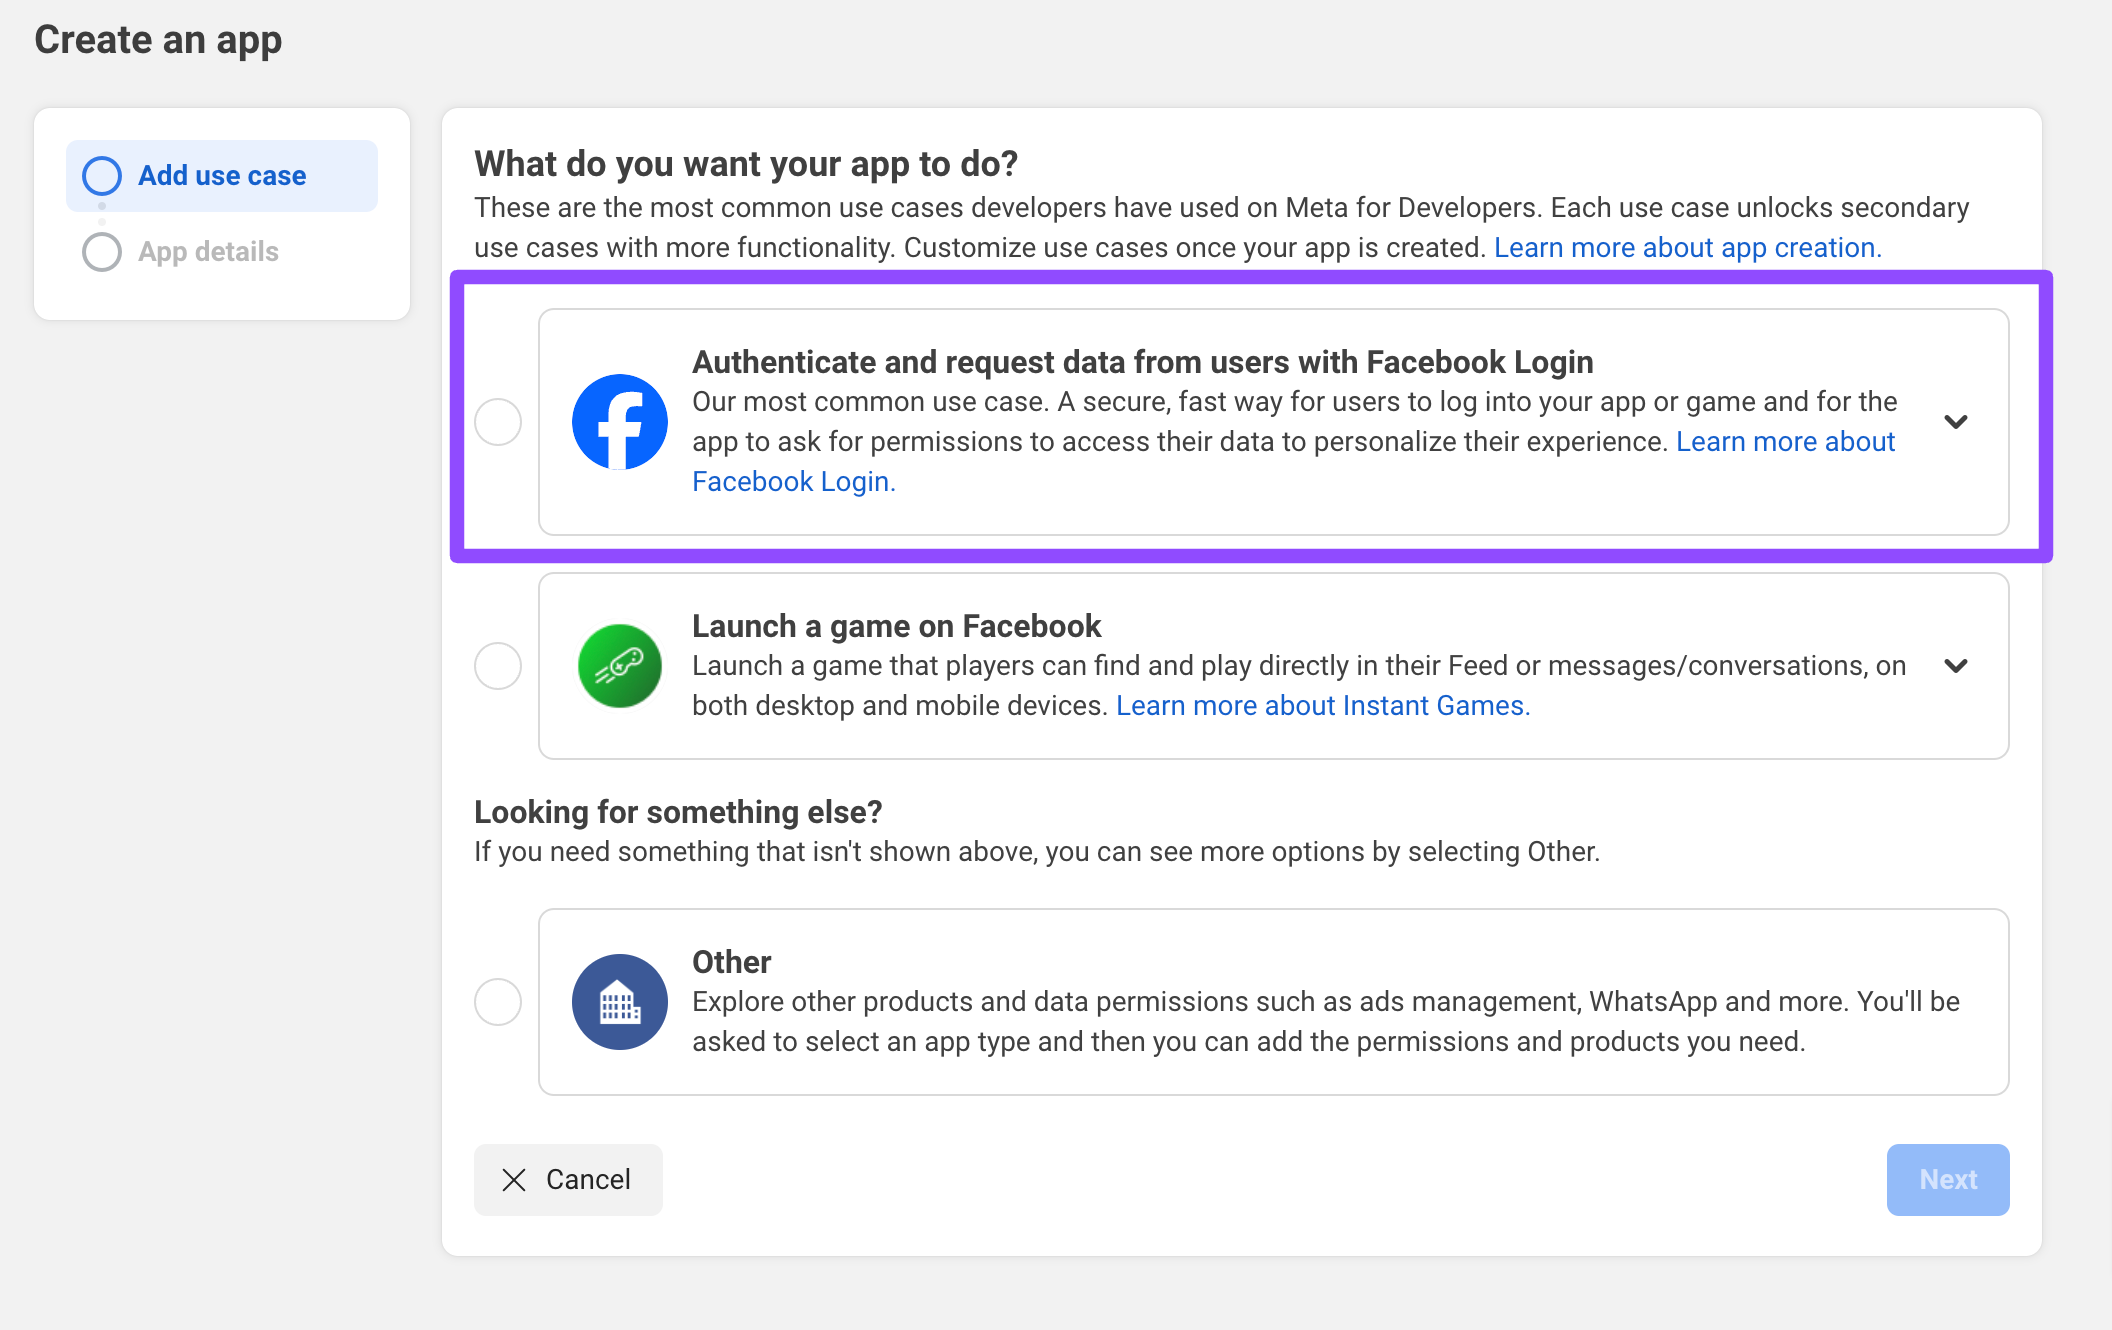
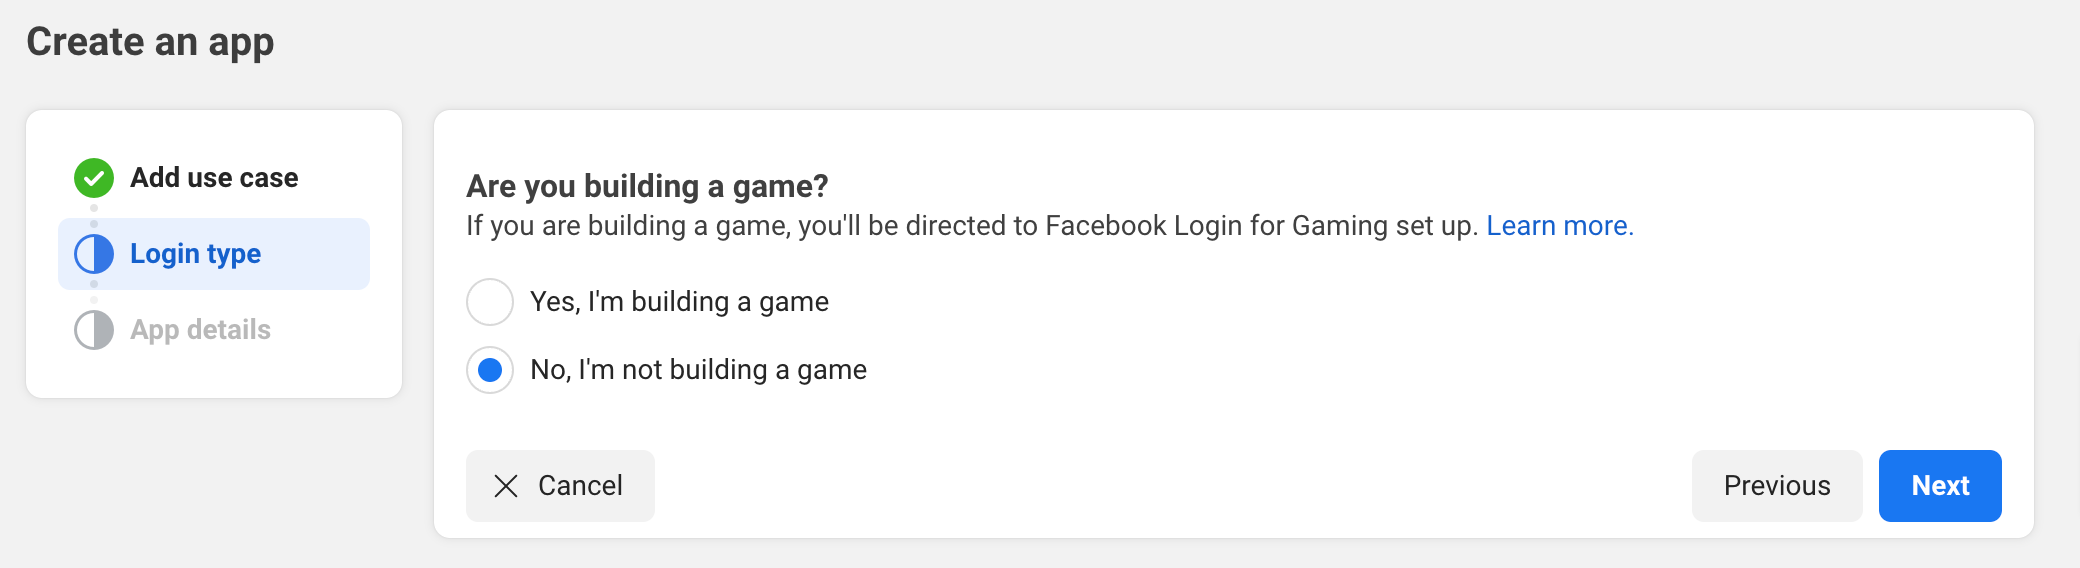
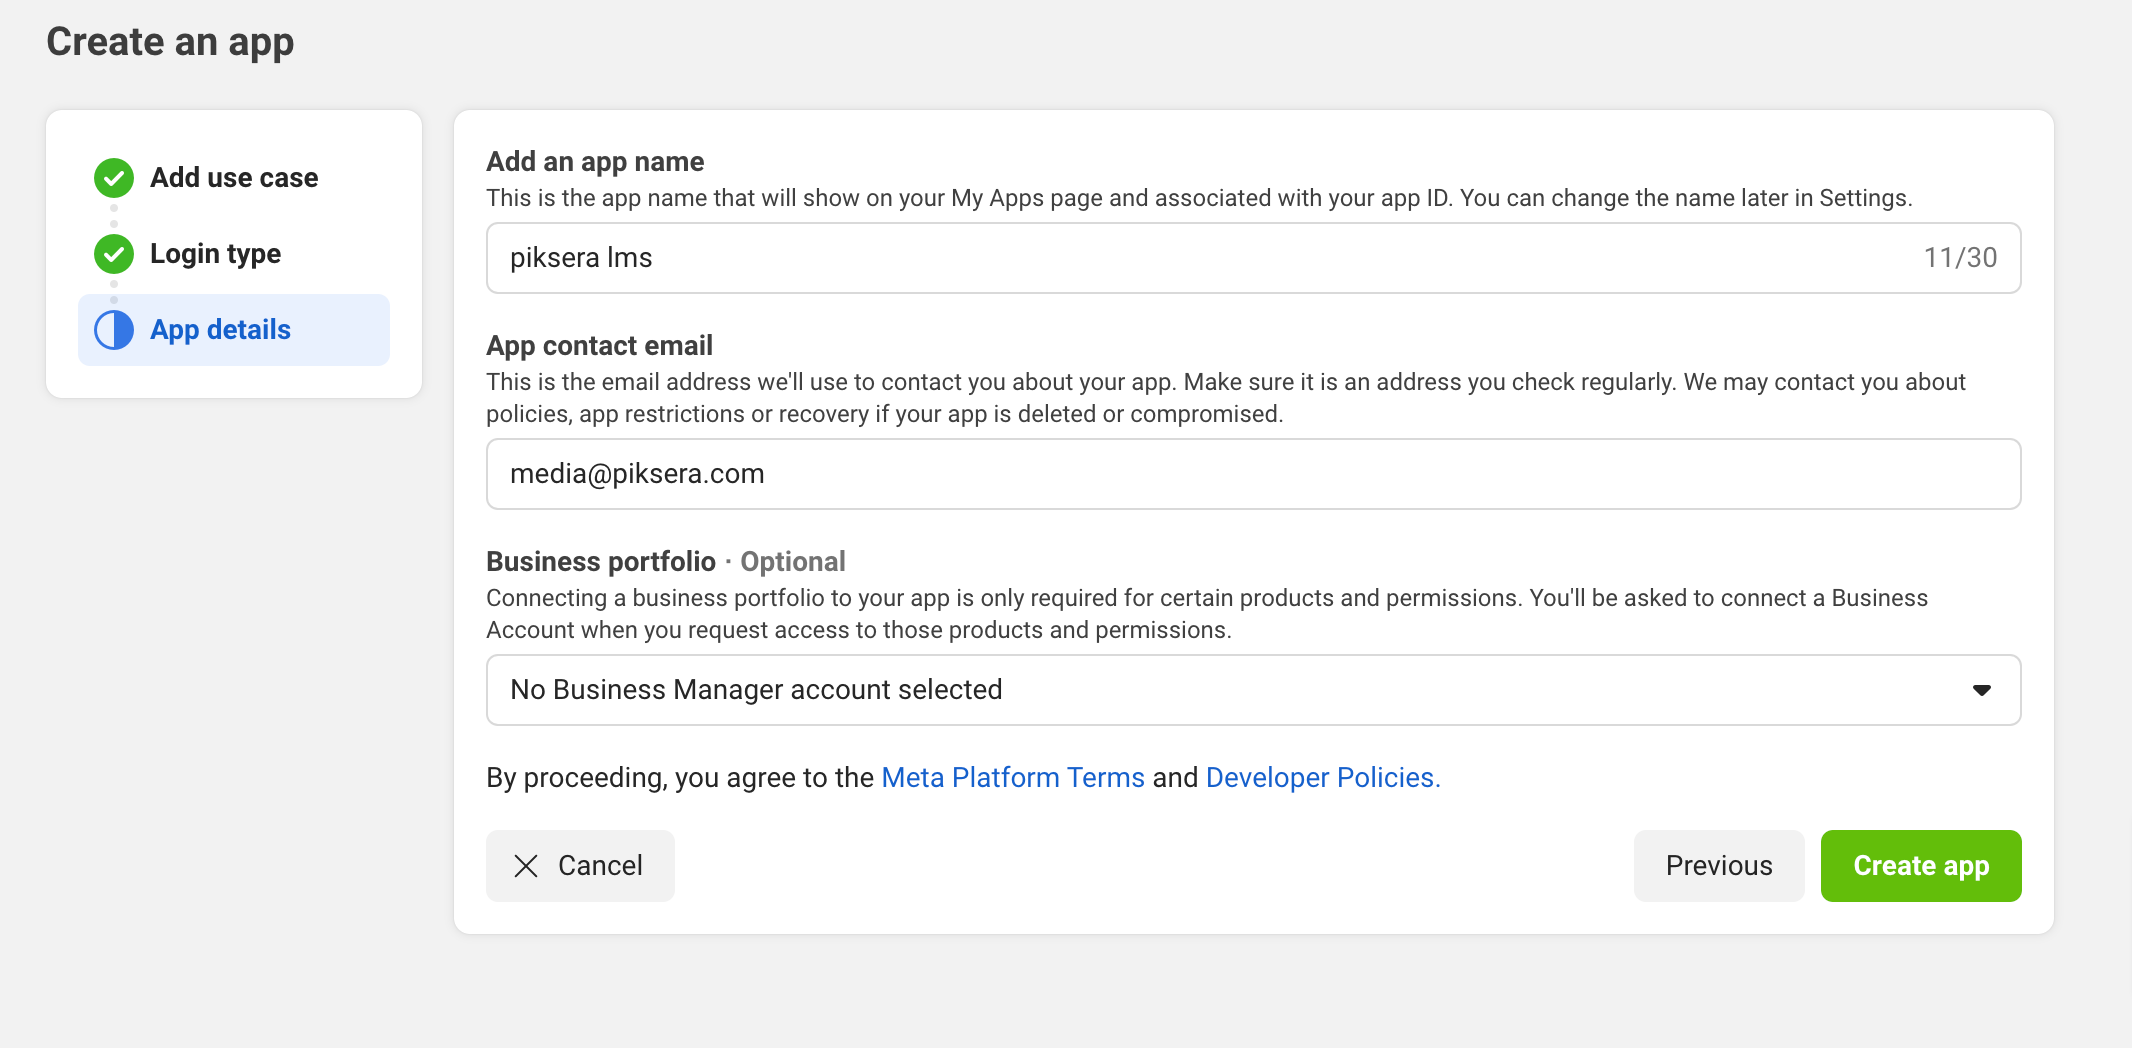
Older Apps: Another Quick way to get keys
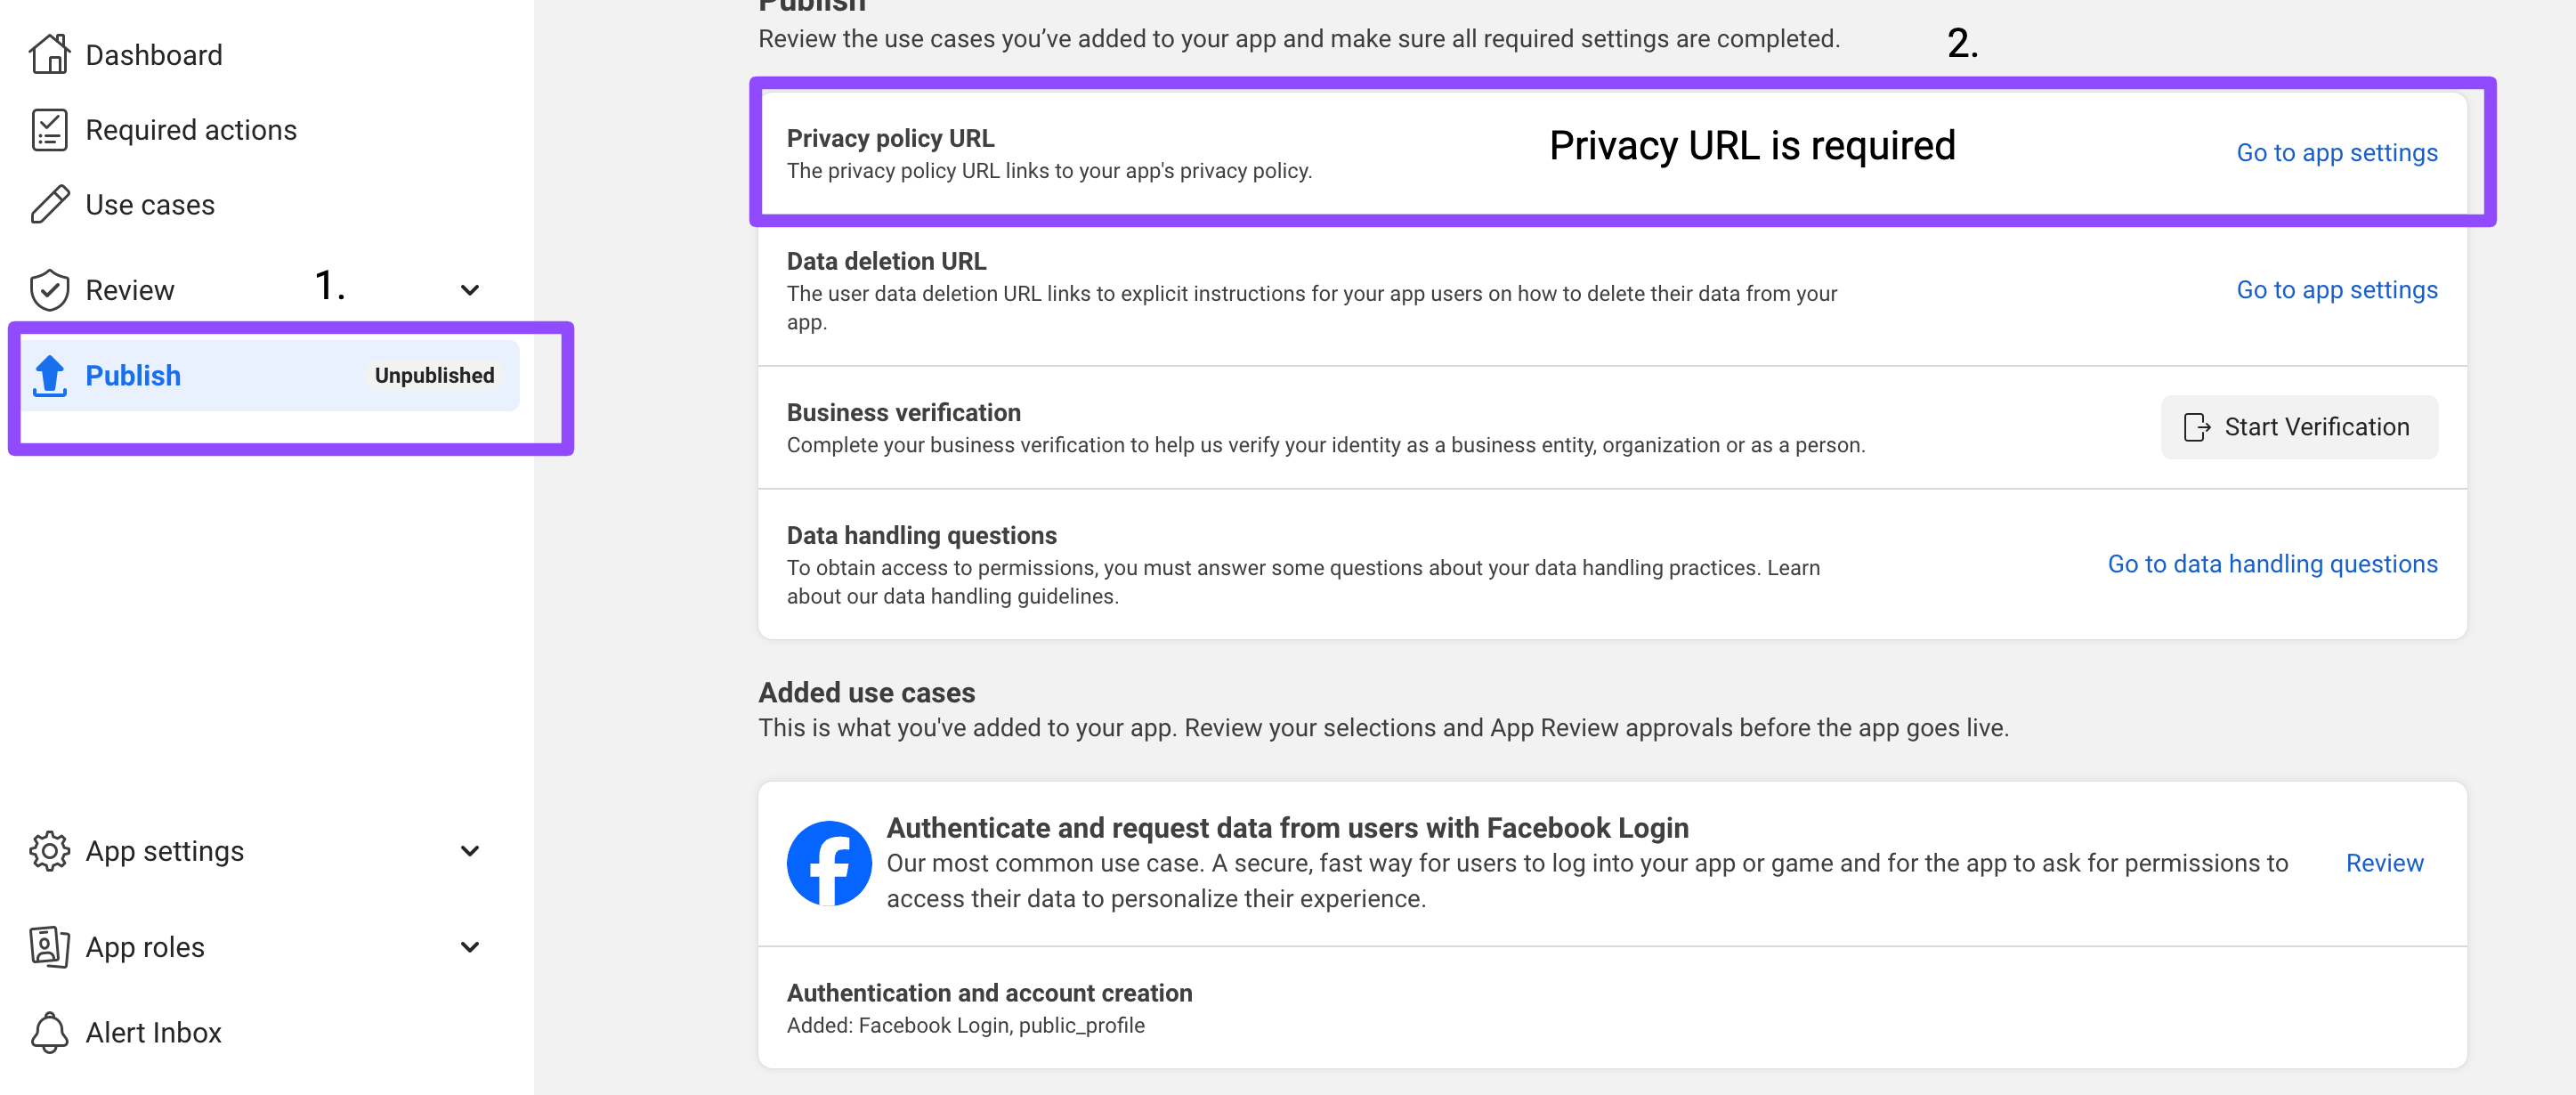
You have Facebook Login settings on the left sidebar, fill this this way:
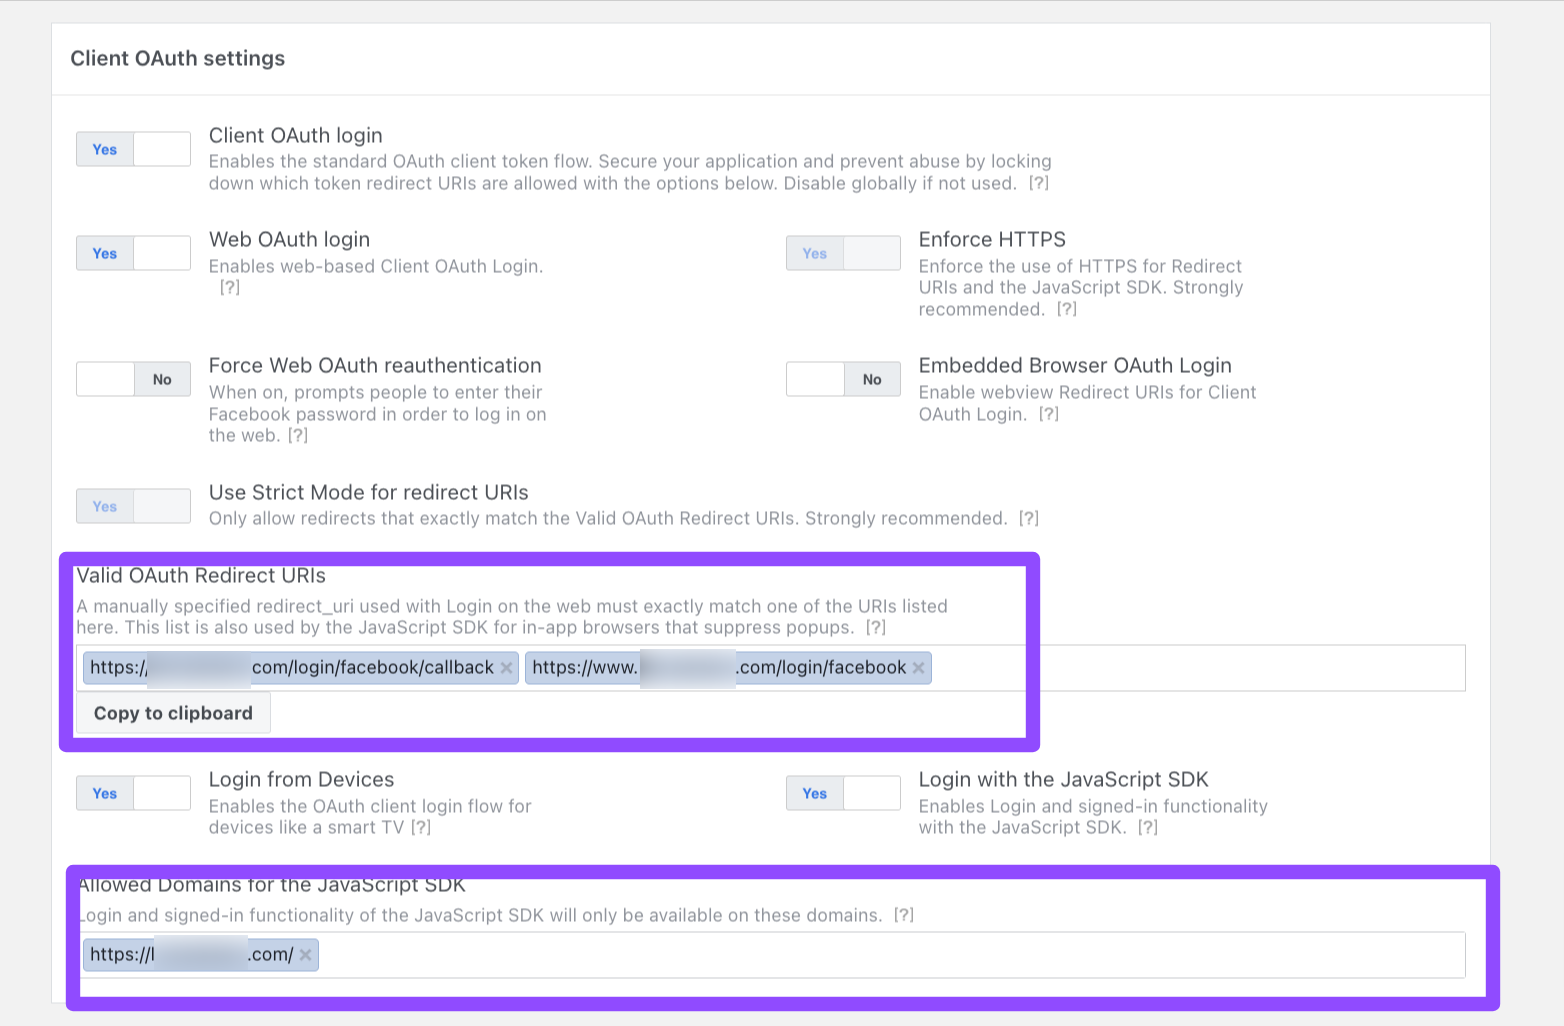
Make sure that you have Client OAuth settings set your website, and callback correctly as in the image Valid OAuth Redirect URIs
are required to be connected to LMS. This setting is found on Facebook login/ settings tab.
Callback URL "https://YOURWEBSITE.com/login/facebook/callback"
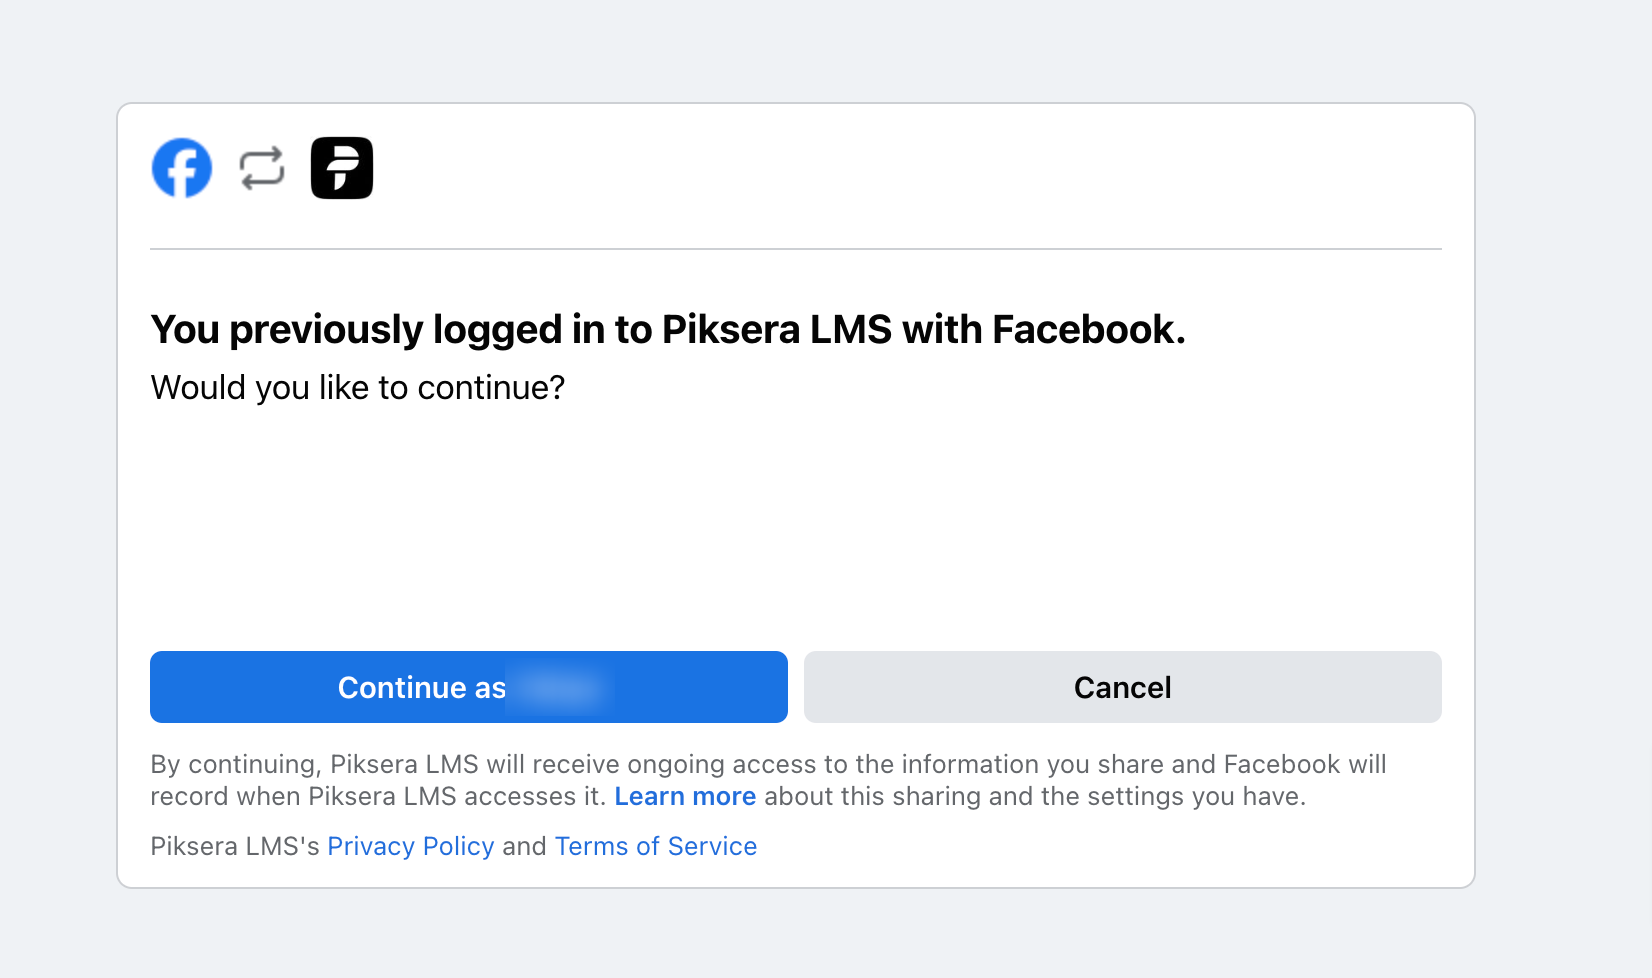
Succesfull connection
If you face any errors while connecting contact us. If you have correctly put Keys, and callback is set correctly also published your app on Meta developers account, it should be successful.
Google login
Loggin with Googe account aka Gmail or Google Auth can make your LMS registration much faster because many students and instructors already have Google accounts. Read Google guide
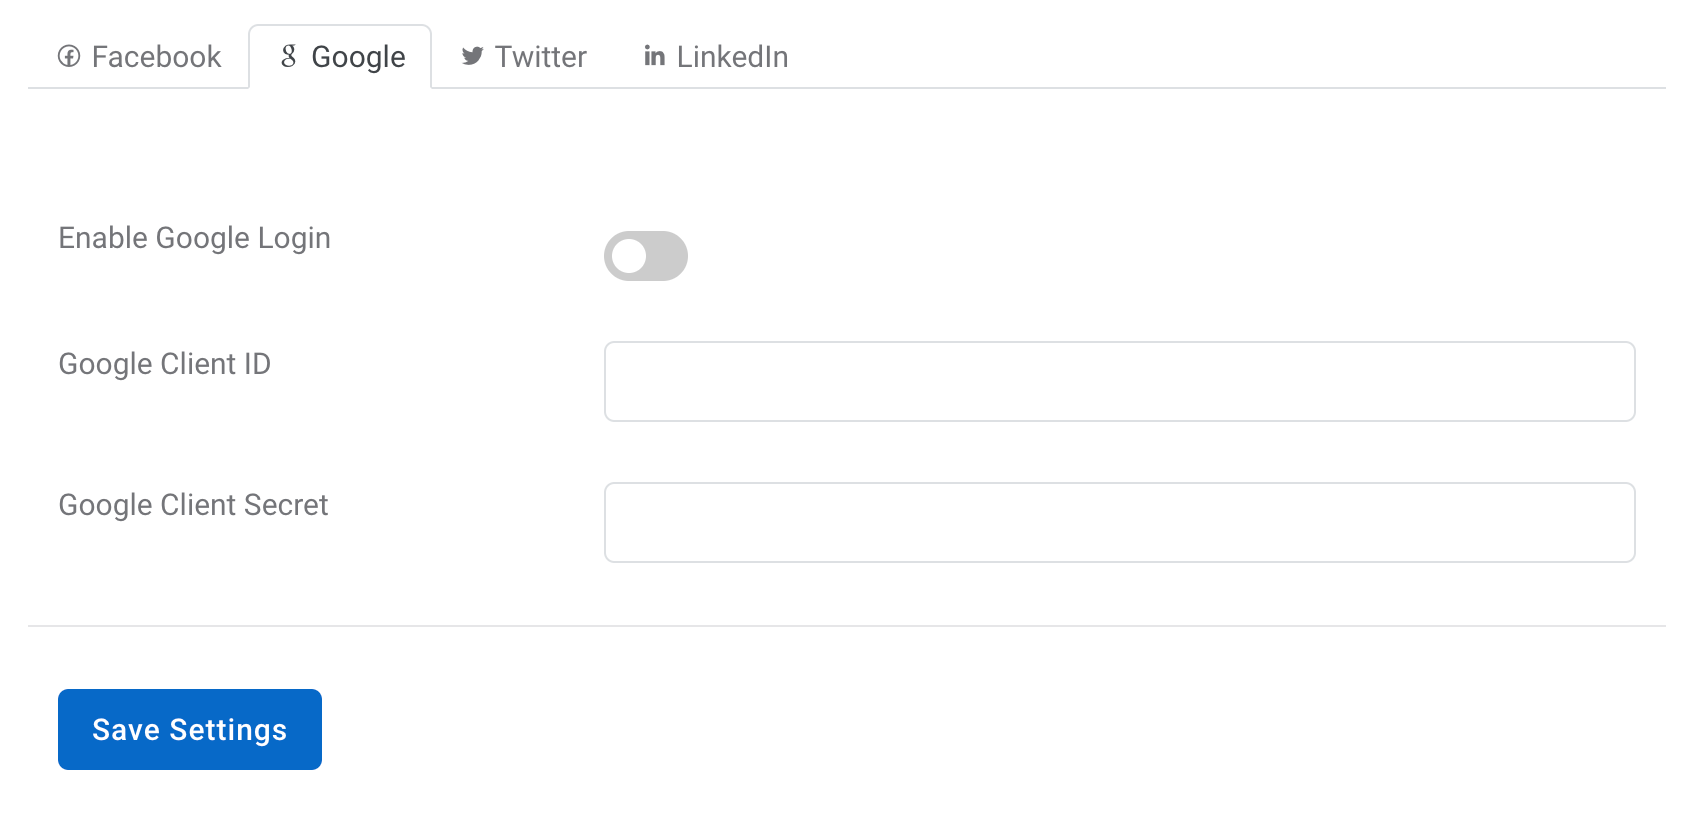
You need to enable google login
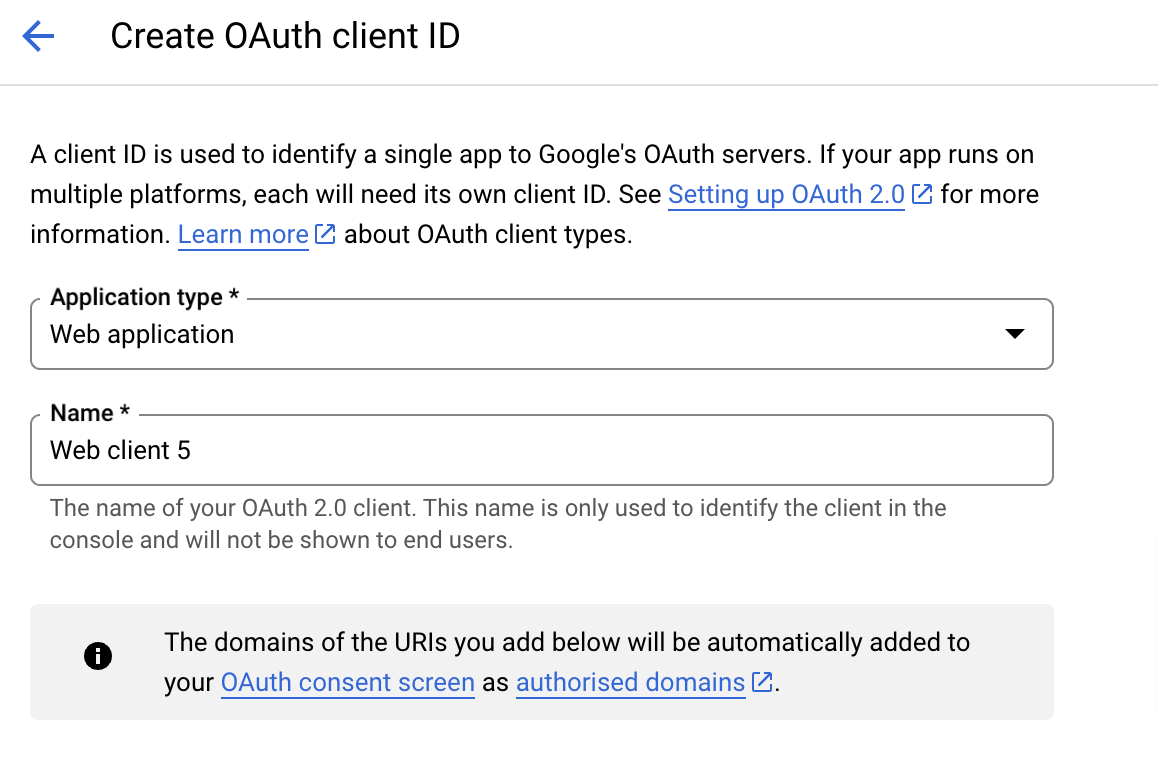
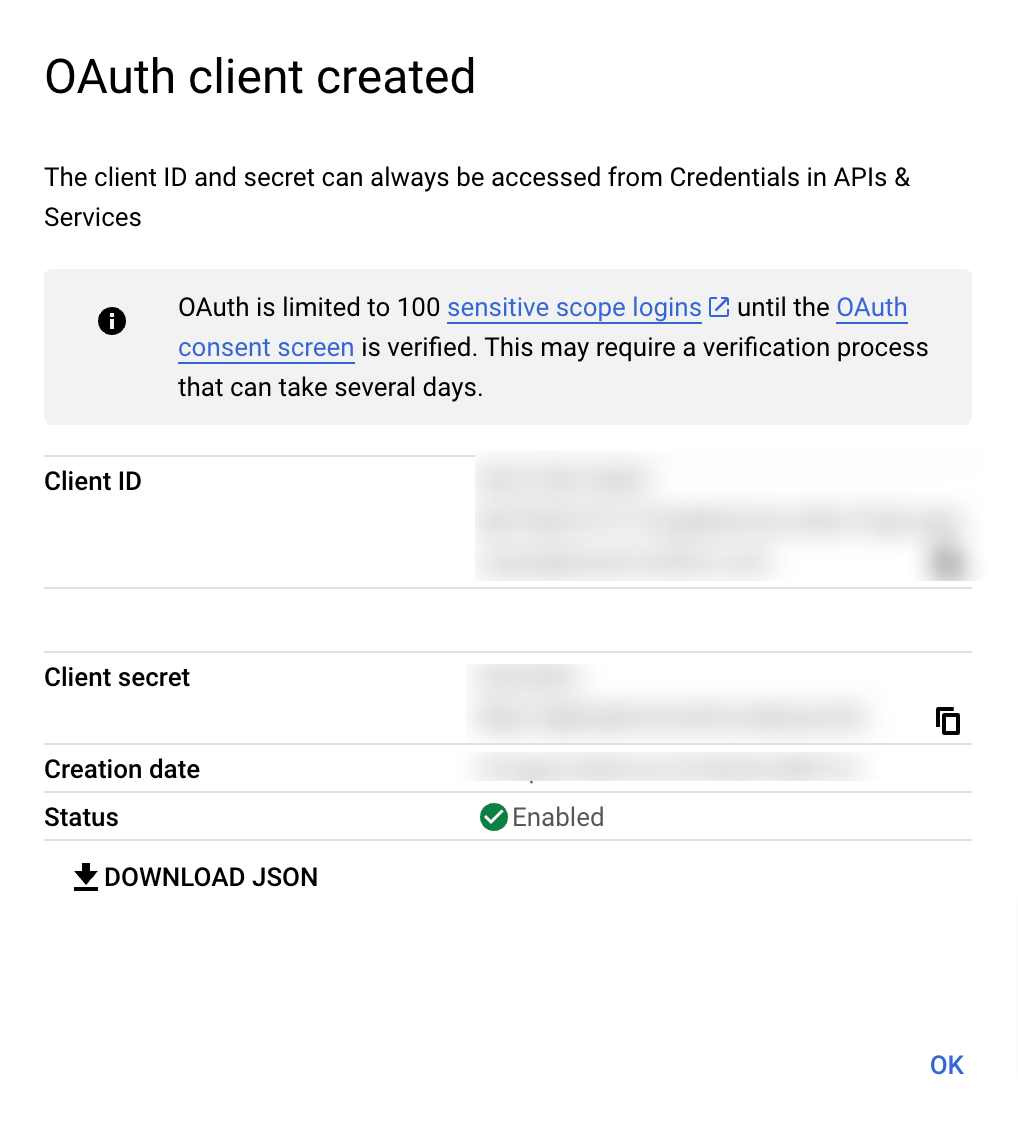
- Then get the Google Client ID and Google Client Secret from Google Console
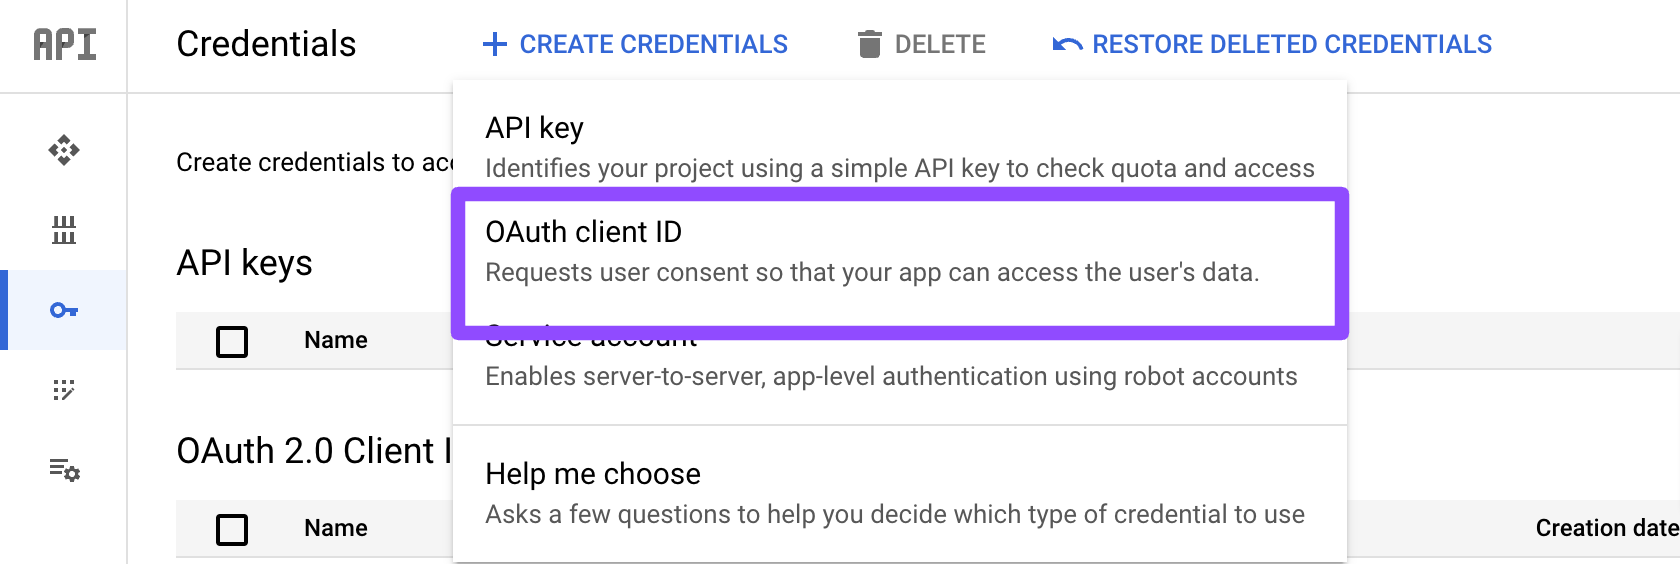
- Go to the Credentials page.
- Click Create credentials > OAuth client ID.
- Select the Web application application type.
- Name your OAuth 2.0 client and click Create
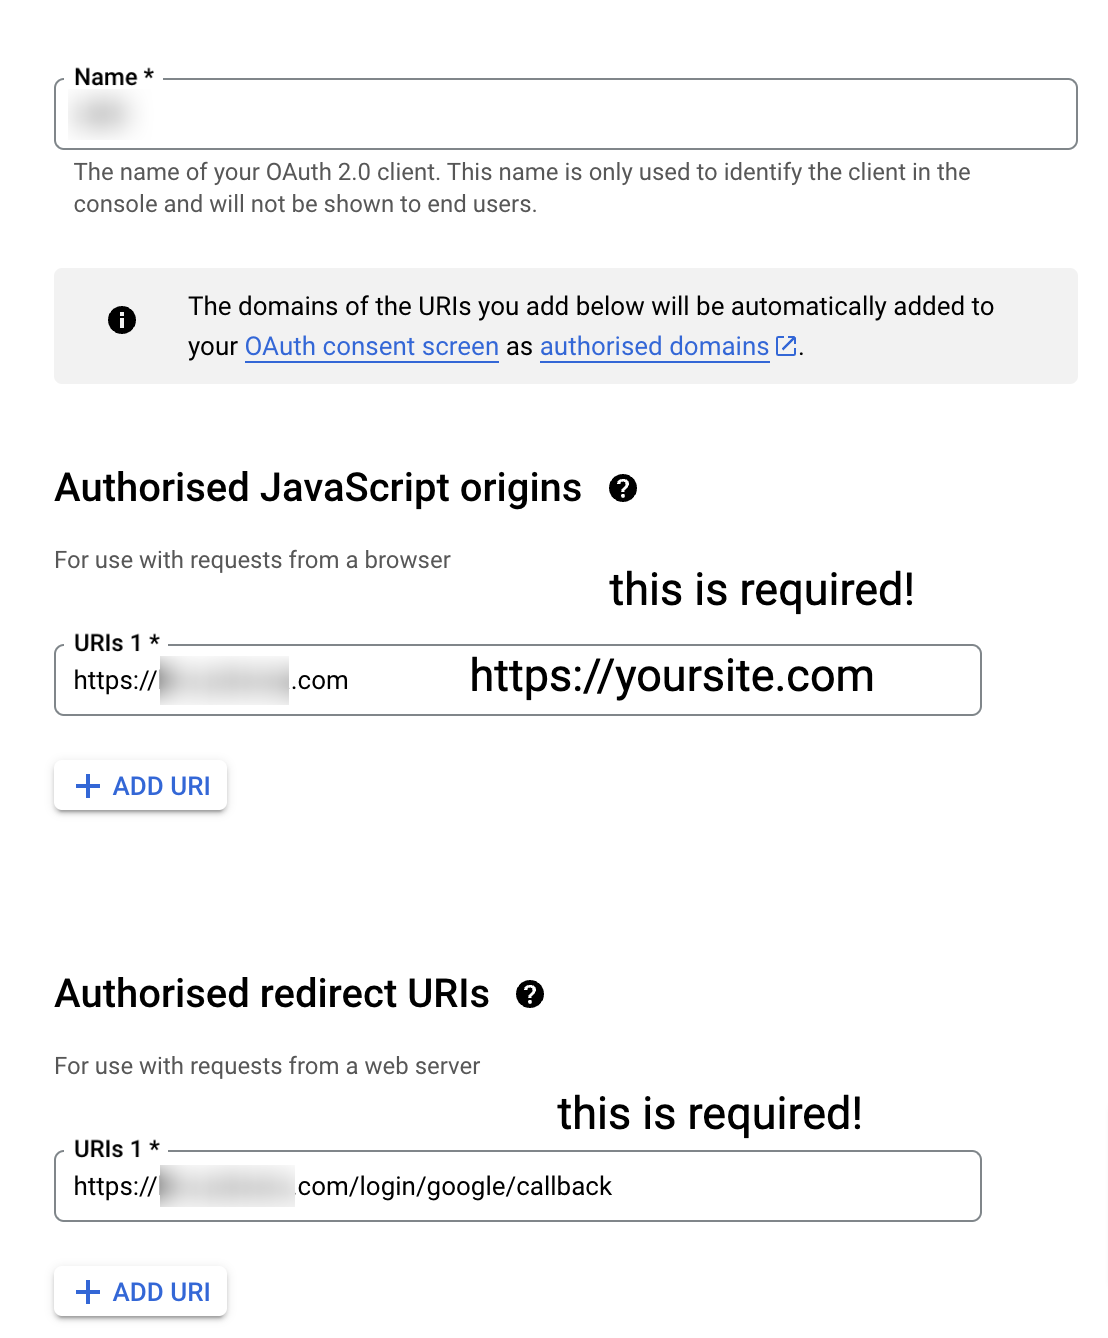
Callback URL "https://YOURWEBSITE.com/login/google/callback"
Fail connection Error 400: redirect_uri_mismatch
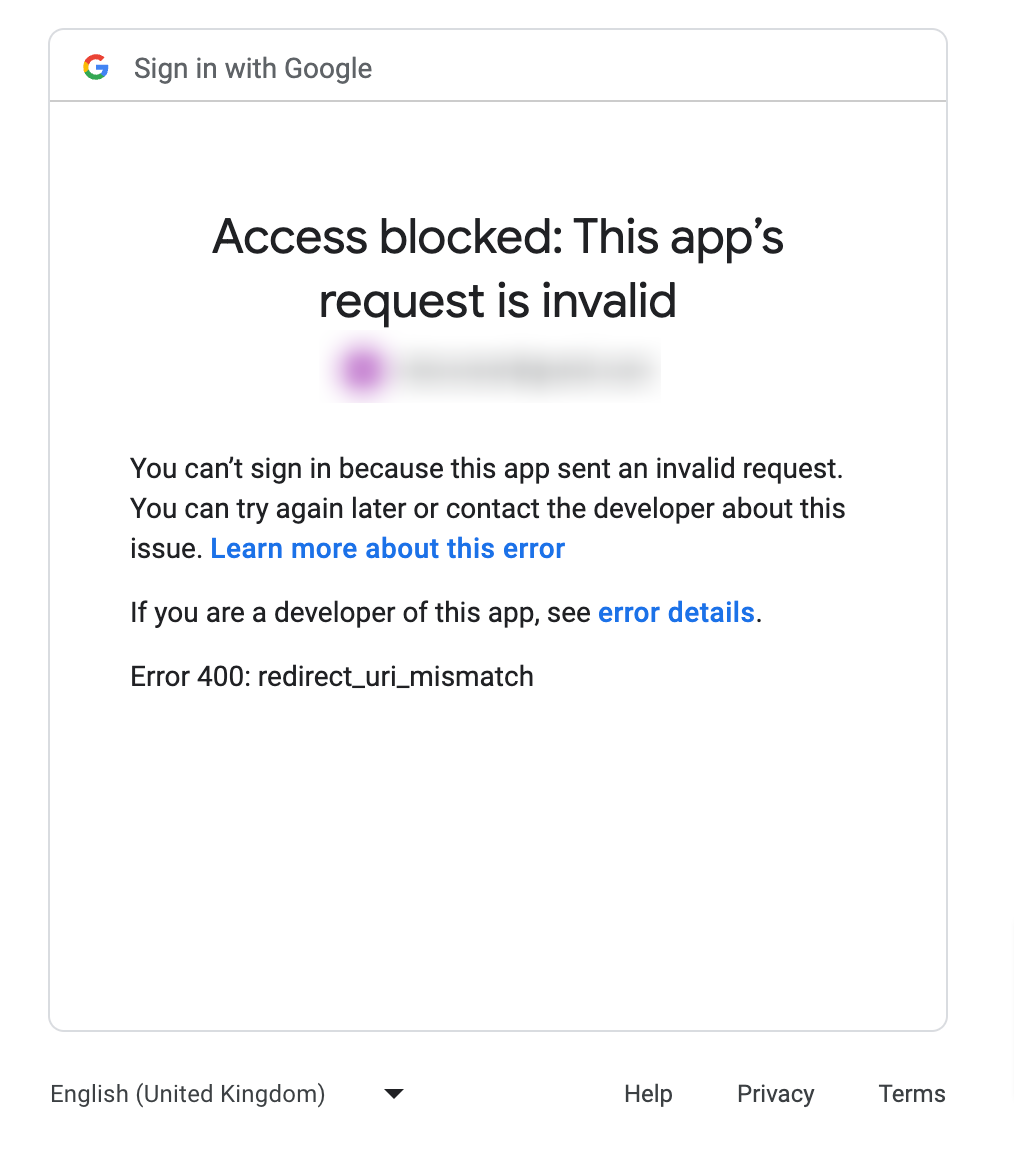
Most of the time people get this error. This error means that your callback need to be fixed as the authorized redirect url doesn't match your website yet.
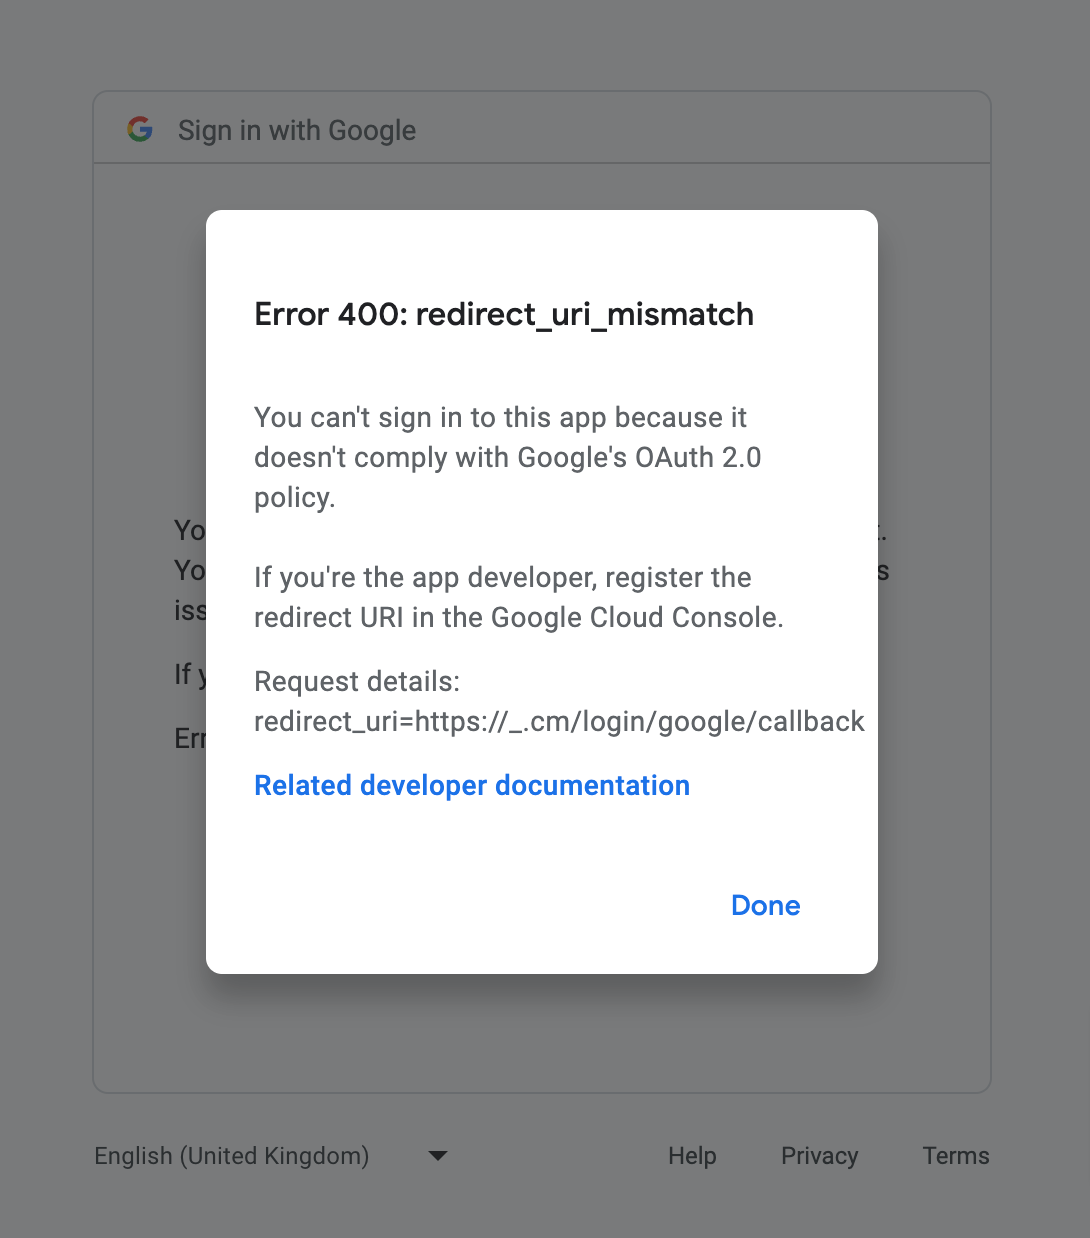
Preview the details by pressing "details on bottom", and it will show you your authorized callback. Copy it and make sure its on web application console correctly.
Succesfull Connection
Congratulations for the succesfull connection. Keep in mind that Google auth login is limited with per users created account their service.
Twitter/X login
Twitter/X login guide is found on Twitter developers page. You can read their guidance on their page Read Twitter's guide
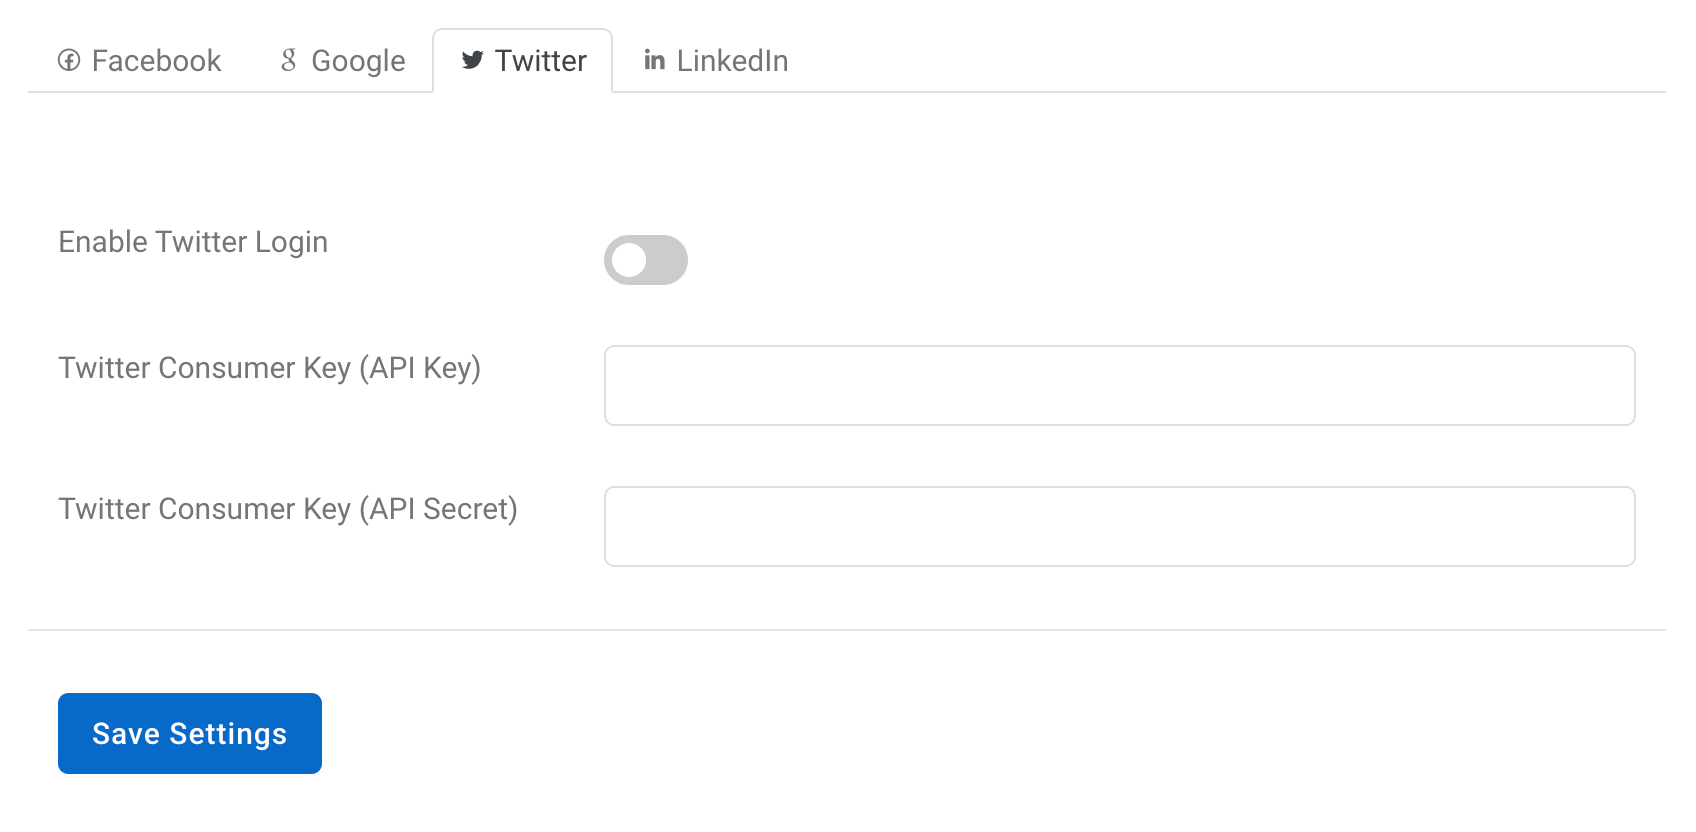
You need to enable twitter login
- Then get the Twitter Consumer Key (API Key) and Twitter Consumer Key (API Secret)
LinkedIn login
LinkedIn login guide is also found on their page. Read LinkedIn's guide
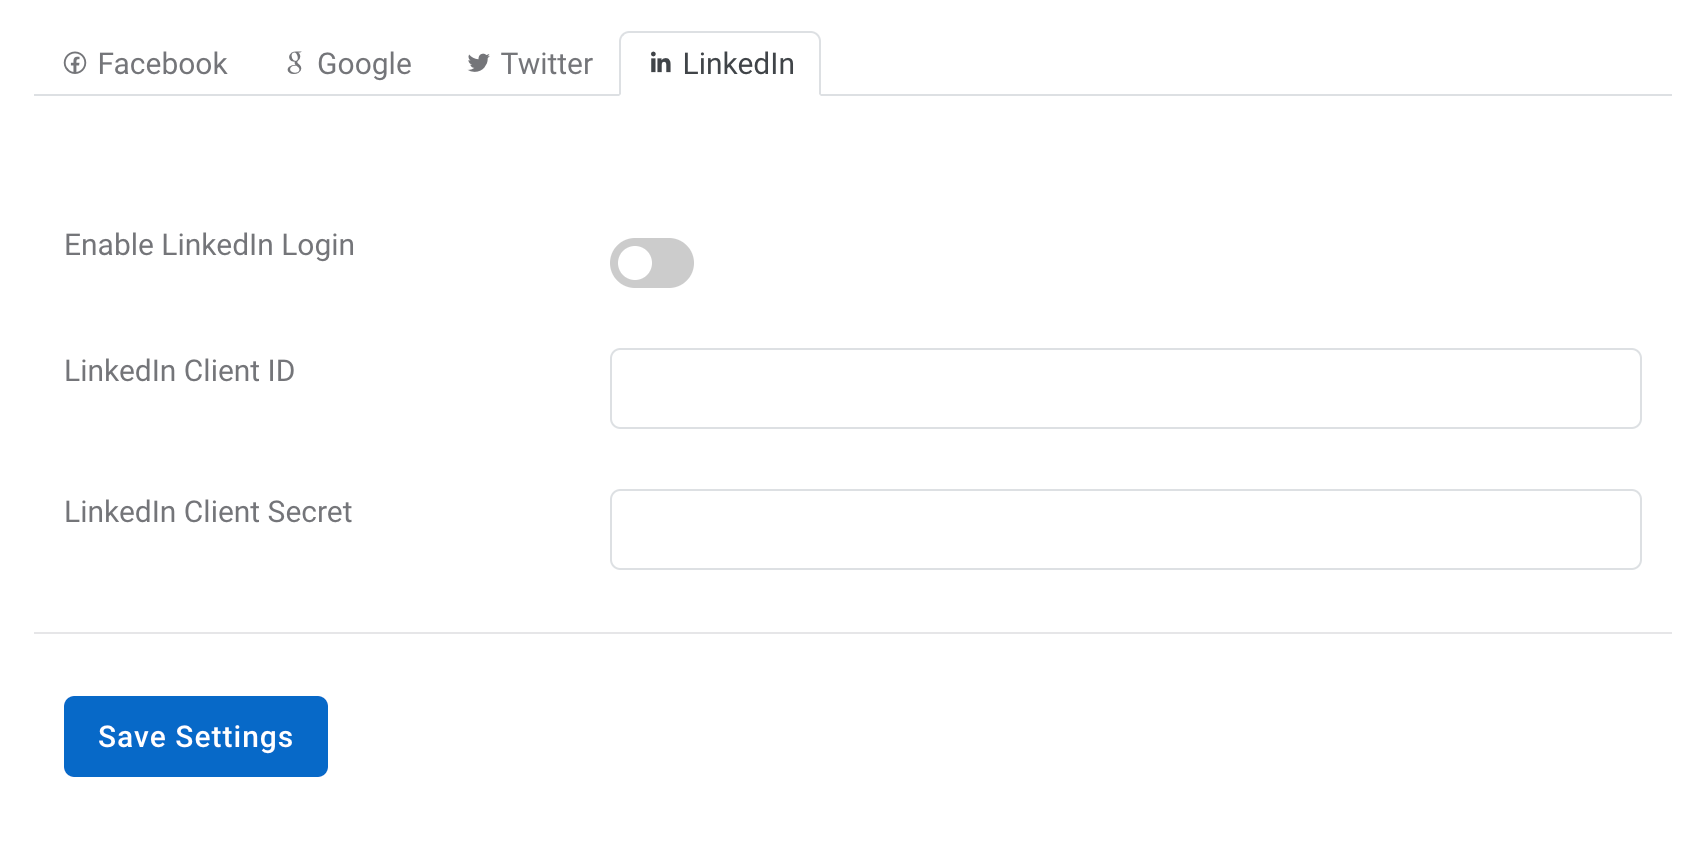
You need to enable twitter login
- Then get the Client ID and Client Secret
CMS, Courses, Media, Tickets, Earnings
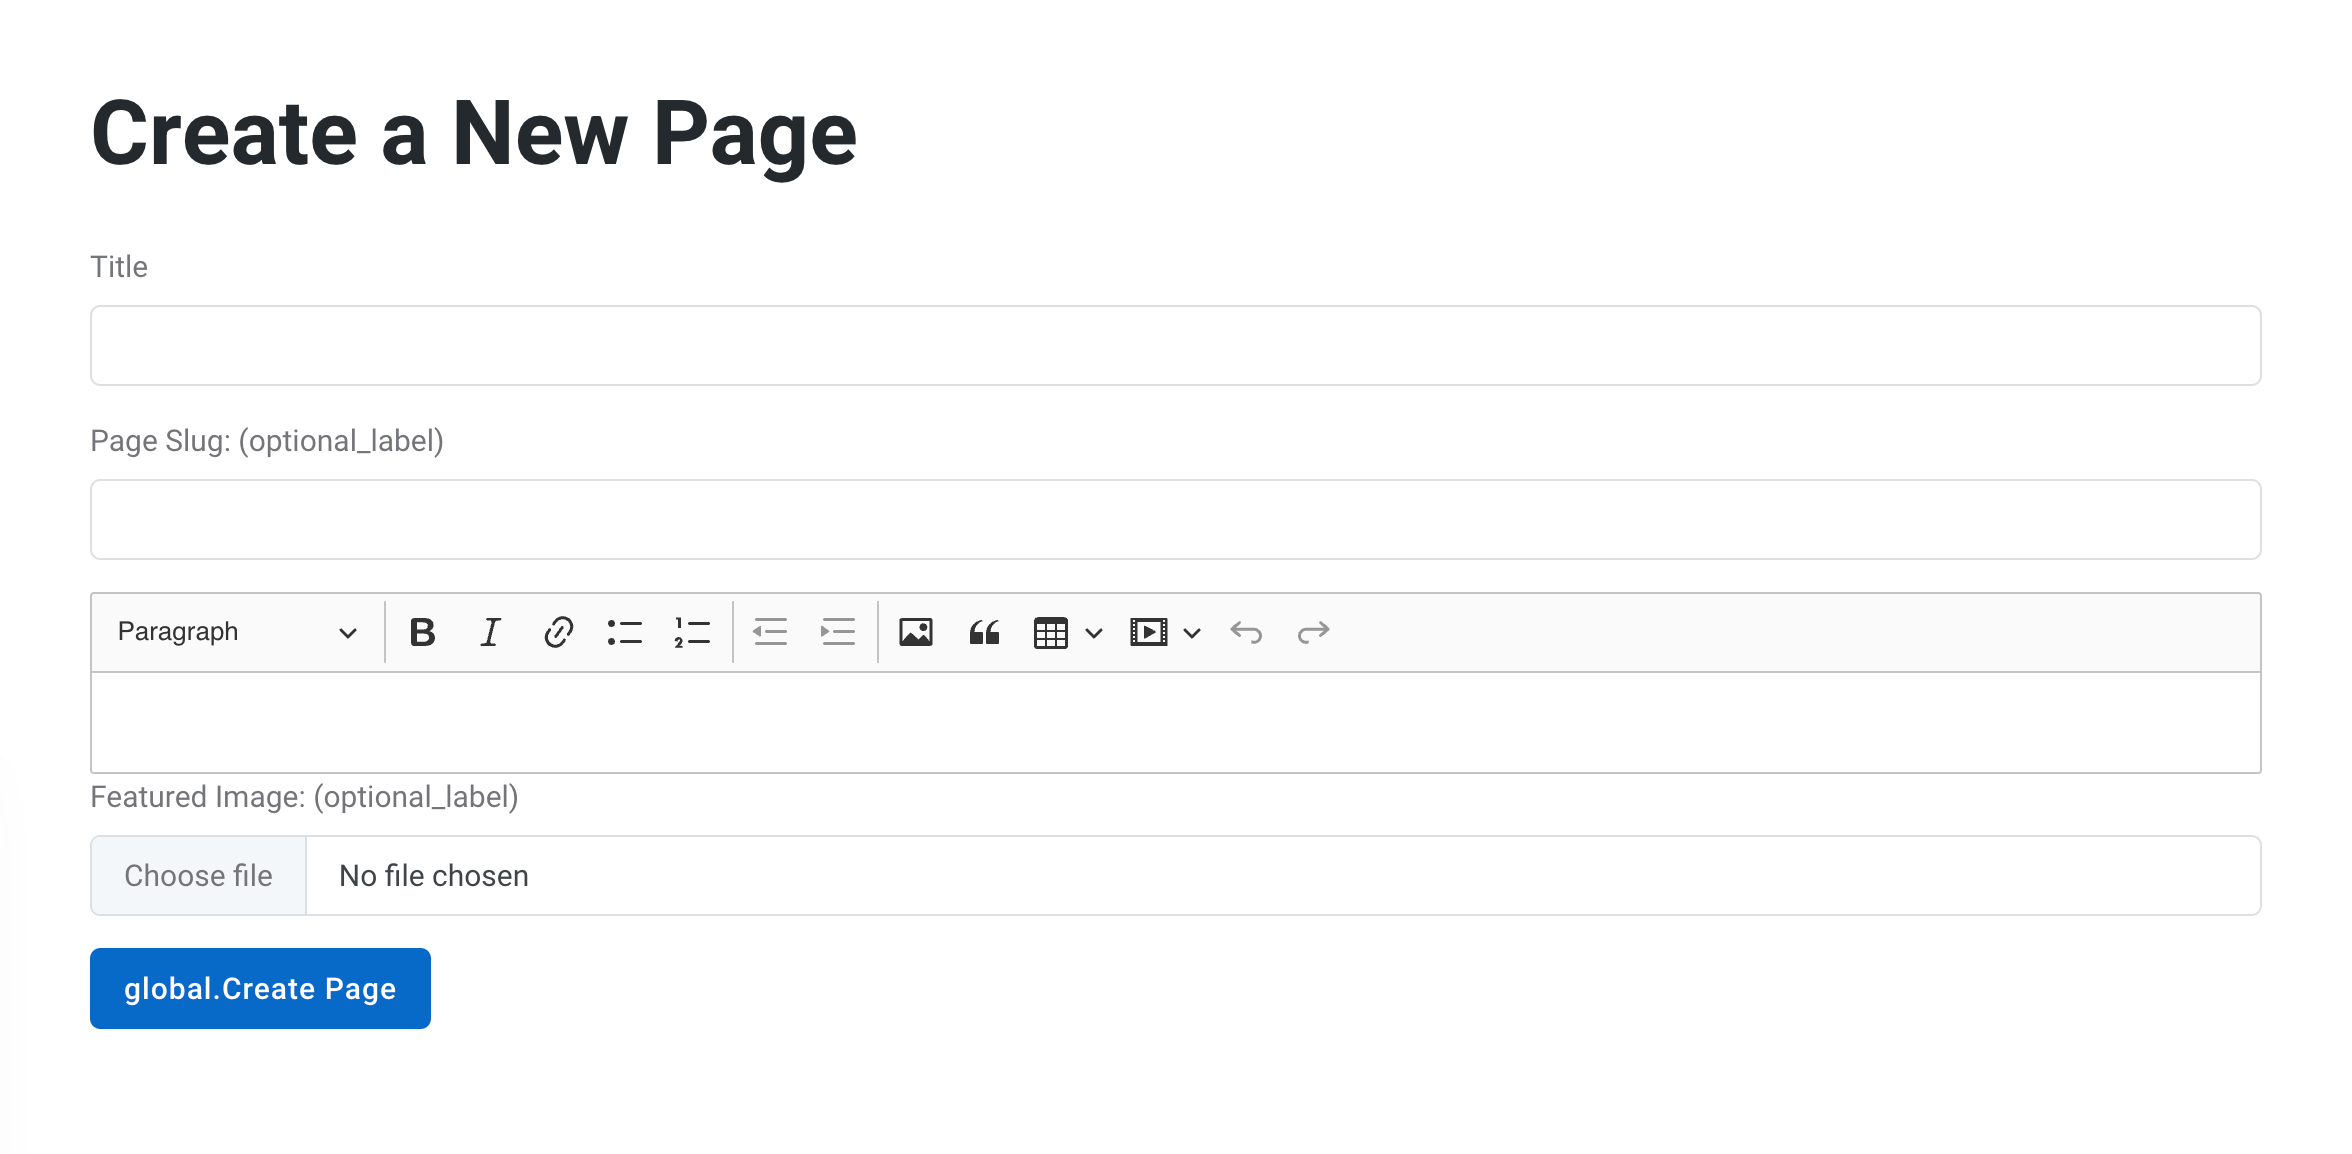
CMS - Page
Creating a page is very simple. Open CMS/Pages, then create a new page.
 hr
hr
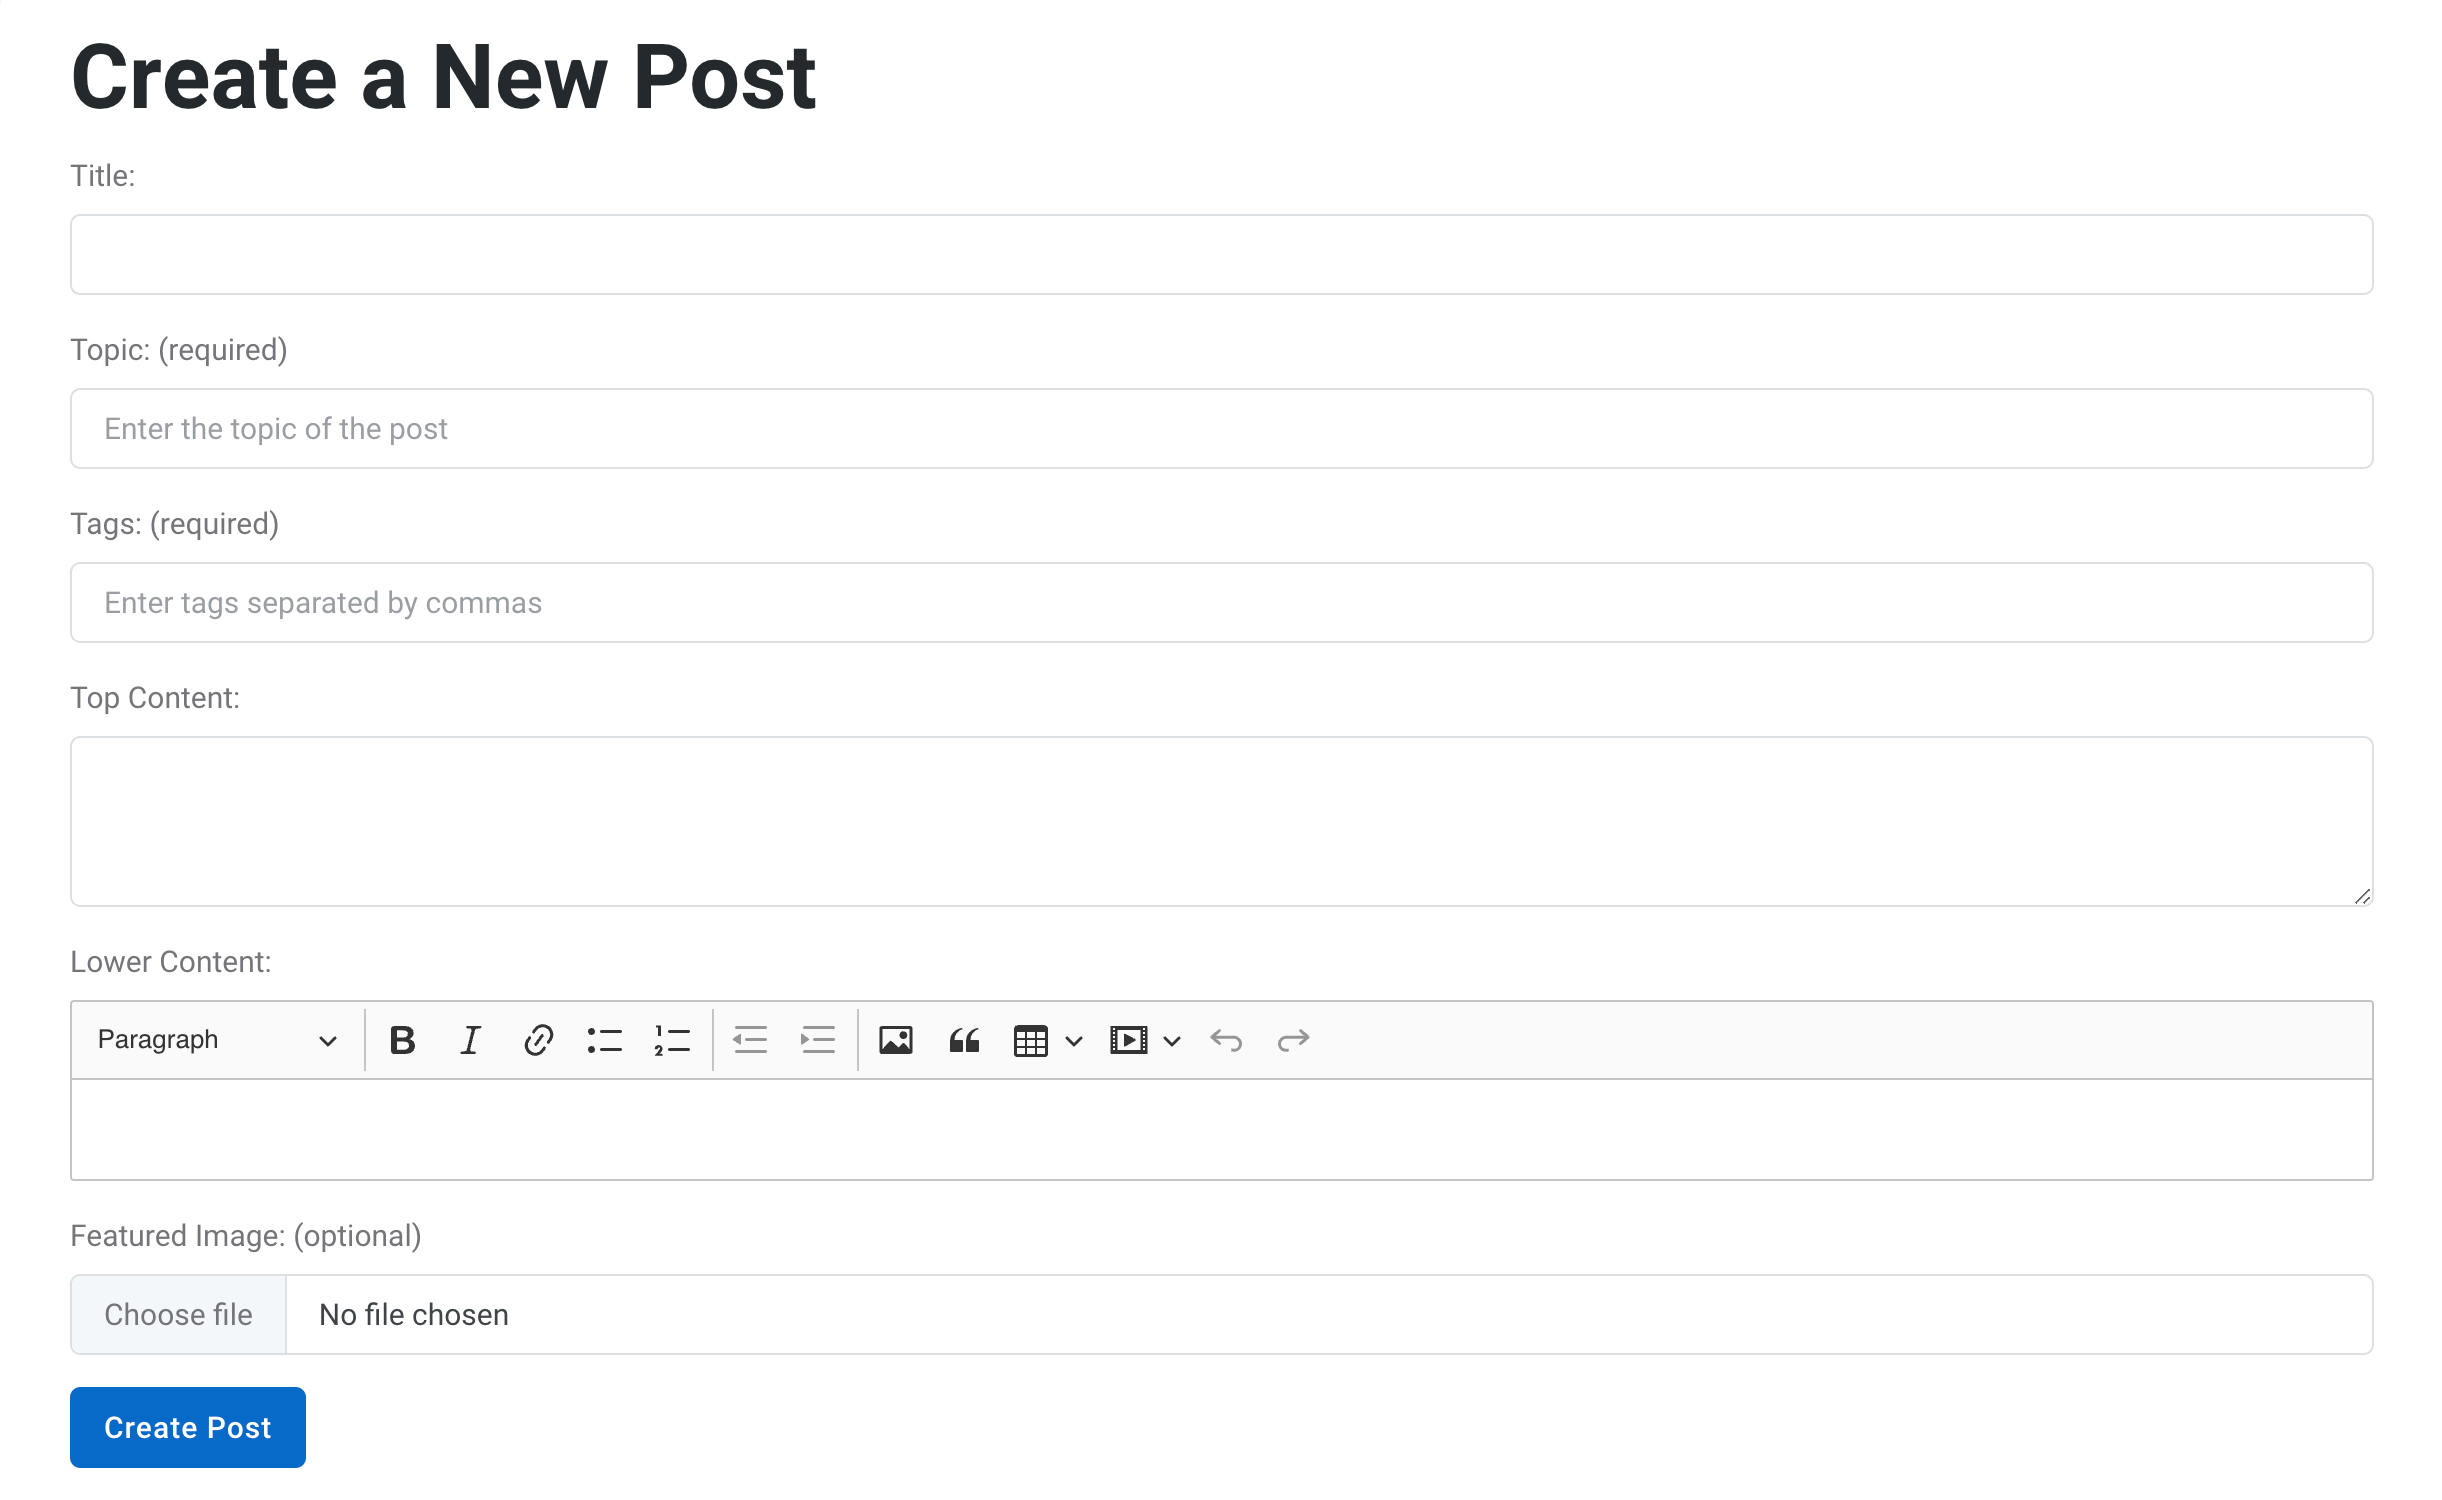
CMS - Post
Creating a post is very simple. Open CMS/Posts, then create a new post. Post creation has two part of content, upper and lower. You can decide to have both or use one.
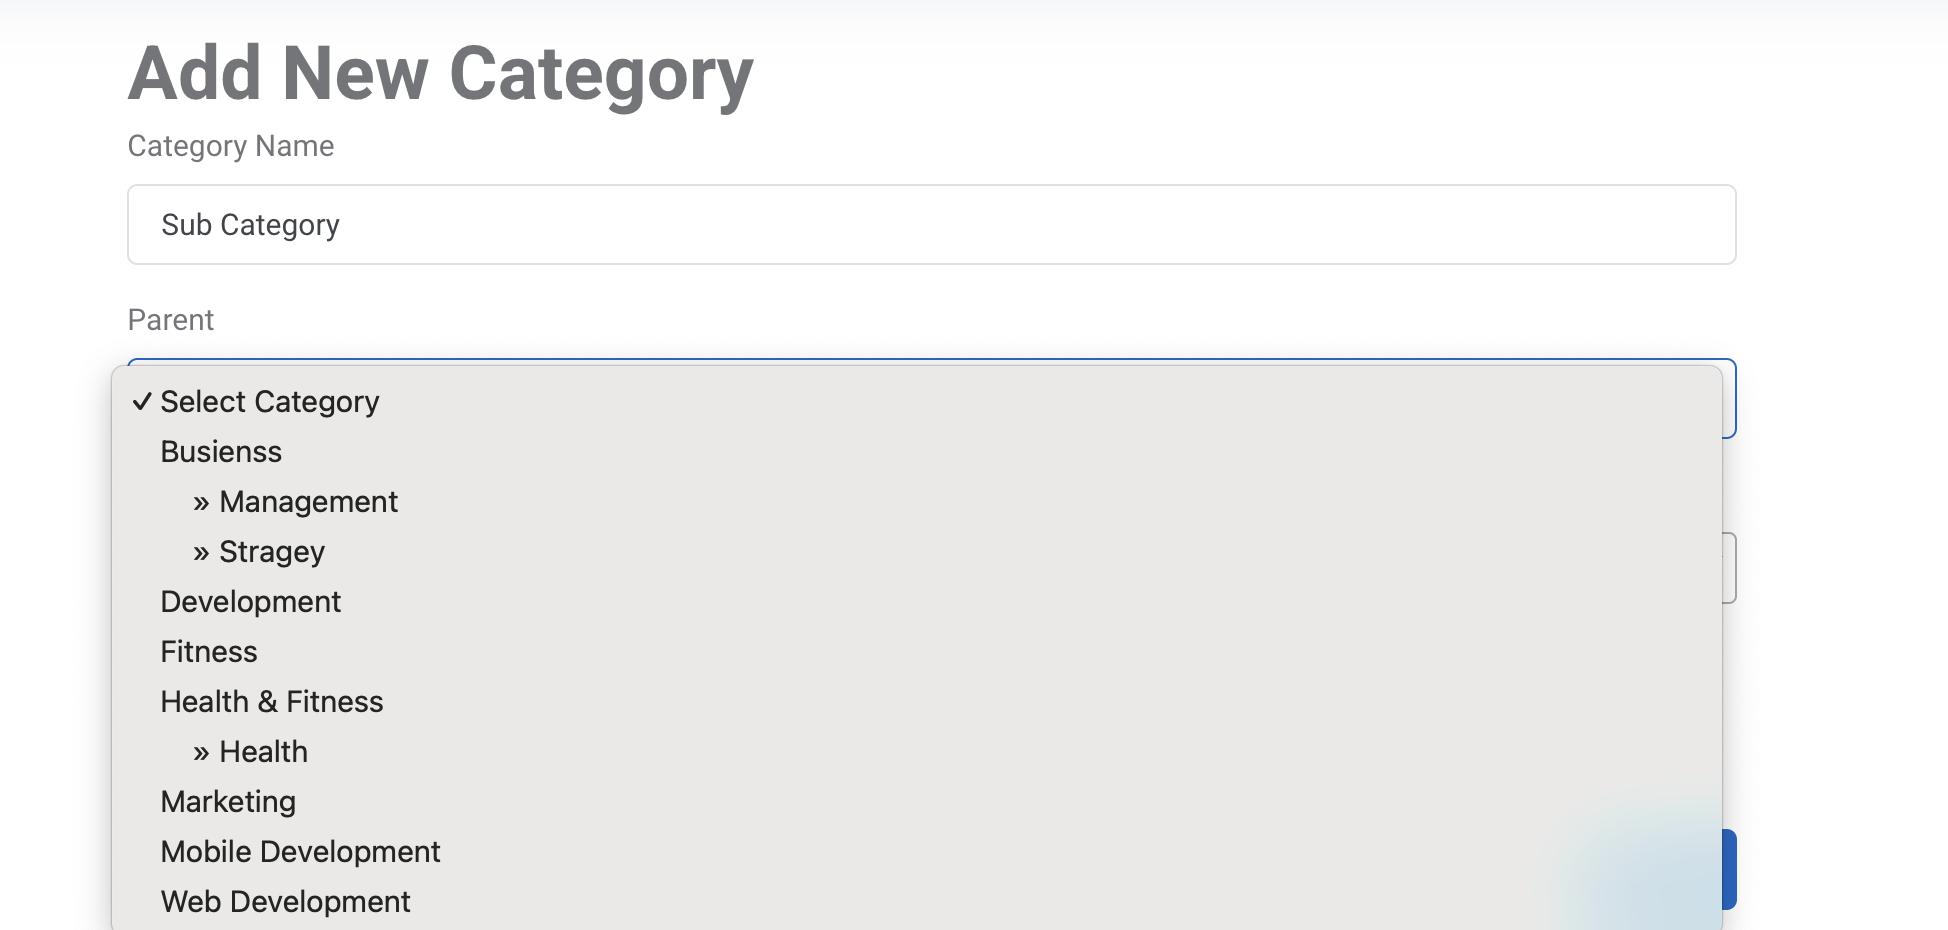
Categories
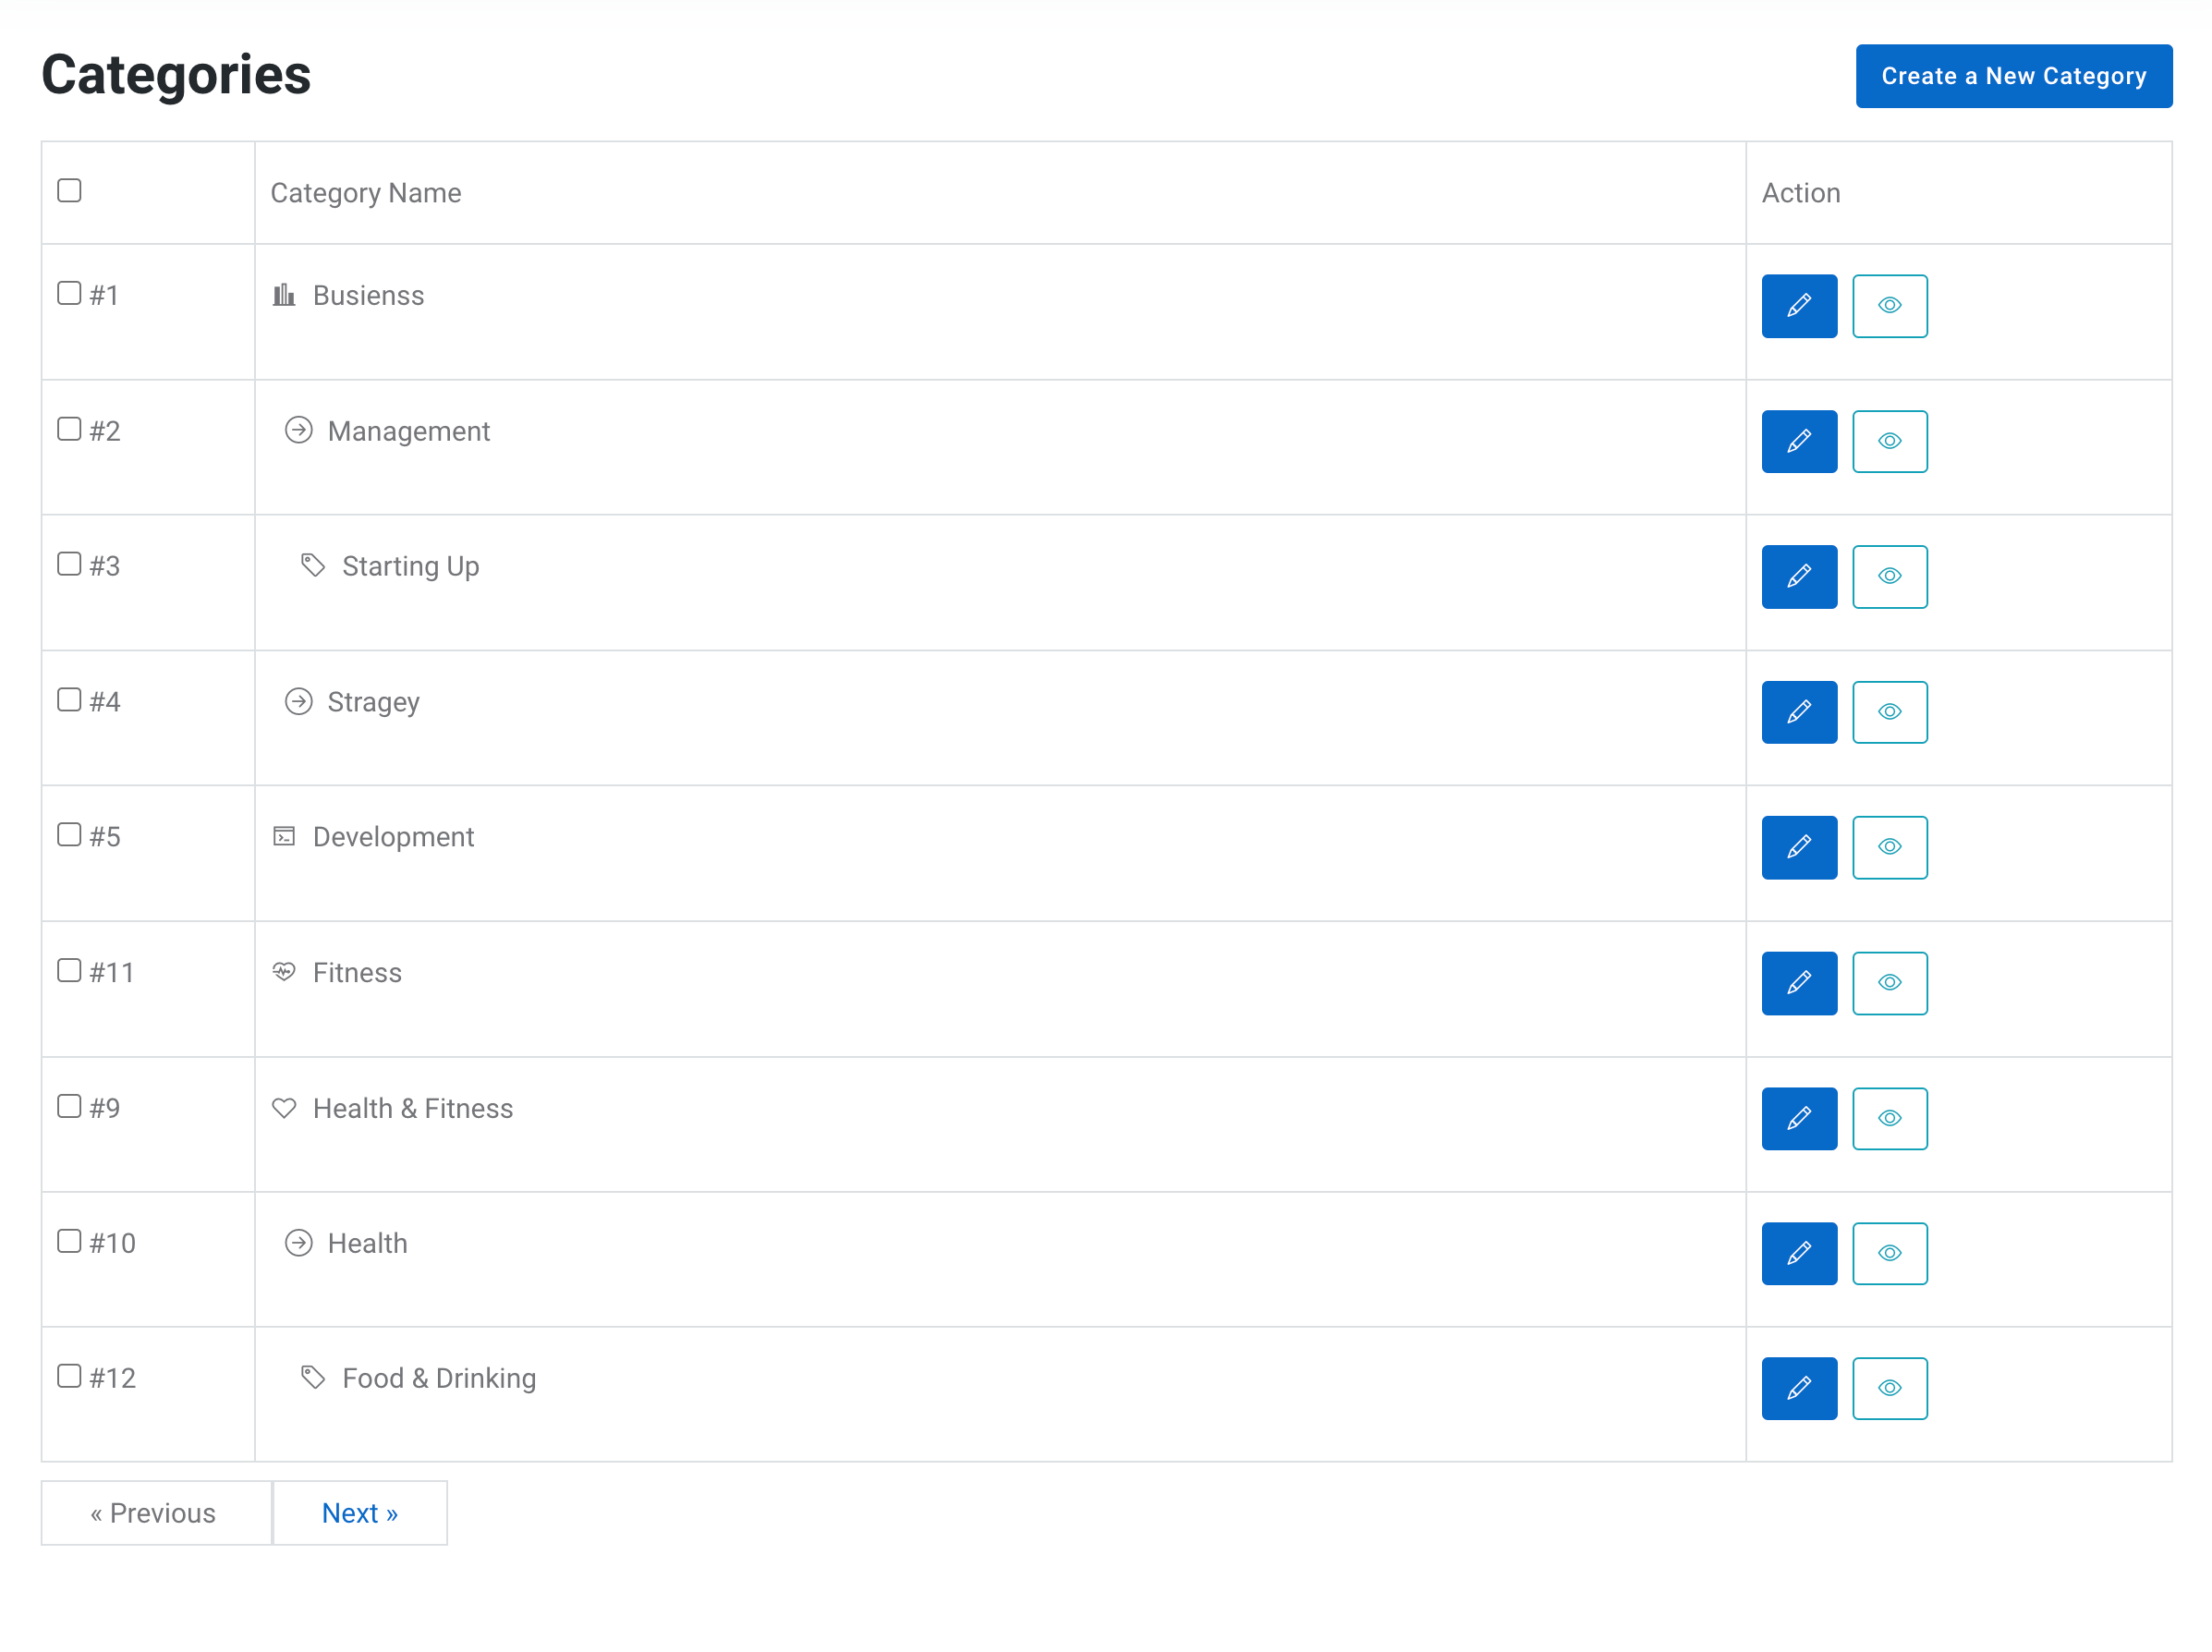
Creating categories help courses to be easily found and categorize. Category is required while creating a course.
You must have parent category and child category. FIRST create the parent category then create a sub categoy, while creating assign it to parent category.
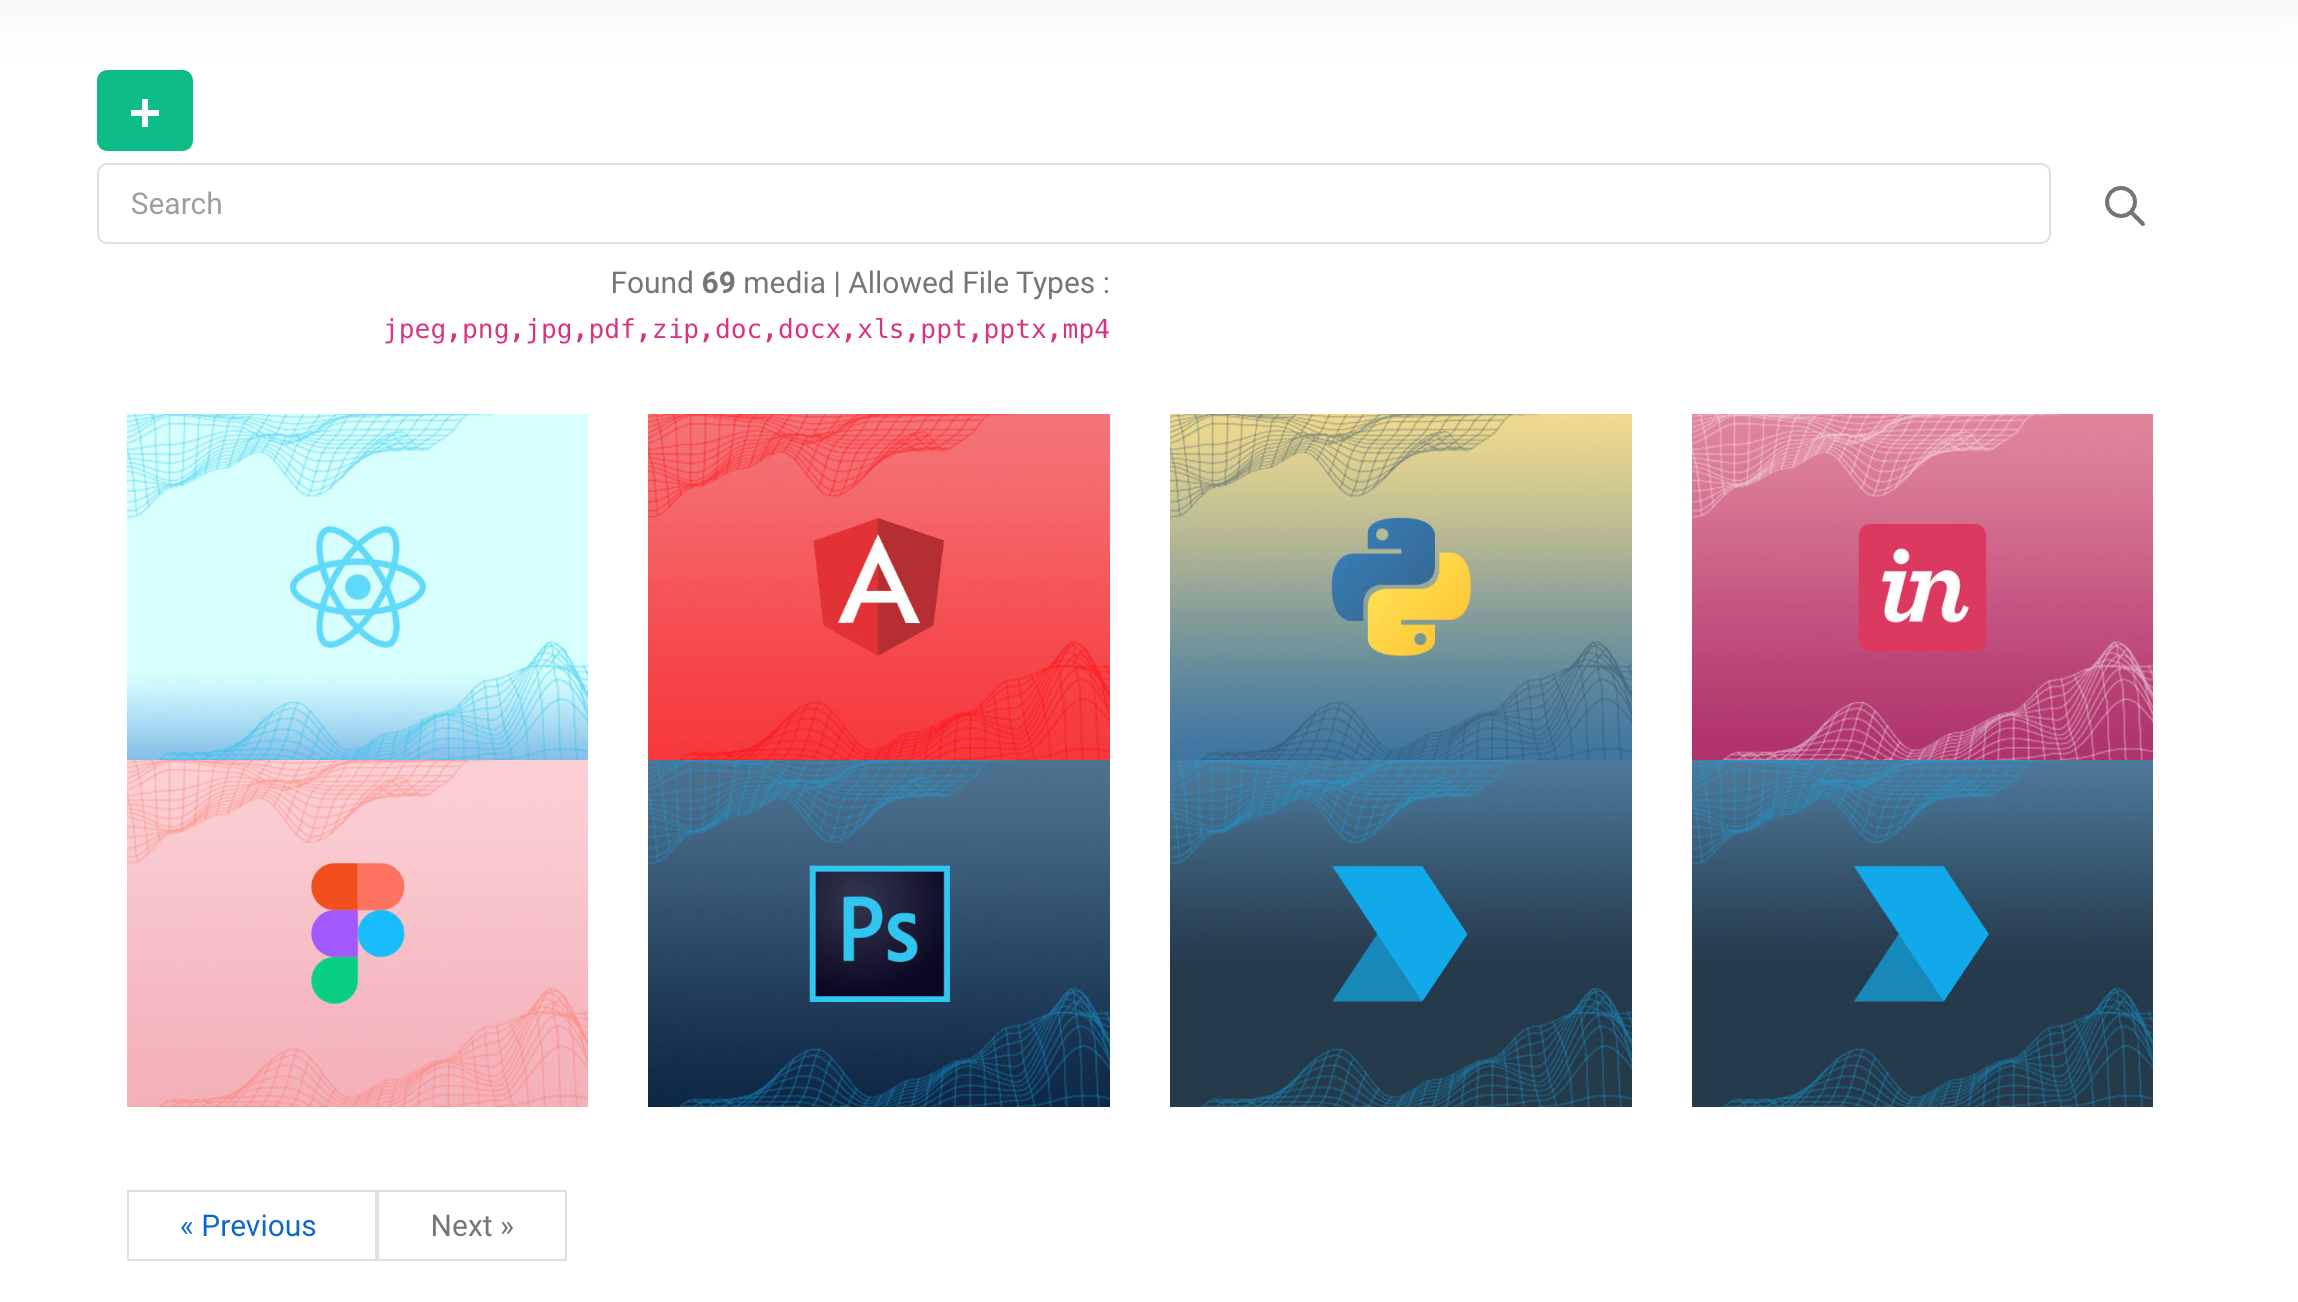
Media
Medias can easily be managed on media manager. You can upload or delete different types medias.
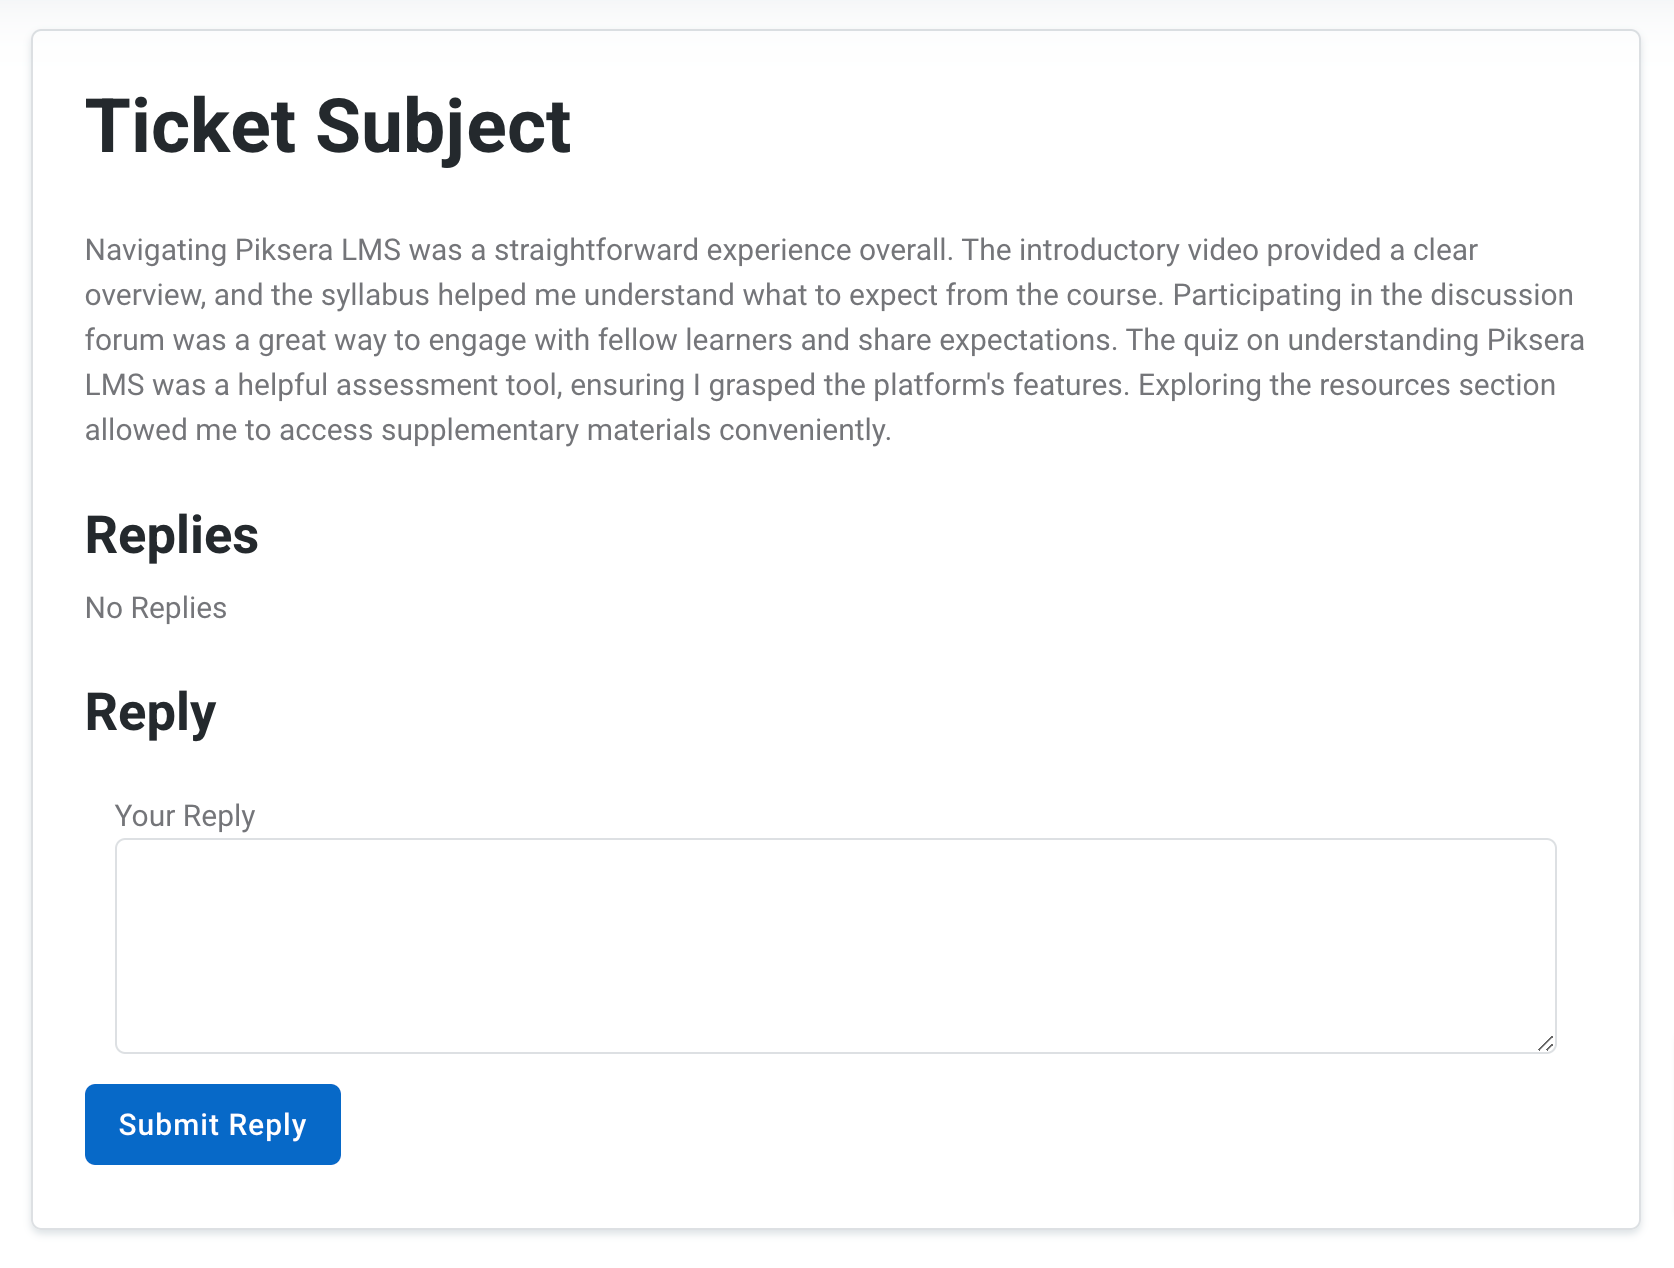
Tickets
Ticket system is between Instructors and Admin. Instructors can open a ticket when they need help from the Admin. Students on the other hand must contact through contact page.
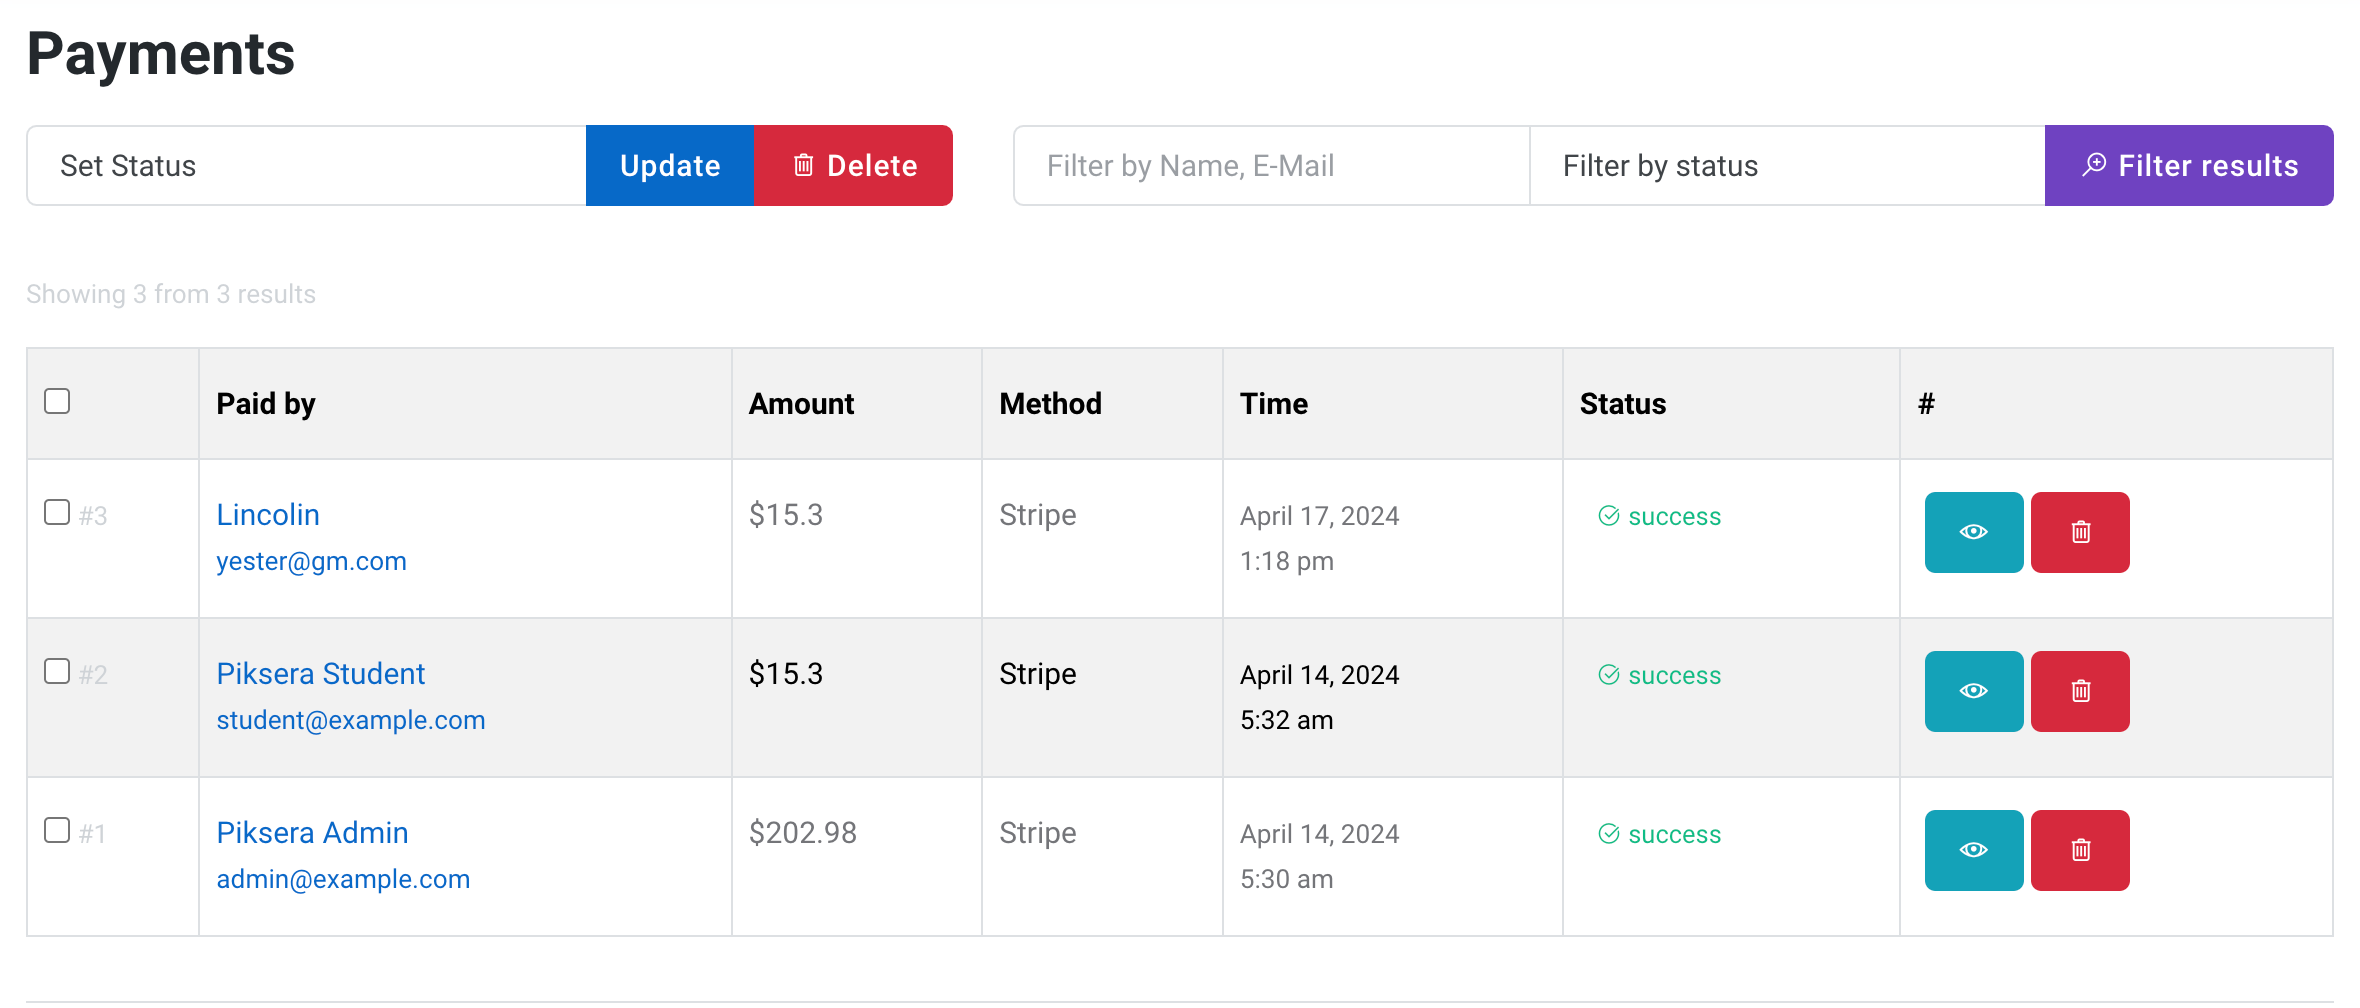
Payments
You have two ways to earn from your LMS. through the course purchases and subscription purhcases. Both are directed to the Payments but you can still view subcription payments separately. You can set status to different payments.
Withdraw
Instructors can request a withdraw and the withdraw settings can be found on admin settings.
Admin Settings
General Settings
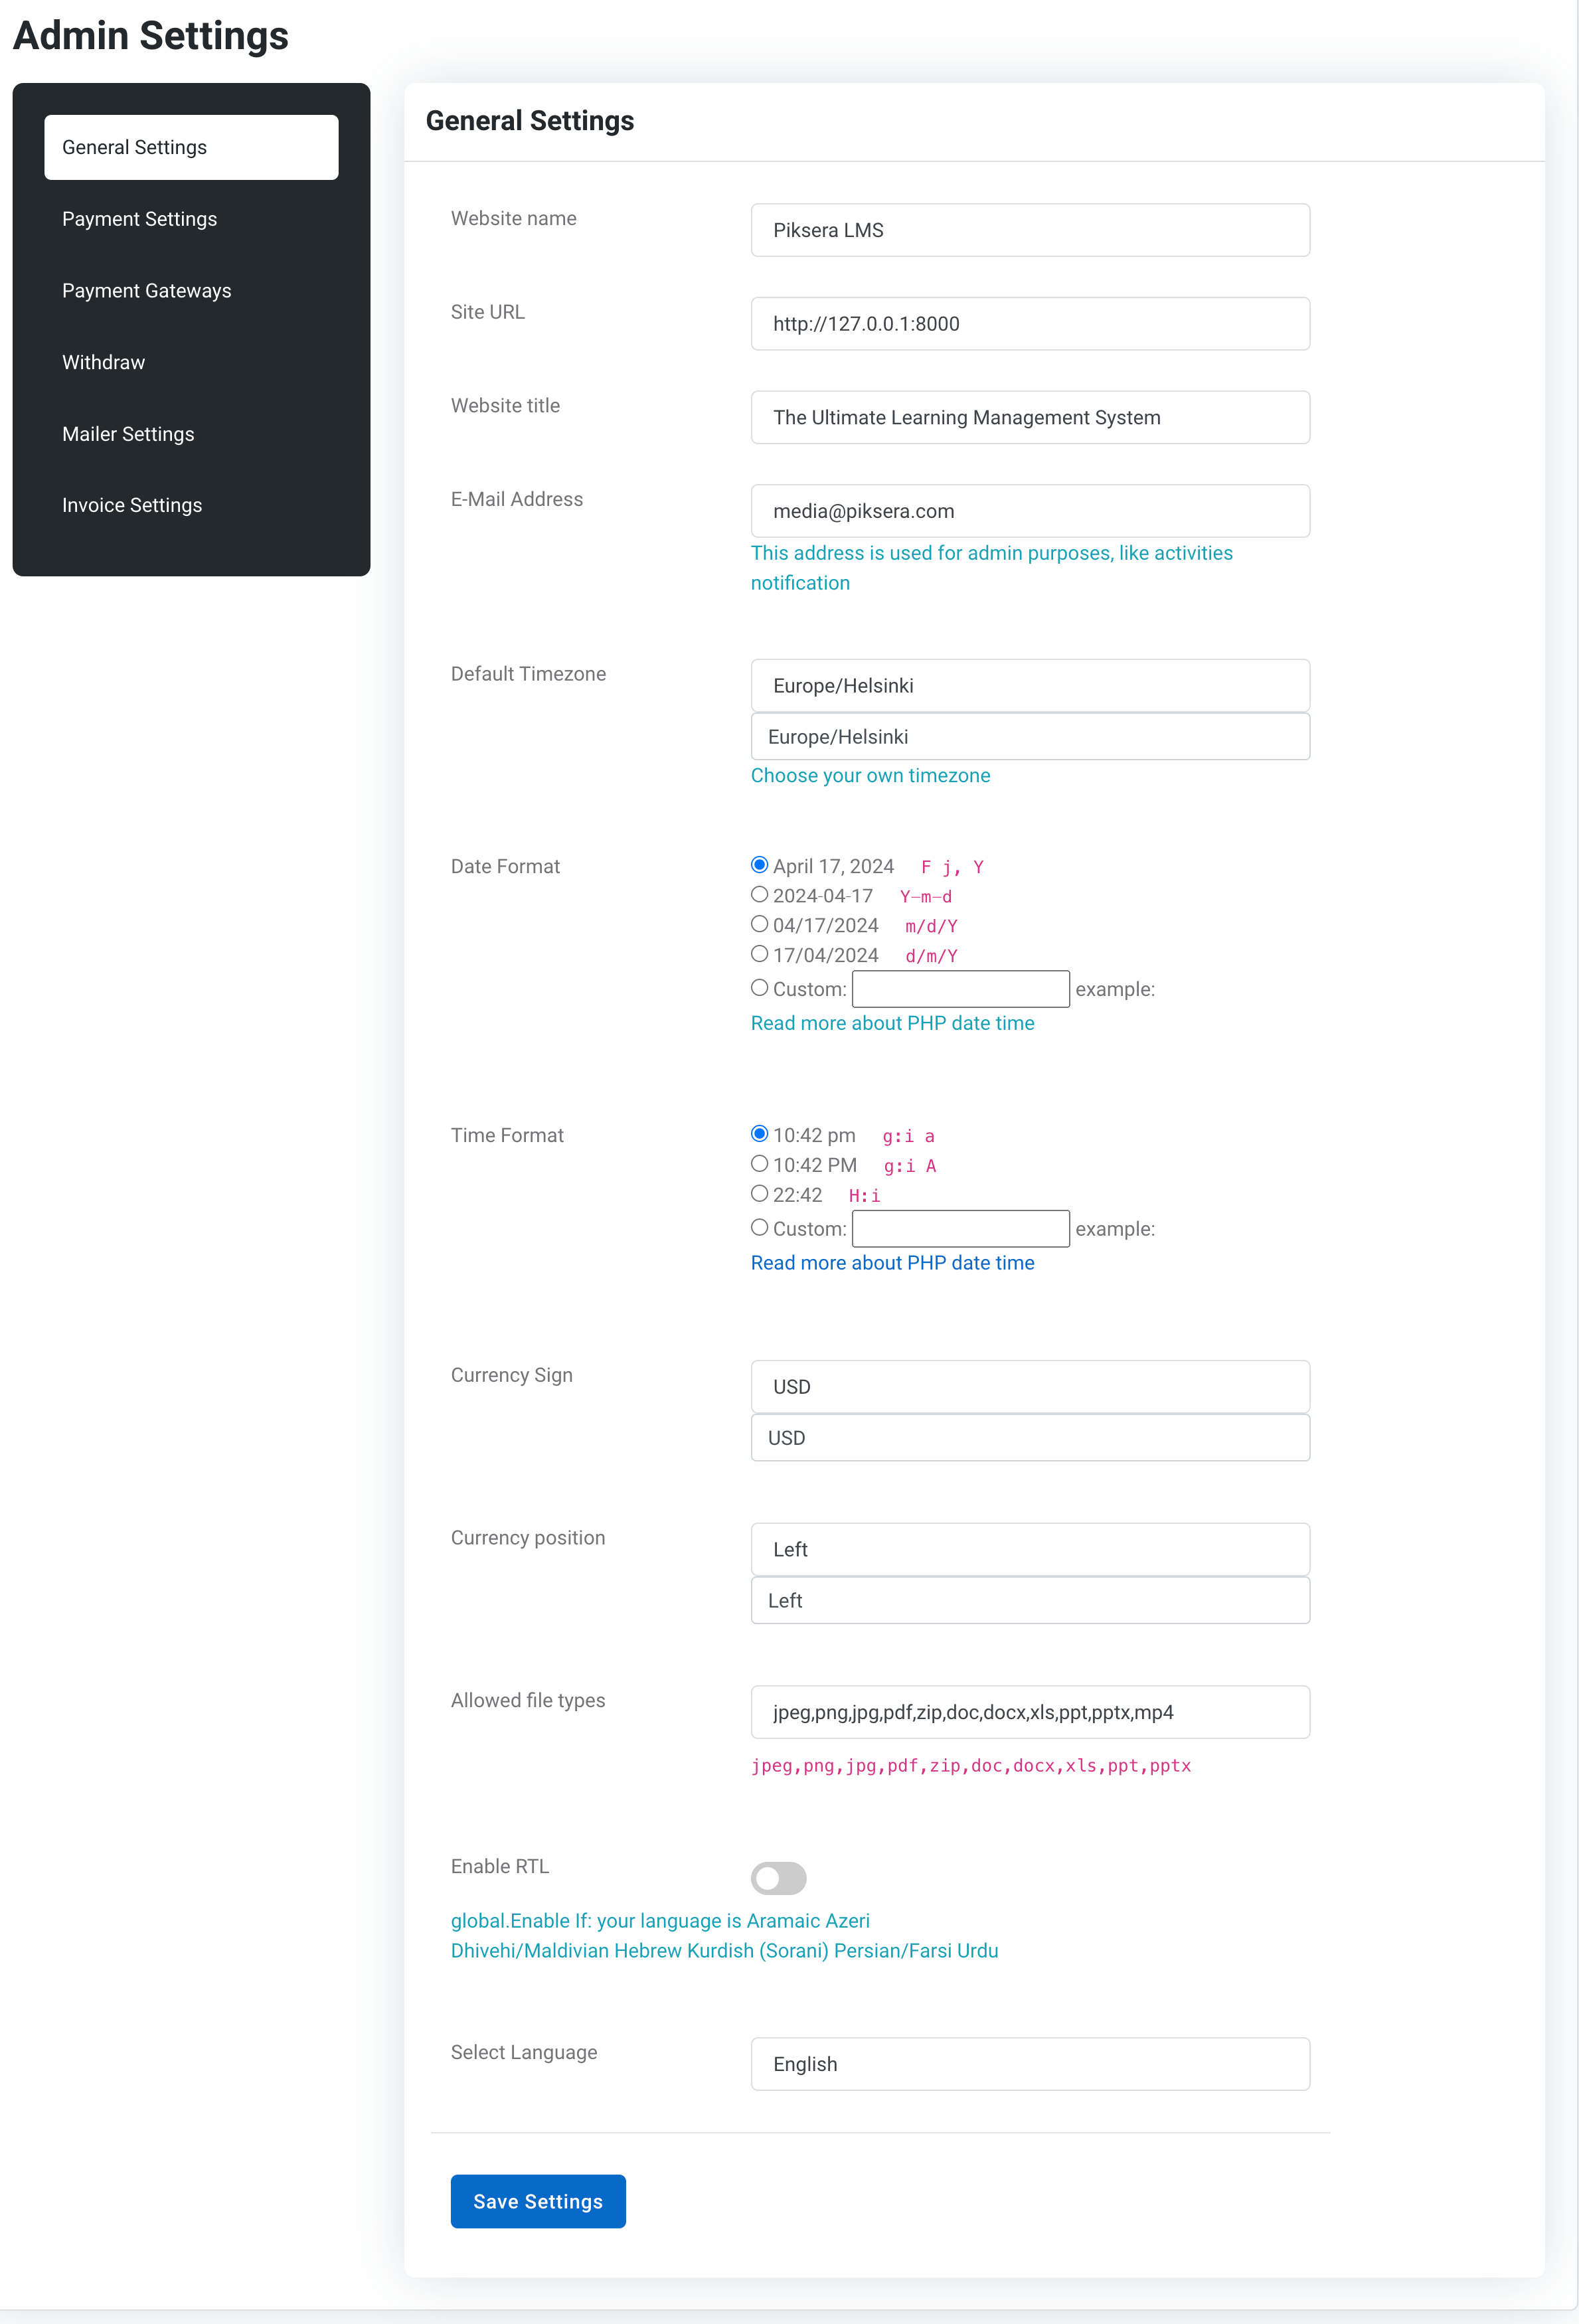
Website name & title
Give the LMS a website name to shine on SEO and everywhere. The system is optimized to support your website title all places.
Site URL
Site URL is not meant to be changed as you must move the files to the domain's directory through file manager.
Email Address
This address is used for admin purposes, like activities notification
Default Timezone
These timezomes are important on posts, pages, courses and so. Set your local timezone by choosing the capital city of your country.
Currency Sign & Position
Choose the currency of your country and the position. It will be displayed around the services and products.
Allowed file types
Write the files types your system allows users to upload. You can limit to any files you wanted. File manager won't then allow to be uploaded if the file type is not on the list.
Enable RTL
Enable RTL: your language is Aramaic Azeri Dhivehi/Maldivian Hebrew Kurdish (Sorani) Persian/Farsi Urdu
Select Default Language
Select the default language for your LMS. This will be the default on publish and admin.
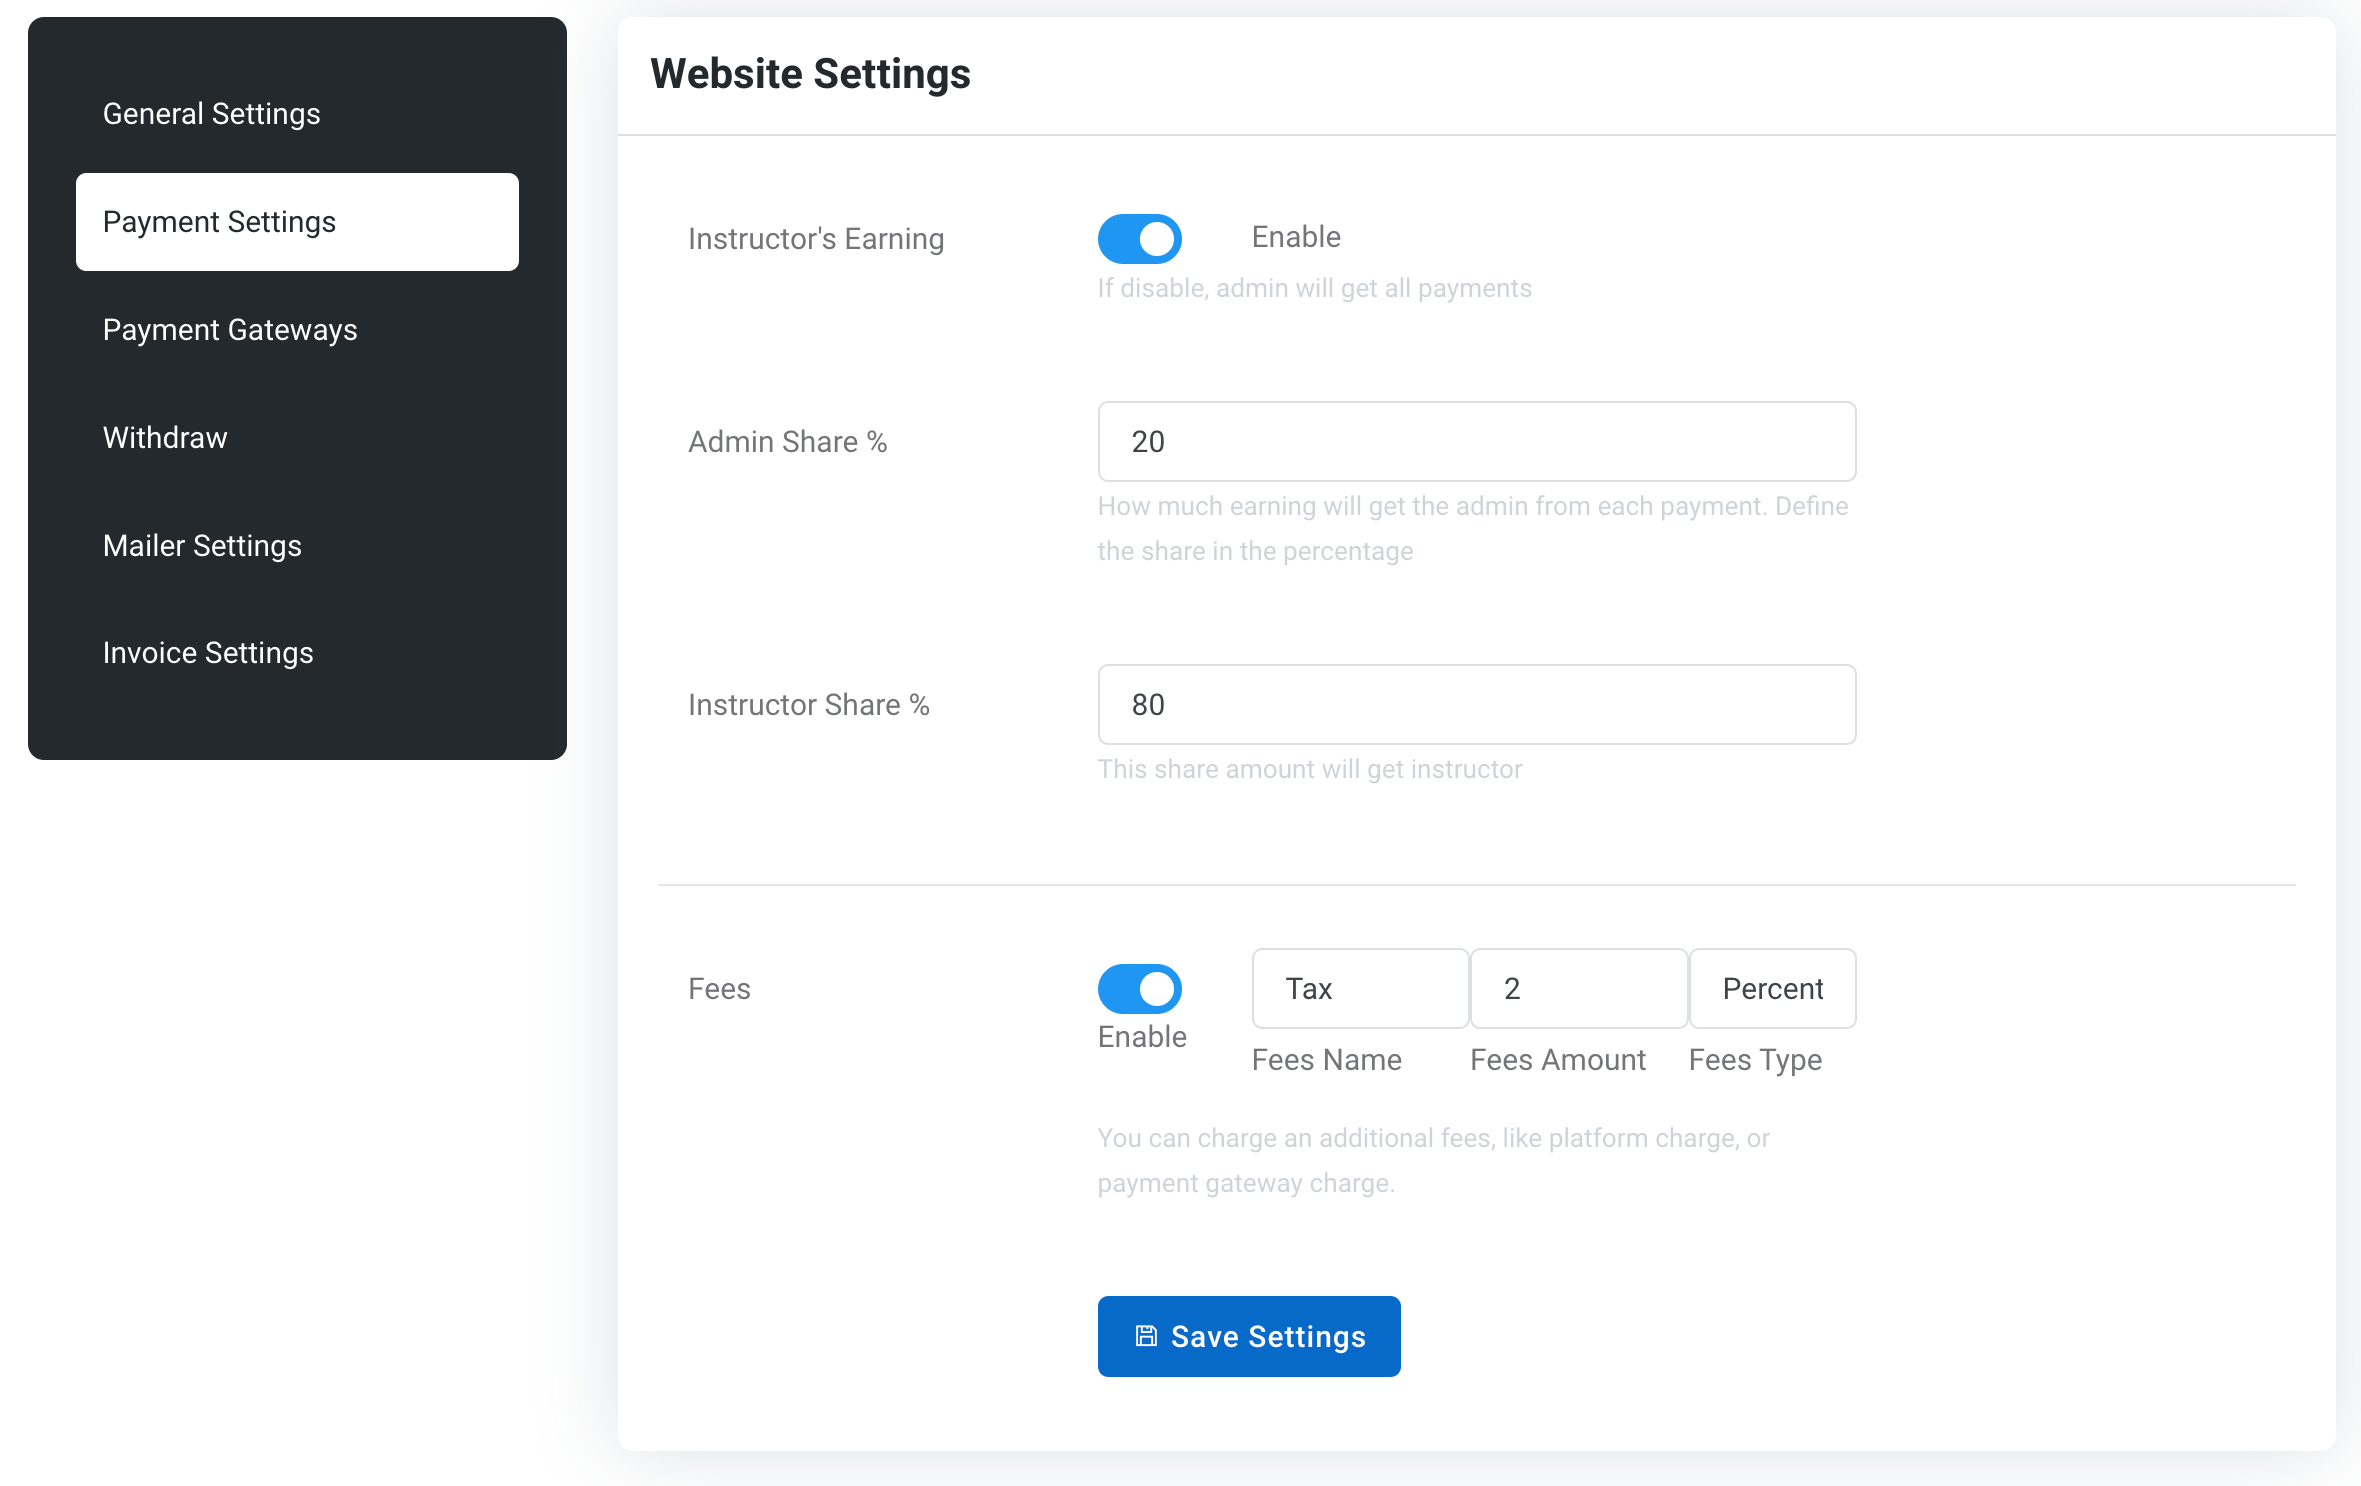
Payment Settings
Payment settings is where you can set the instructor share, the admin share, and the fees. The system will calculate the shares automatically and let instructors know their earnings when a student purchases their course.
Fees go on the checkout page, and each student will pay the fees when purchasing the subscription or courses.
Payment Gateways
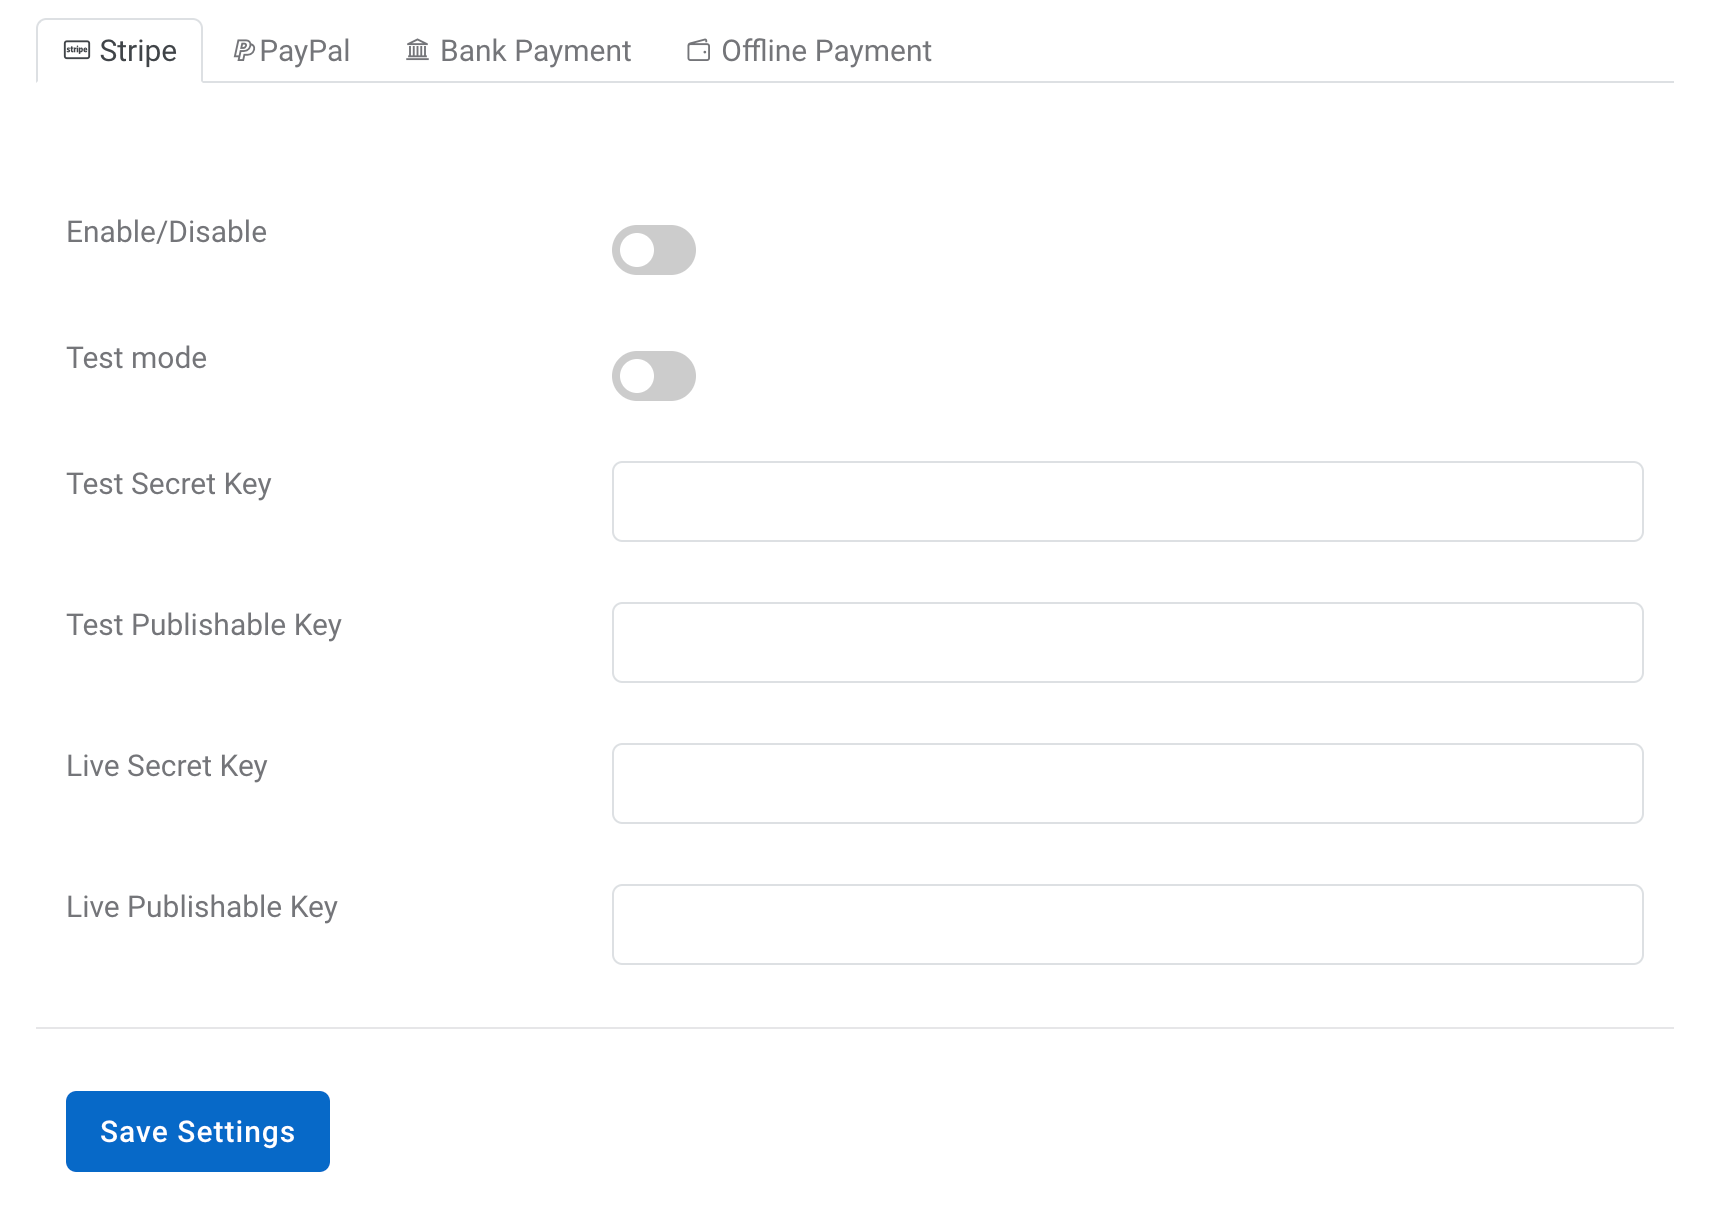
Stripe
Setting up Stripe payment has been recently checked and works amazingly and easily. You can test it using the test keys and later switch to publish keys. Read the Stripe Documentation for more information.
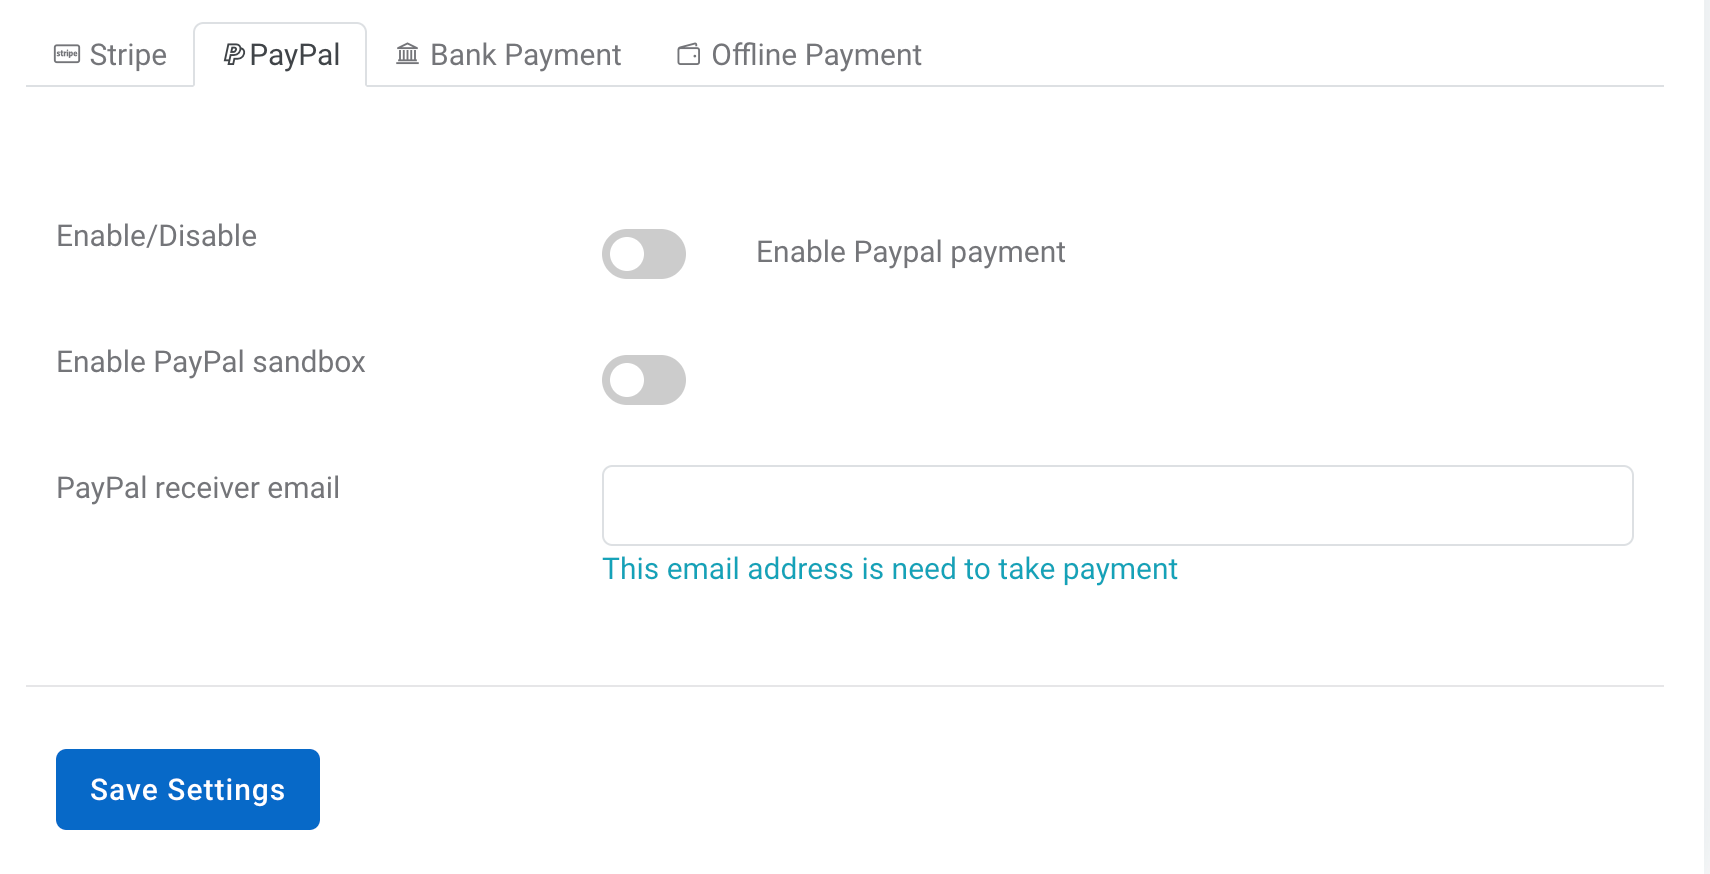
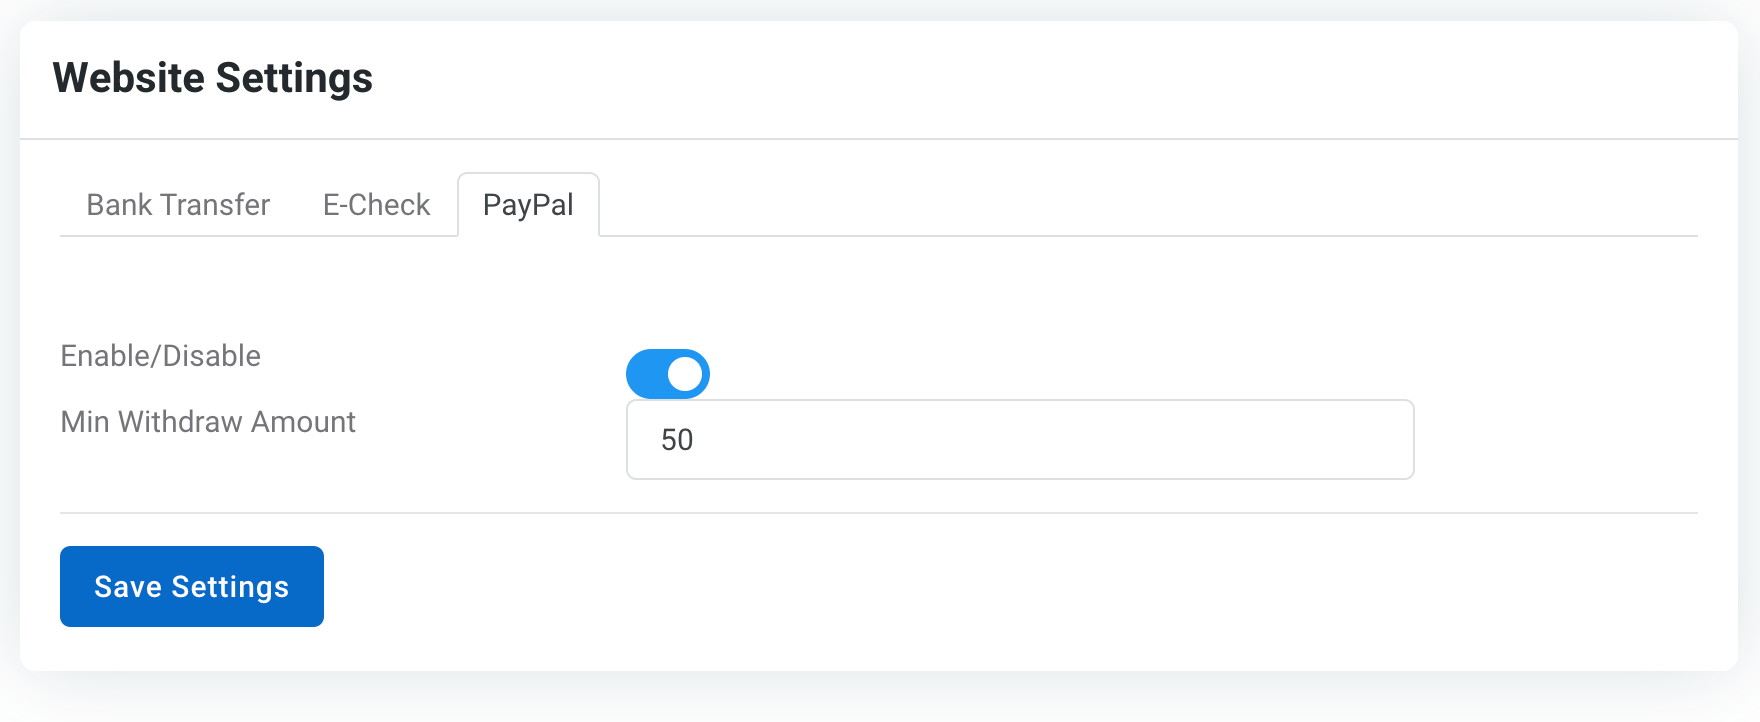
PayPal
Enabling PayPal payments allows your users to make purchases conveniently. To set up PayPal, follow these steps:
- Log in to your admin dashboard.
- Navigate to the payment settings section.
- Locate the PayPal option and toggle it on.
- Enter the email address associated with your PayPal account as the PayPal receiver email.
Once enabled, users will be able to choose PayPal as a payment option during checkout.
When a user makes a purchase, the specified PayPal email will receive the payment directly. This ensures a seamless transaction process.
Remember to use a valid PayPal email address to ensure all payments are received correctly.
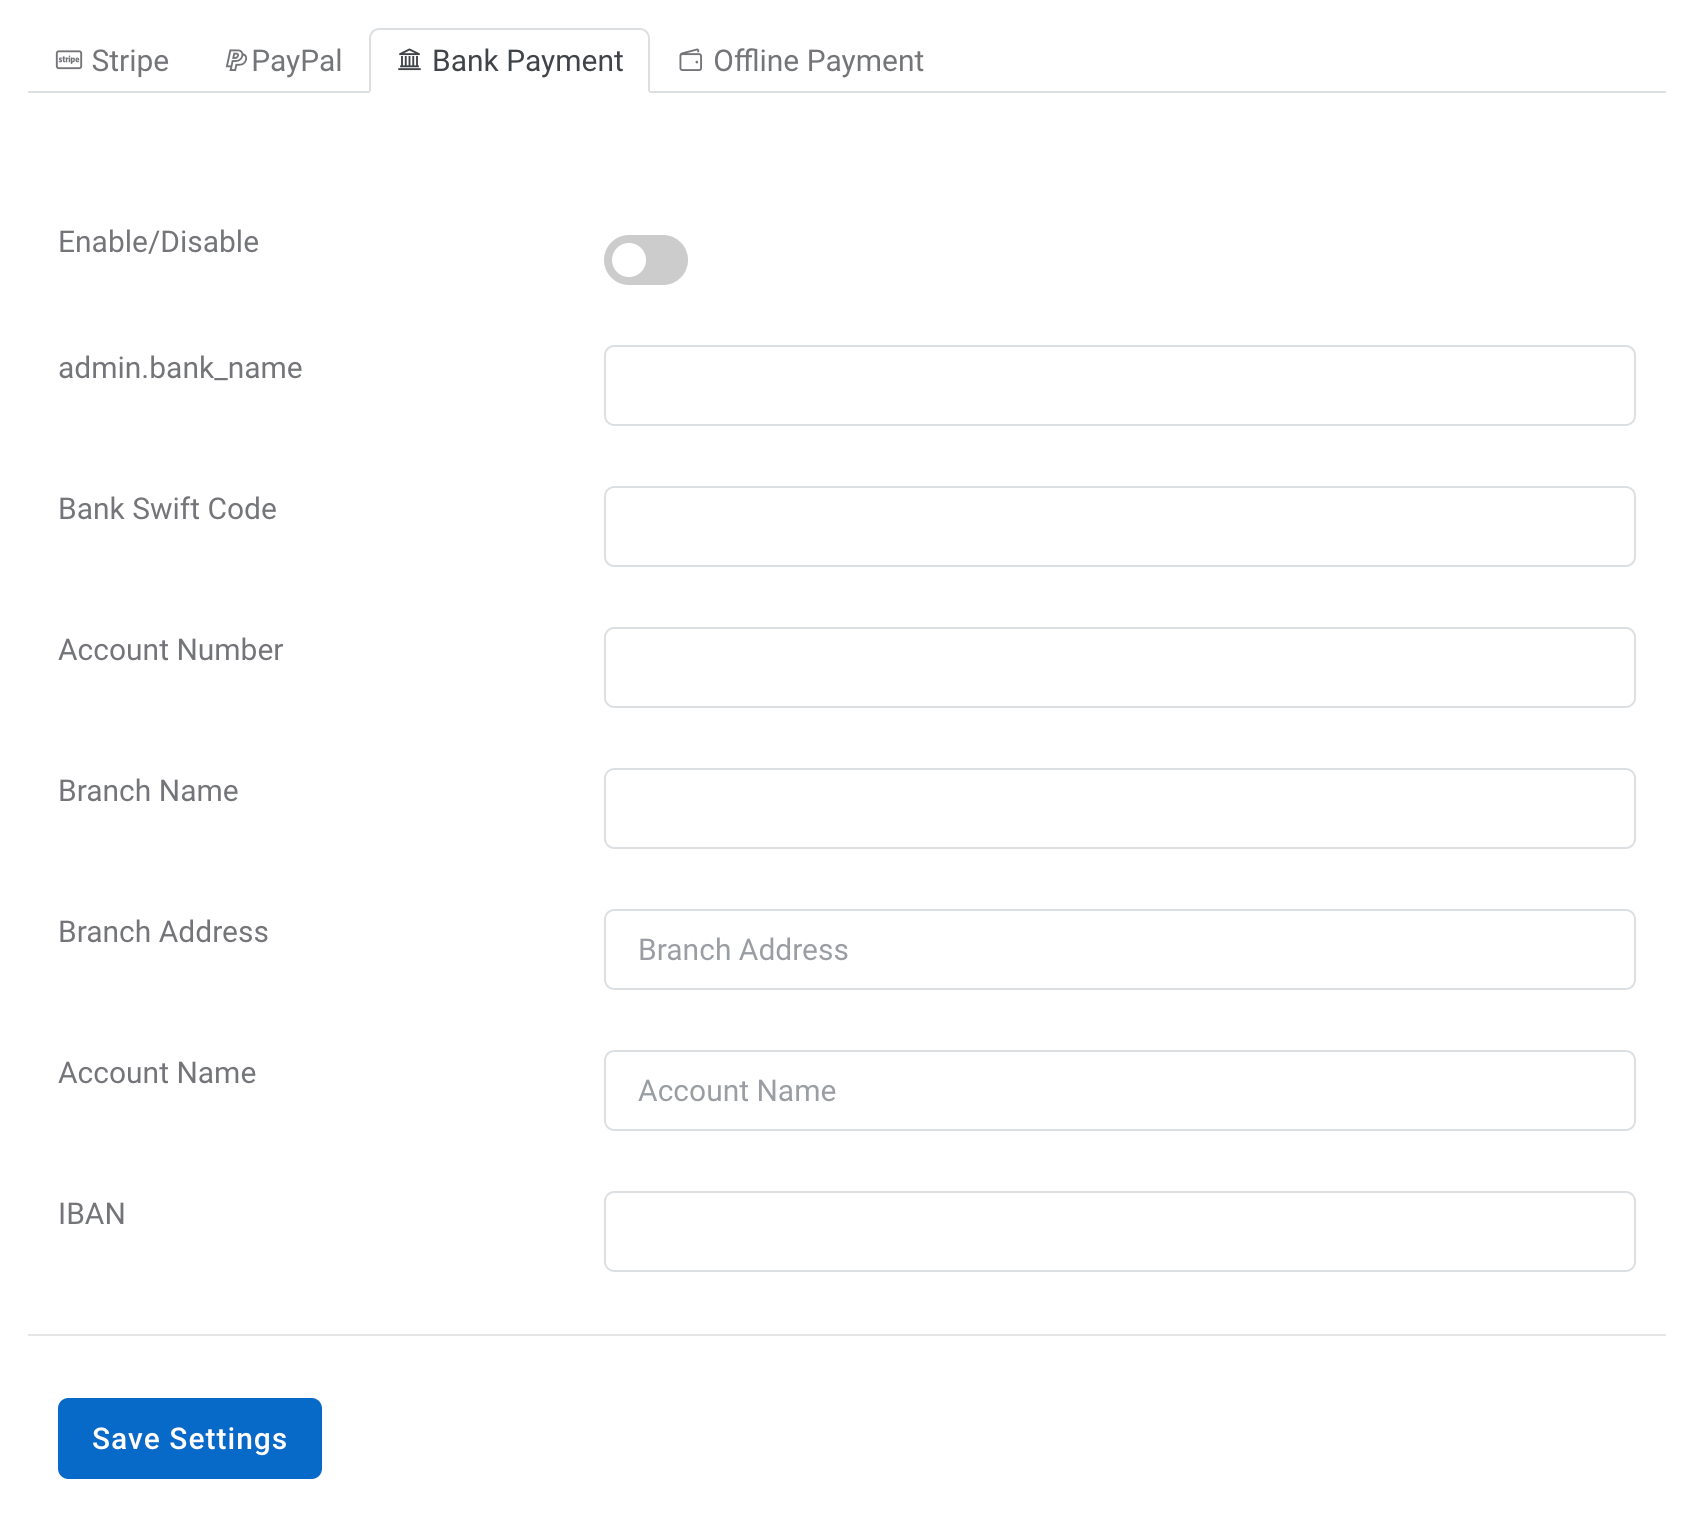
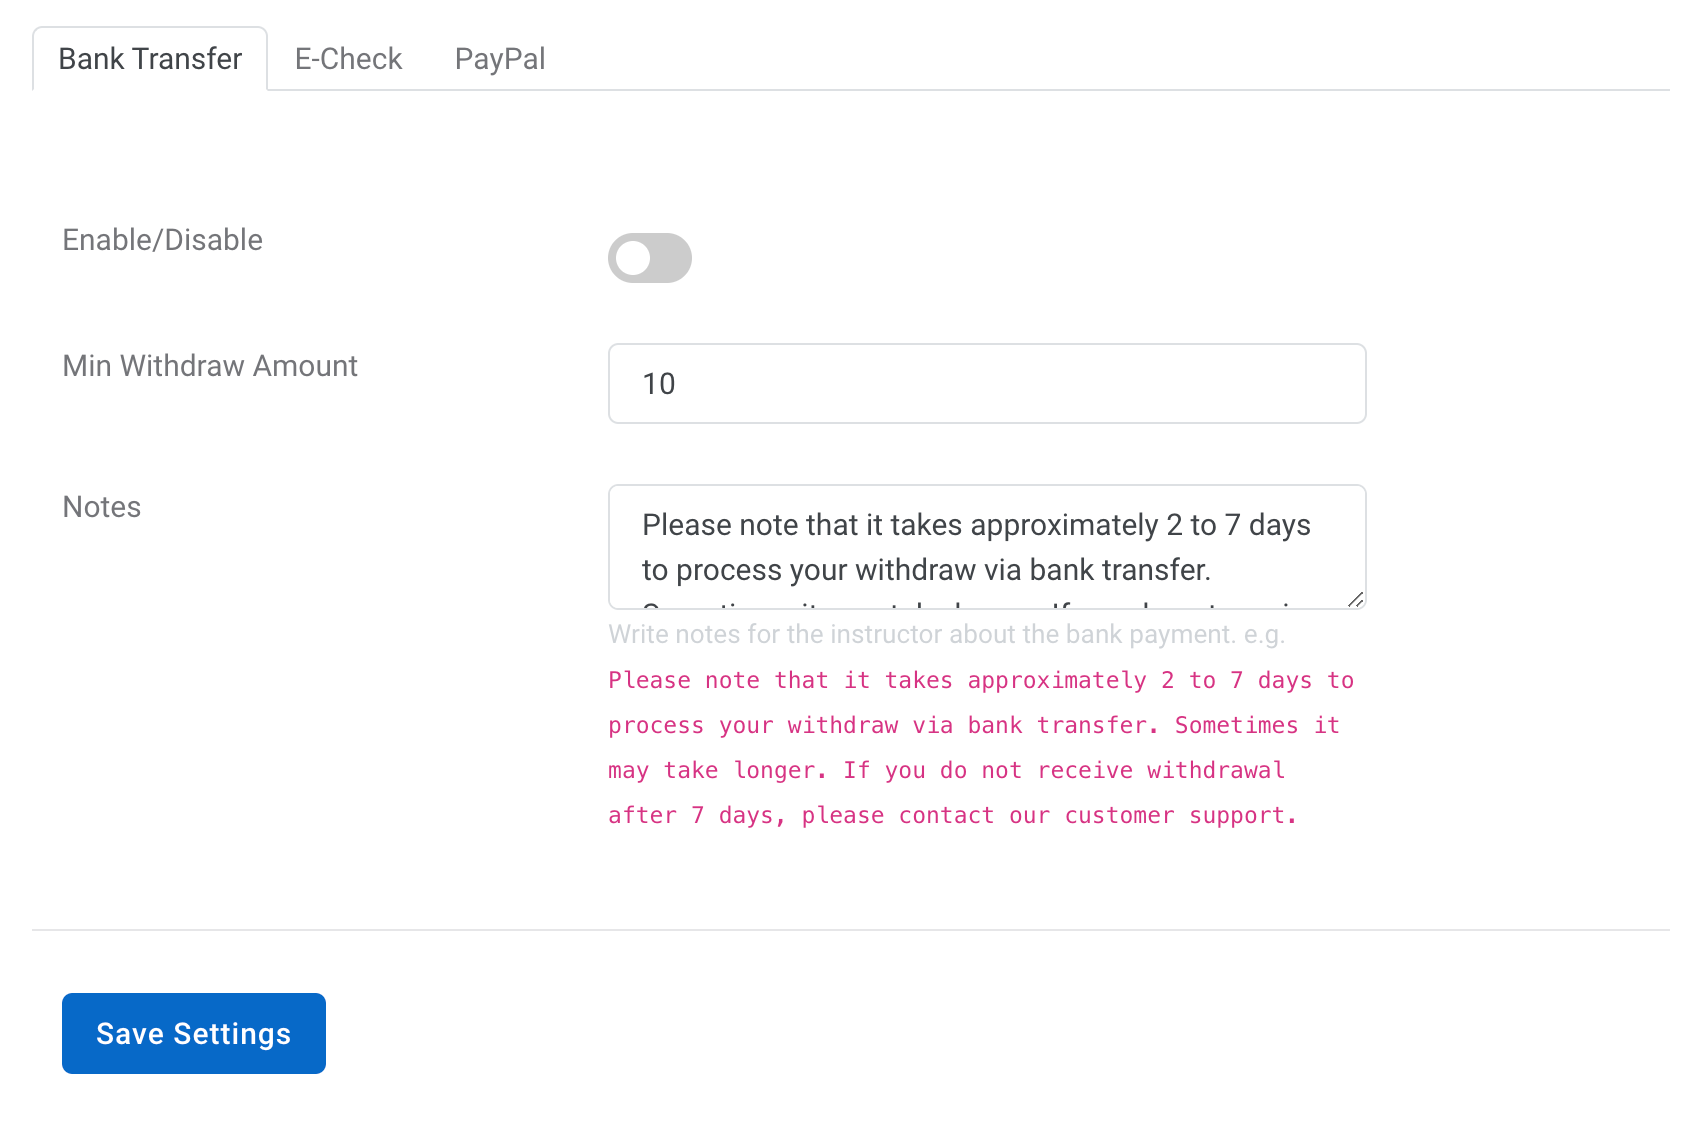
Bank Transfer
Bank transfer allows users to pay directly from their bank accounts to your business bank account.
To enable bank transfer payments, follow these steps:
- Enable the Bank Transfer option.
- Fill out the form with the following details:
- Bank Name
- Bank Swift Code
- Account Number
- Branch Name
- Branch Address
- Account Name
- IBAN
These details will be displayed to users who choose to pay via bank transfer. Users will use this information to make the payment. After they've made the payment, they need to mark the payment as "Paid With Bank Transfer."
Once you receive the payment, you must manually update the payment status as the system will initially set it to "On Hold" until you make the change.
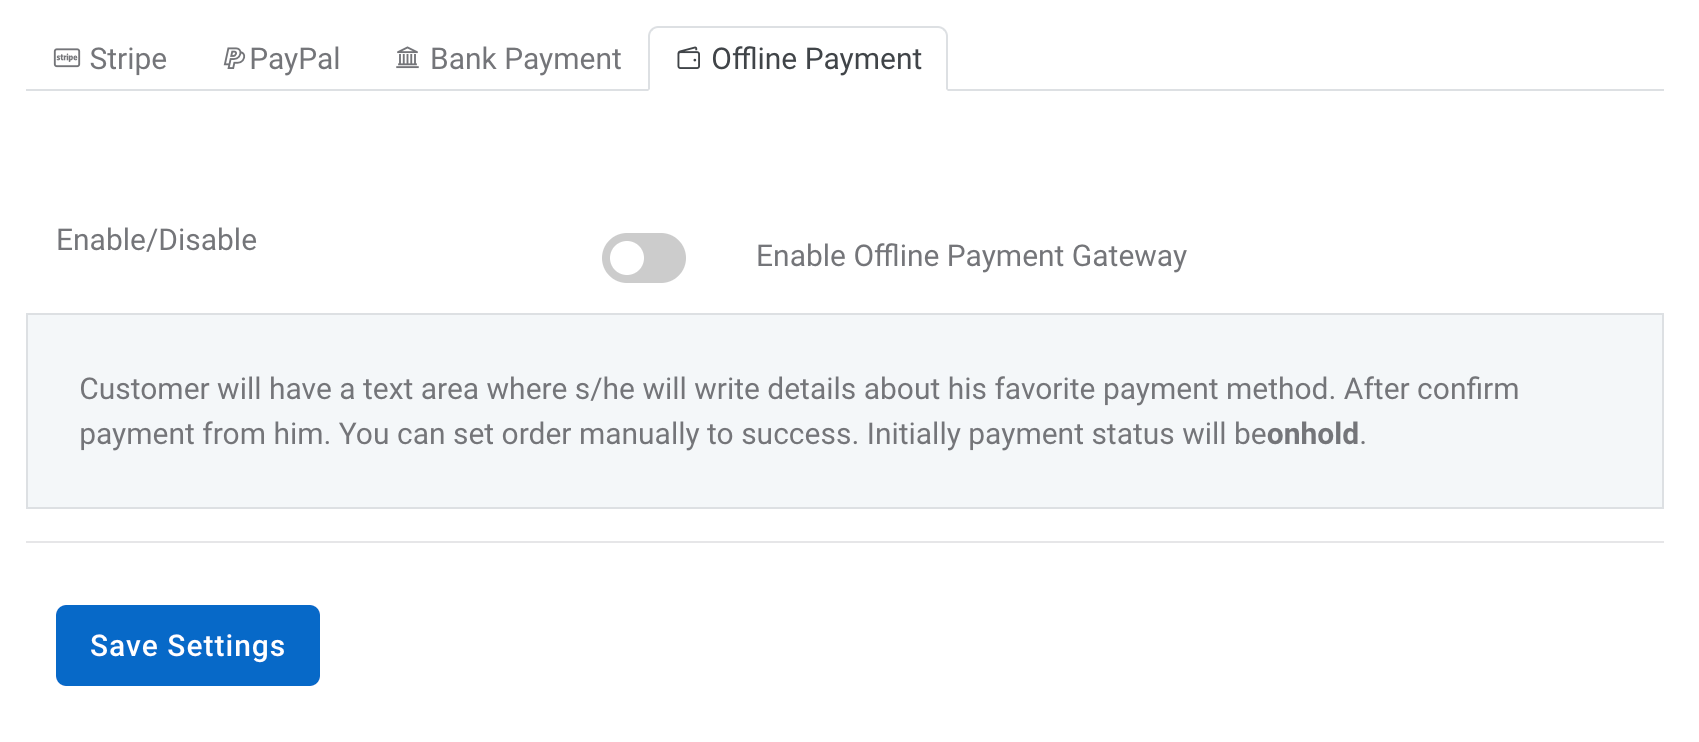
Offline Payment
Offline Payment is a flexible payment option that allows users to pay using various local methods such as cash, mobile payments, and more. Users select "I paid offline" during checkout.
After selecting this option, the system will create a payment but will place it on hold. Users will need to wait until an admin changes the status from "On Hold" to one of the following: "Successful," "Pending," "Failed," or "Canceled."
Customer will have a text area where s/he will write details about their favorite payment method. After confirm payment from him. You can set order manually to success. Initially payment status will beonhold.
Communication between users making payments and admins receiving them can occur through the contact page or email.
Withdraw Settings
Bank Transfer
Instructors can request their withdraw using bank transfer account.
Paypal
The Instructors can request to be withdrawed using Paypal
E-Check
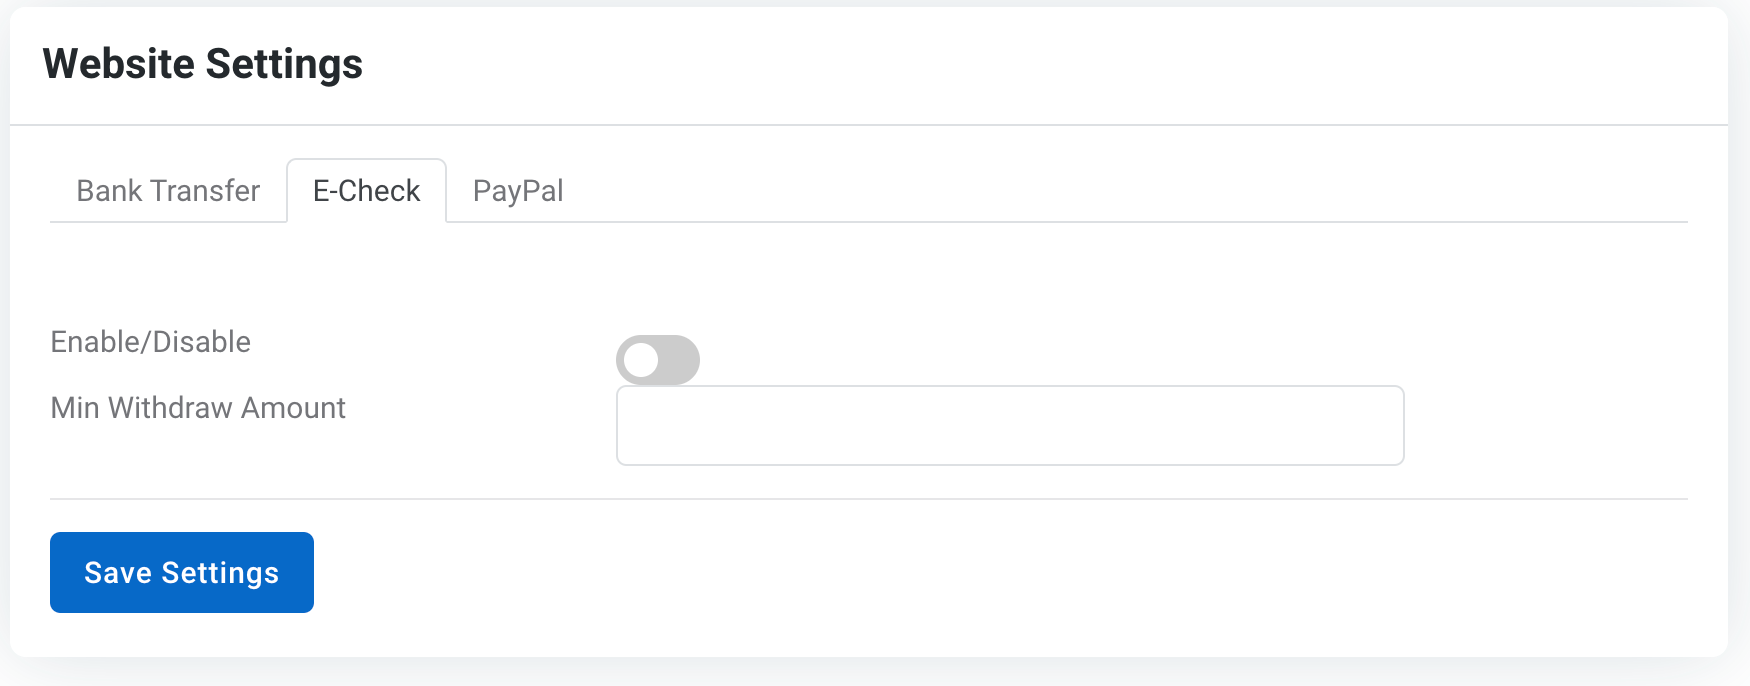
Instructors can request their withdraw using E-check.
Mailer Settings
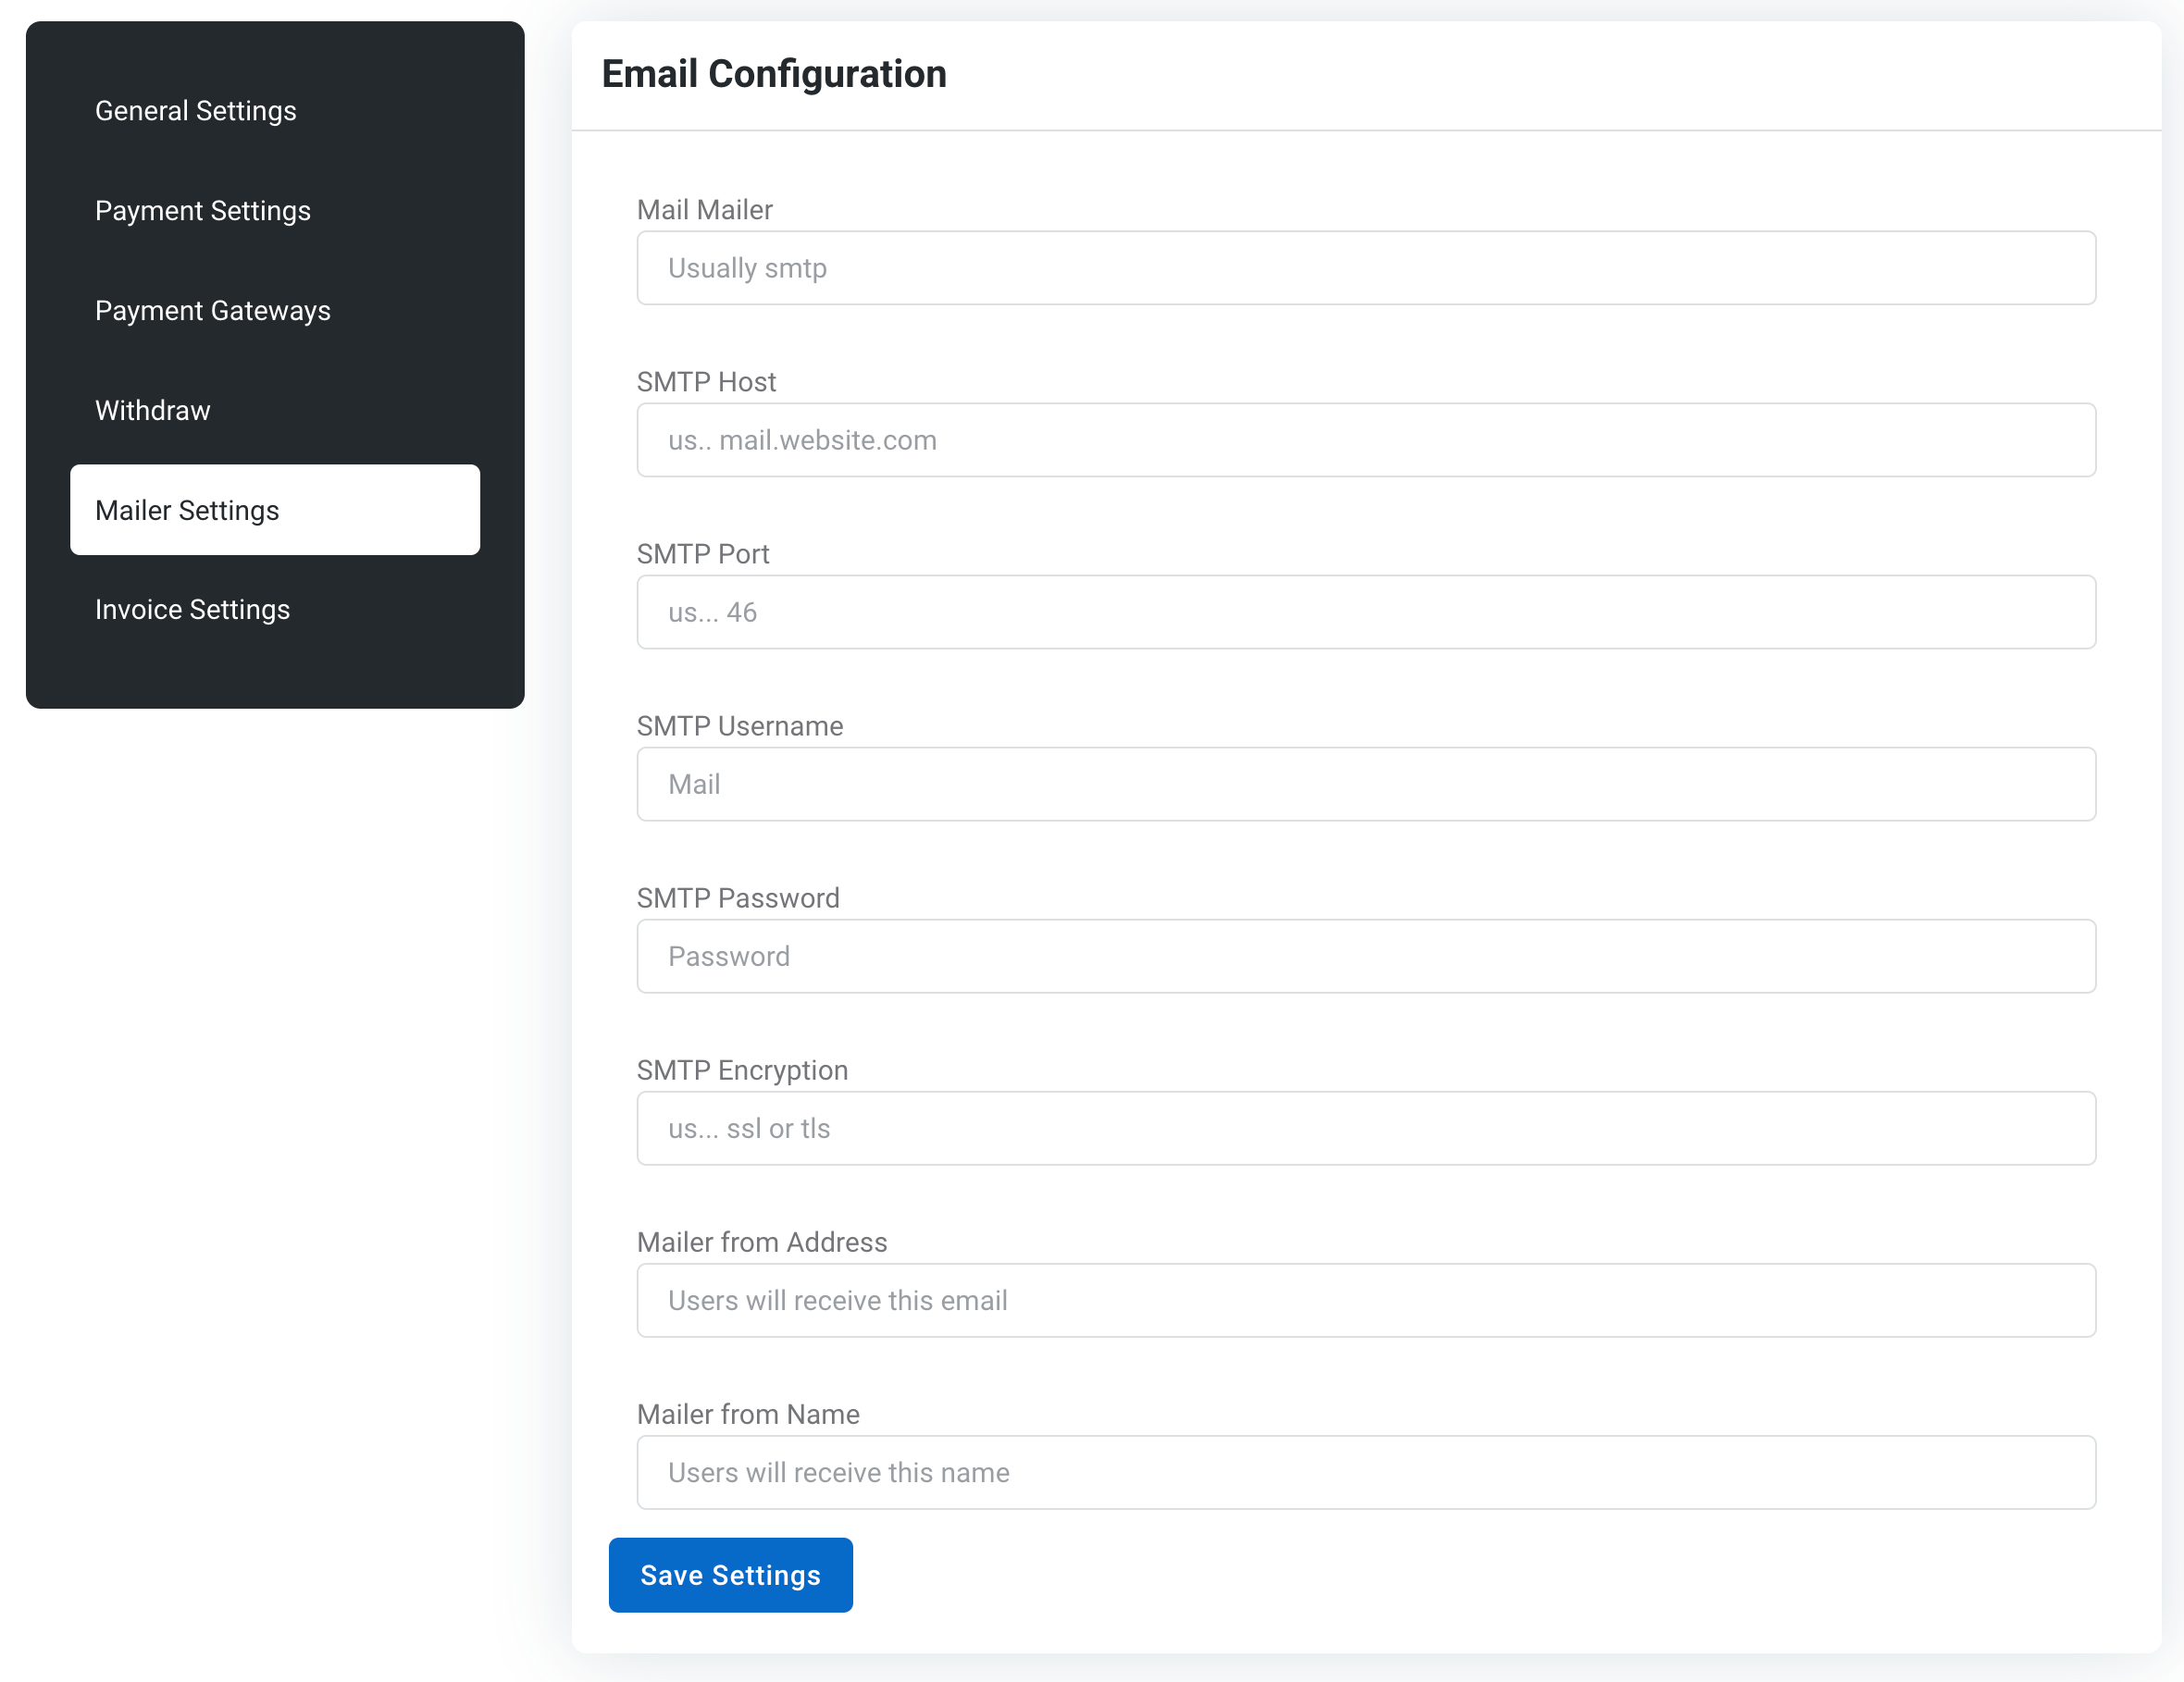
The Mailer feature facilitates tasks like password resetting for users.
To configure the Mailer settings and connect your SMTP or other mail service, follow these steps:
- Mail Mailer: Usually SMTP
- SMTP Host: Your SMTP server address, e.g., us.mail.website.com
- SMTP Port: Port number for SMTP, e.g., 46
- SMTP Username: Your mail account username
- SMTP Password: Your mail account password
- SMTP Encryption: Encryption type, e.g., SSL or TLS
- Mailer From Address: Email address users will see as the sender
- Mailer From Name: Name users will see as the sender
Once configured, users will receive emails from the specified address and name.
Extend The System with Plugins
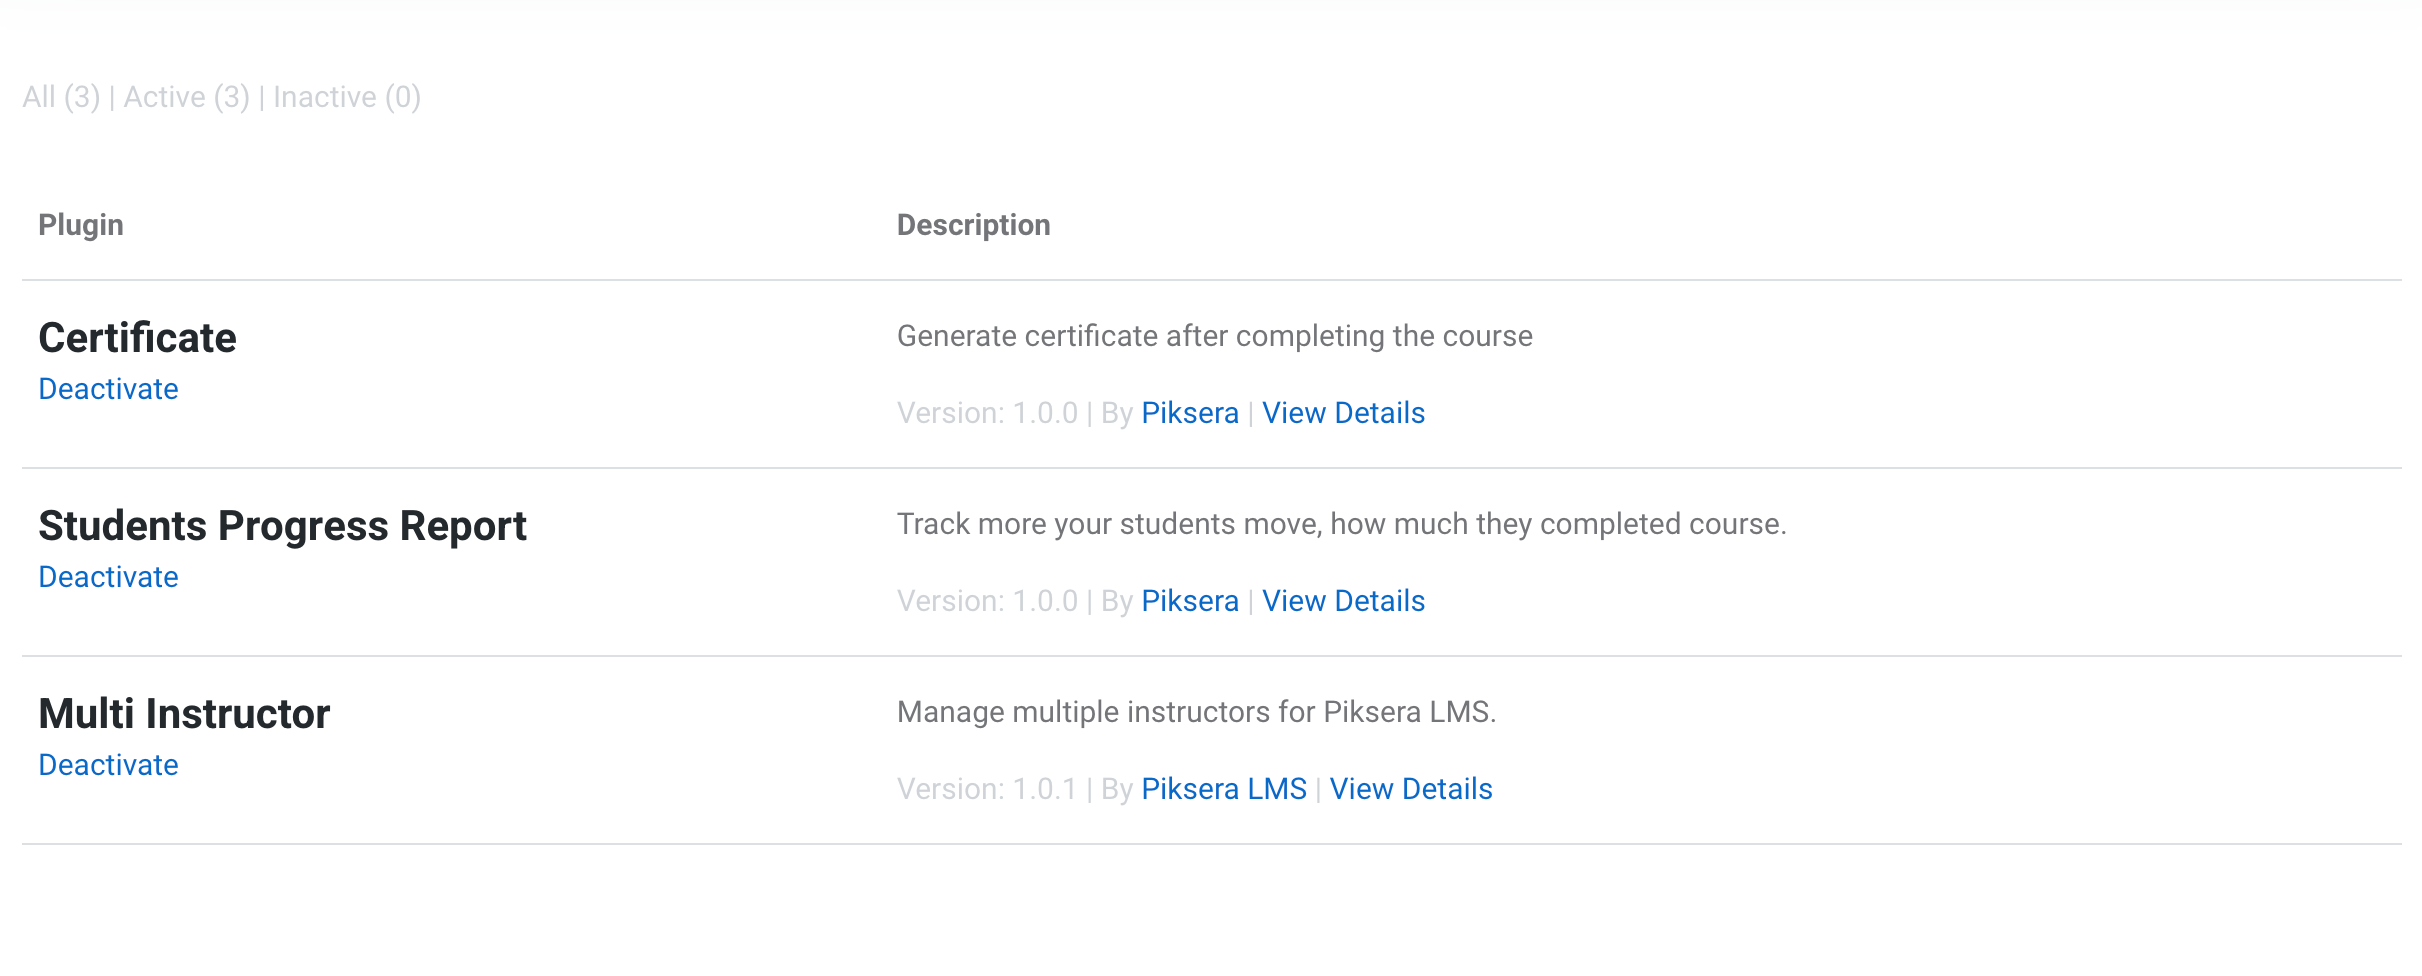
Using Piksera LMS plugins extends the LMS system with Certificate, Students progress and MultiInstructors plugin.
Certificate
Activate Certficate plugin on /admin/plugins.
Open Certificate settings from the sidebar menu /plugins.
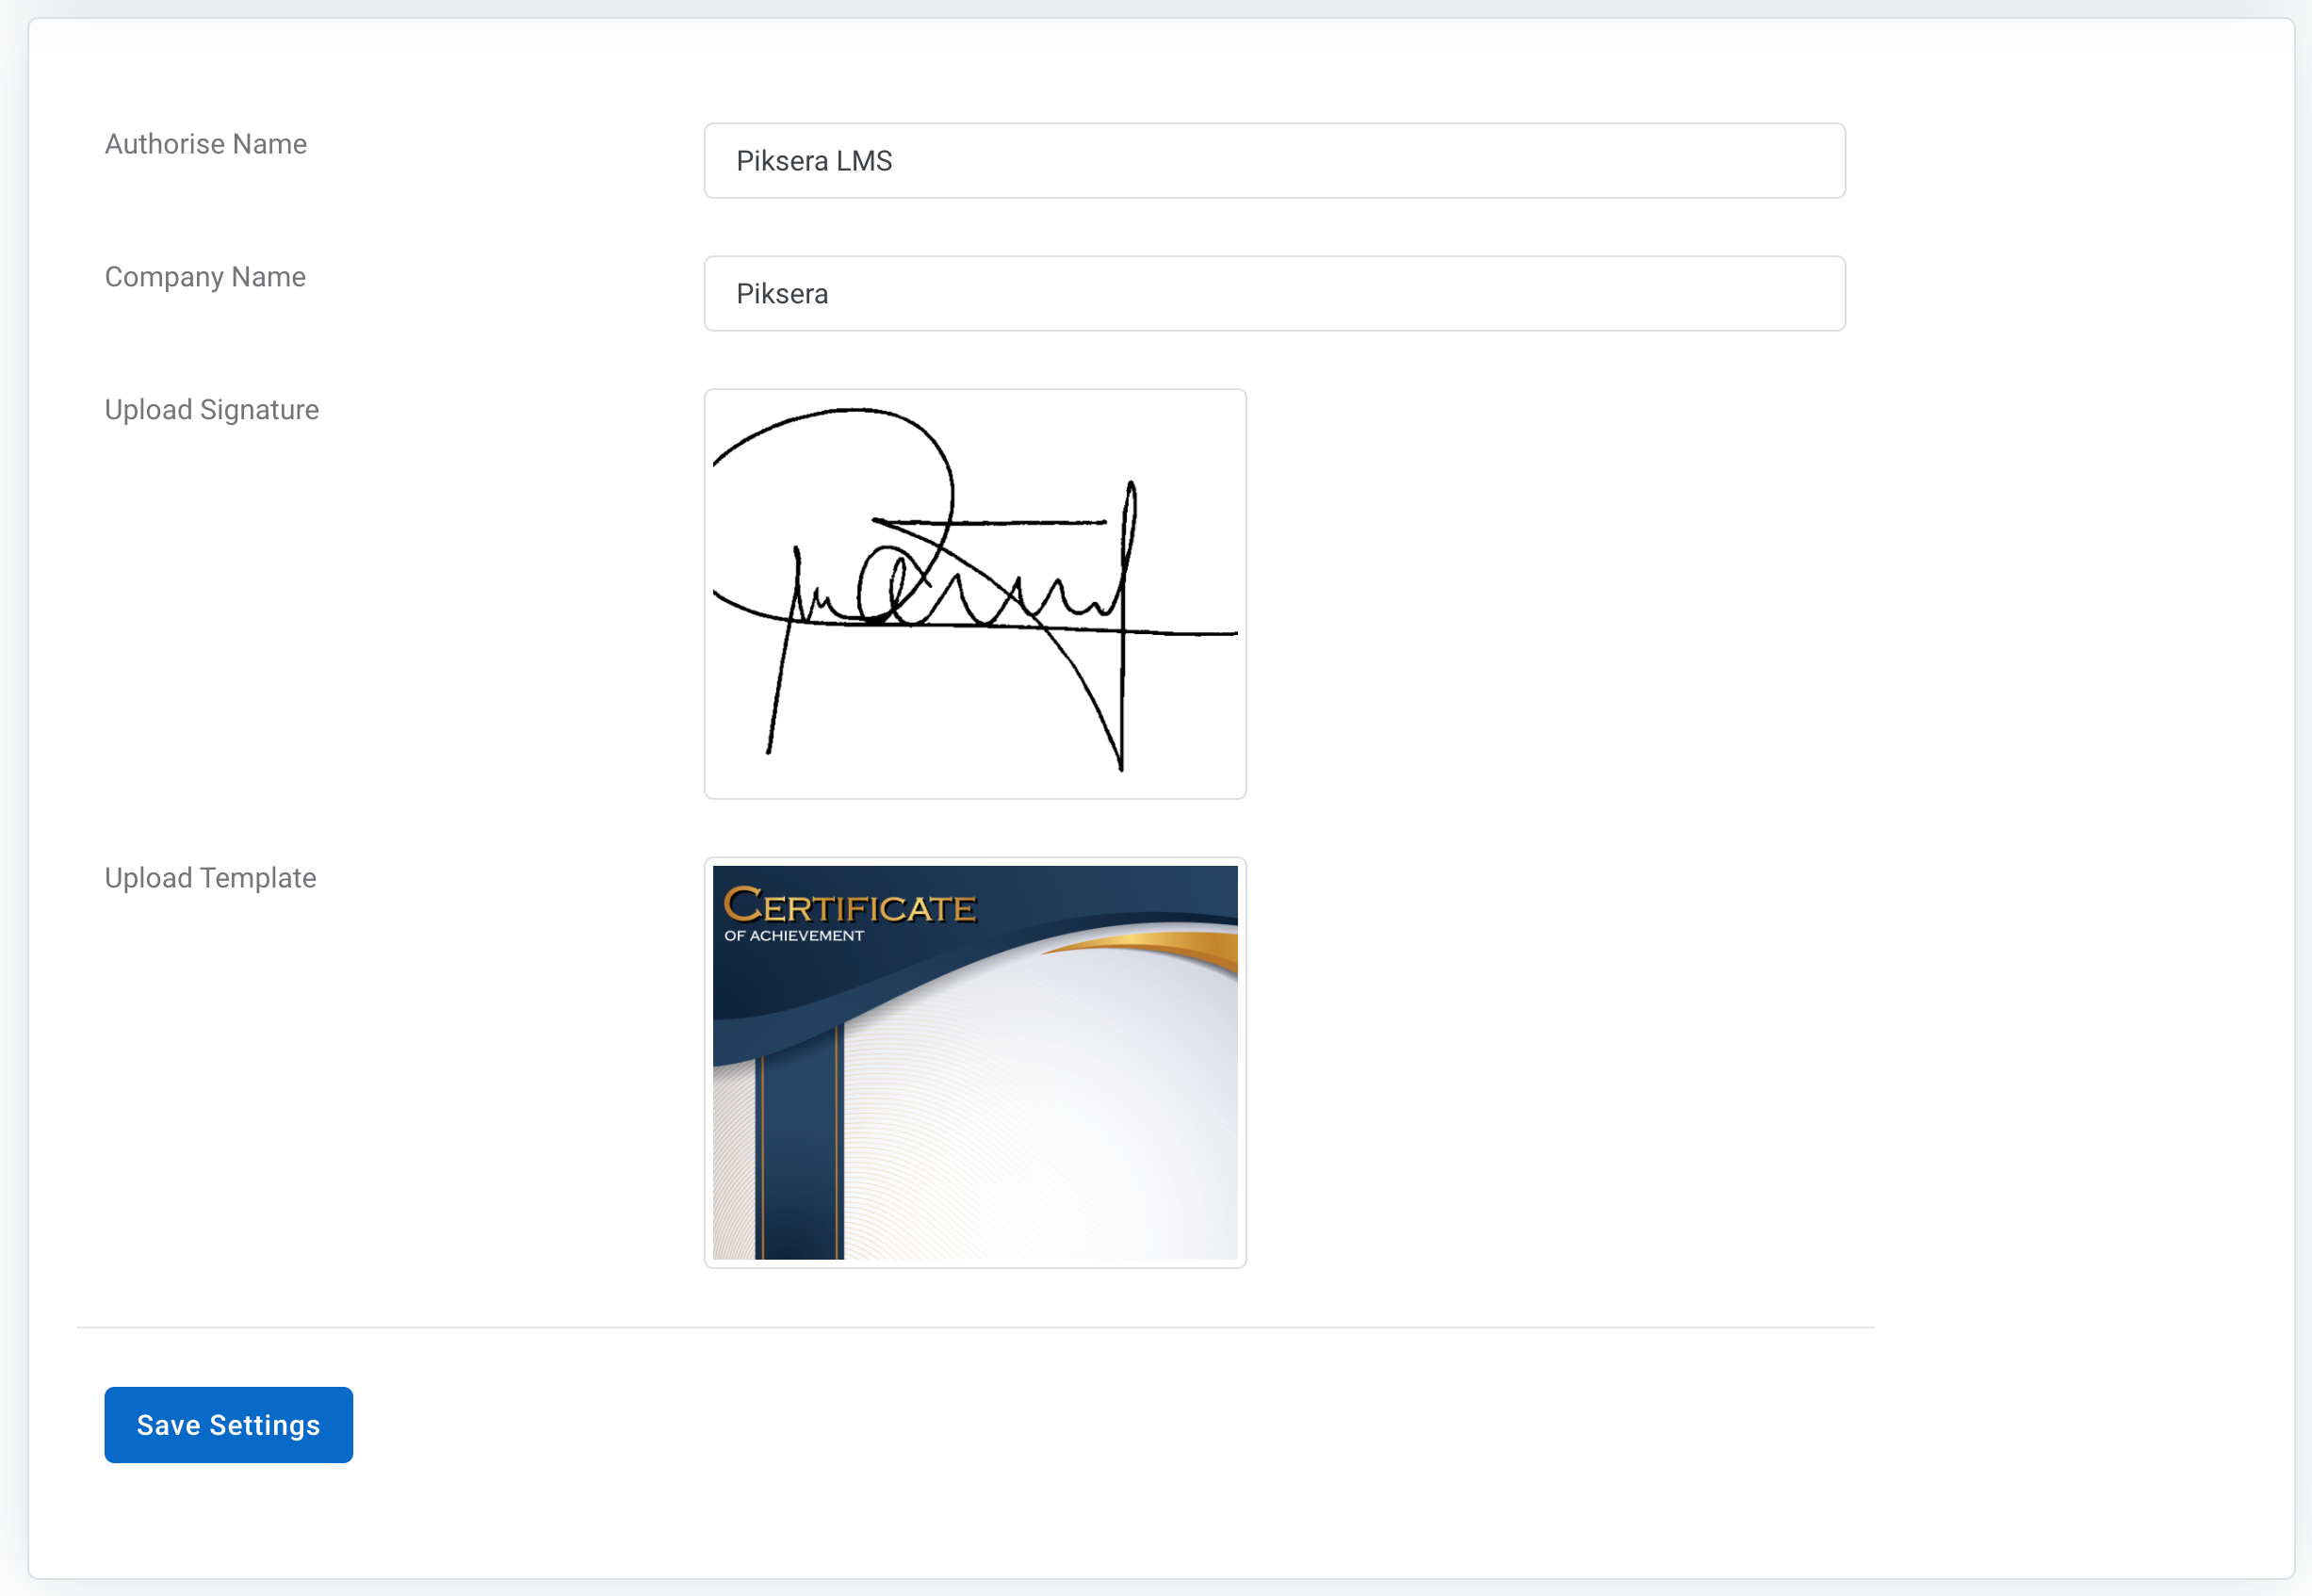
On Certificate setting you can adjust the:
- Authorise Name
- Company Name
- Upload Signature
- Upload Certificate Template
While uploading Certificate Template, Make sure that Certificate Template is 1132px x 800px to fit the content.
MultiInstructors
MultiInstructors plugin enables instructors to add more colleges to their courses.
Activate MultiInstructors plugin /admin/plugins.
On course edit, there will be a new step called "instructors", which will allow instructors to add their colleagues by searching their name or email.
Students progress plugin
Activate Students progress plugin on /admin/plugins.
After activating the Students progress plugin, the instructor dashboard menu will have a new "students" link, which will allow instructors to choose their course.
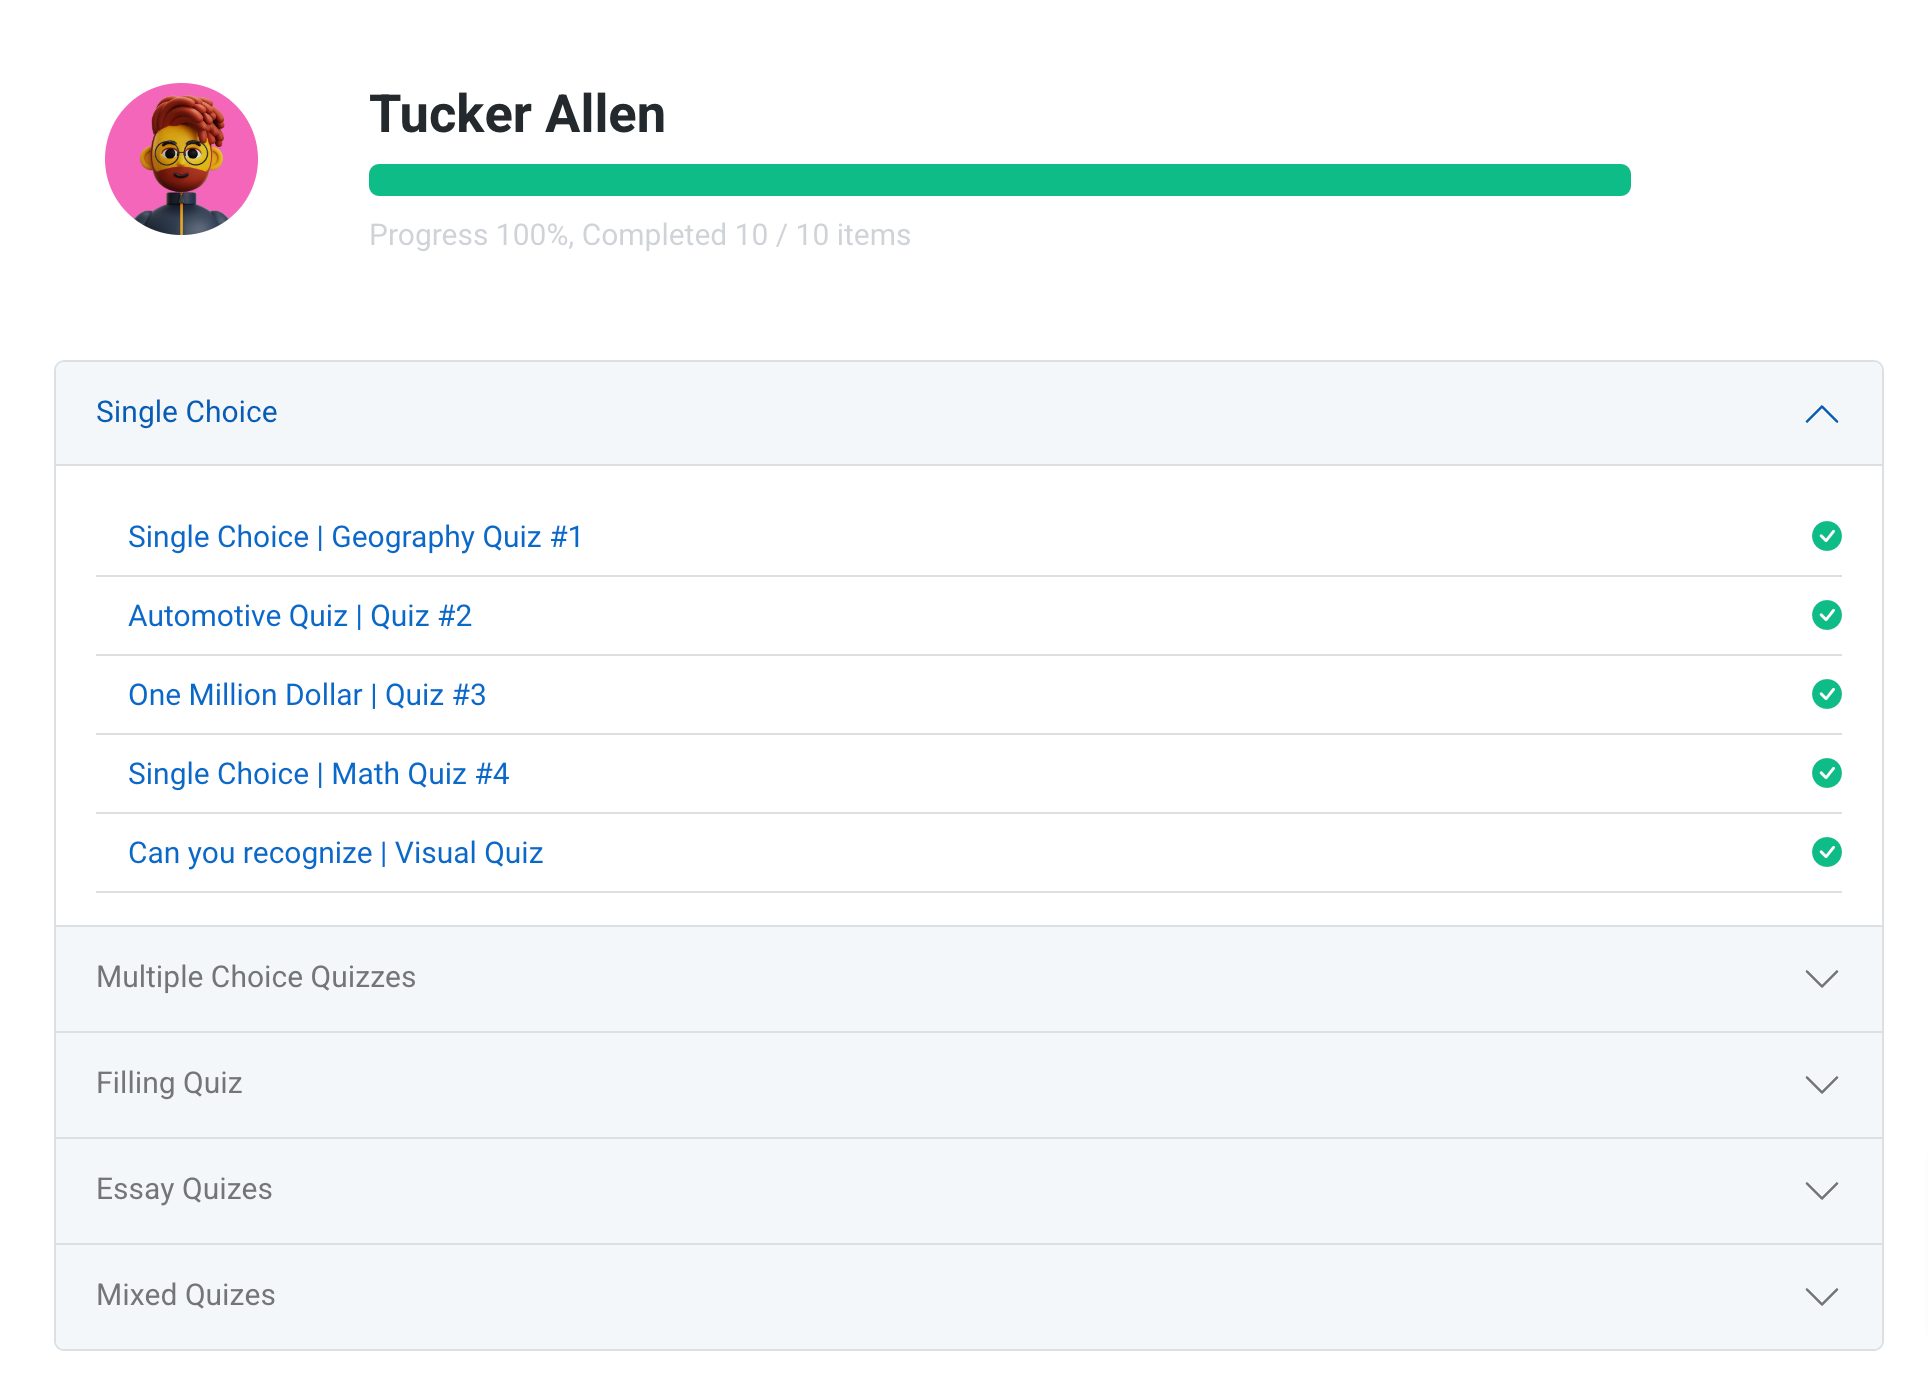
After choosing one of their courses, they can see all the students participating in the course and follow their progress by viewing their course accomplishments, etc.
Instructor & Student tools
Covers Dashboad tools for instructors and students
Dashboard
Both Insturctor and Student get different dashboard page, with different data and tools.
Instructor Dashboard
Student Dashboard
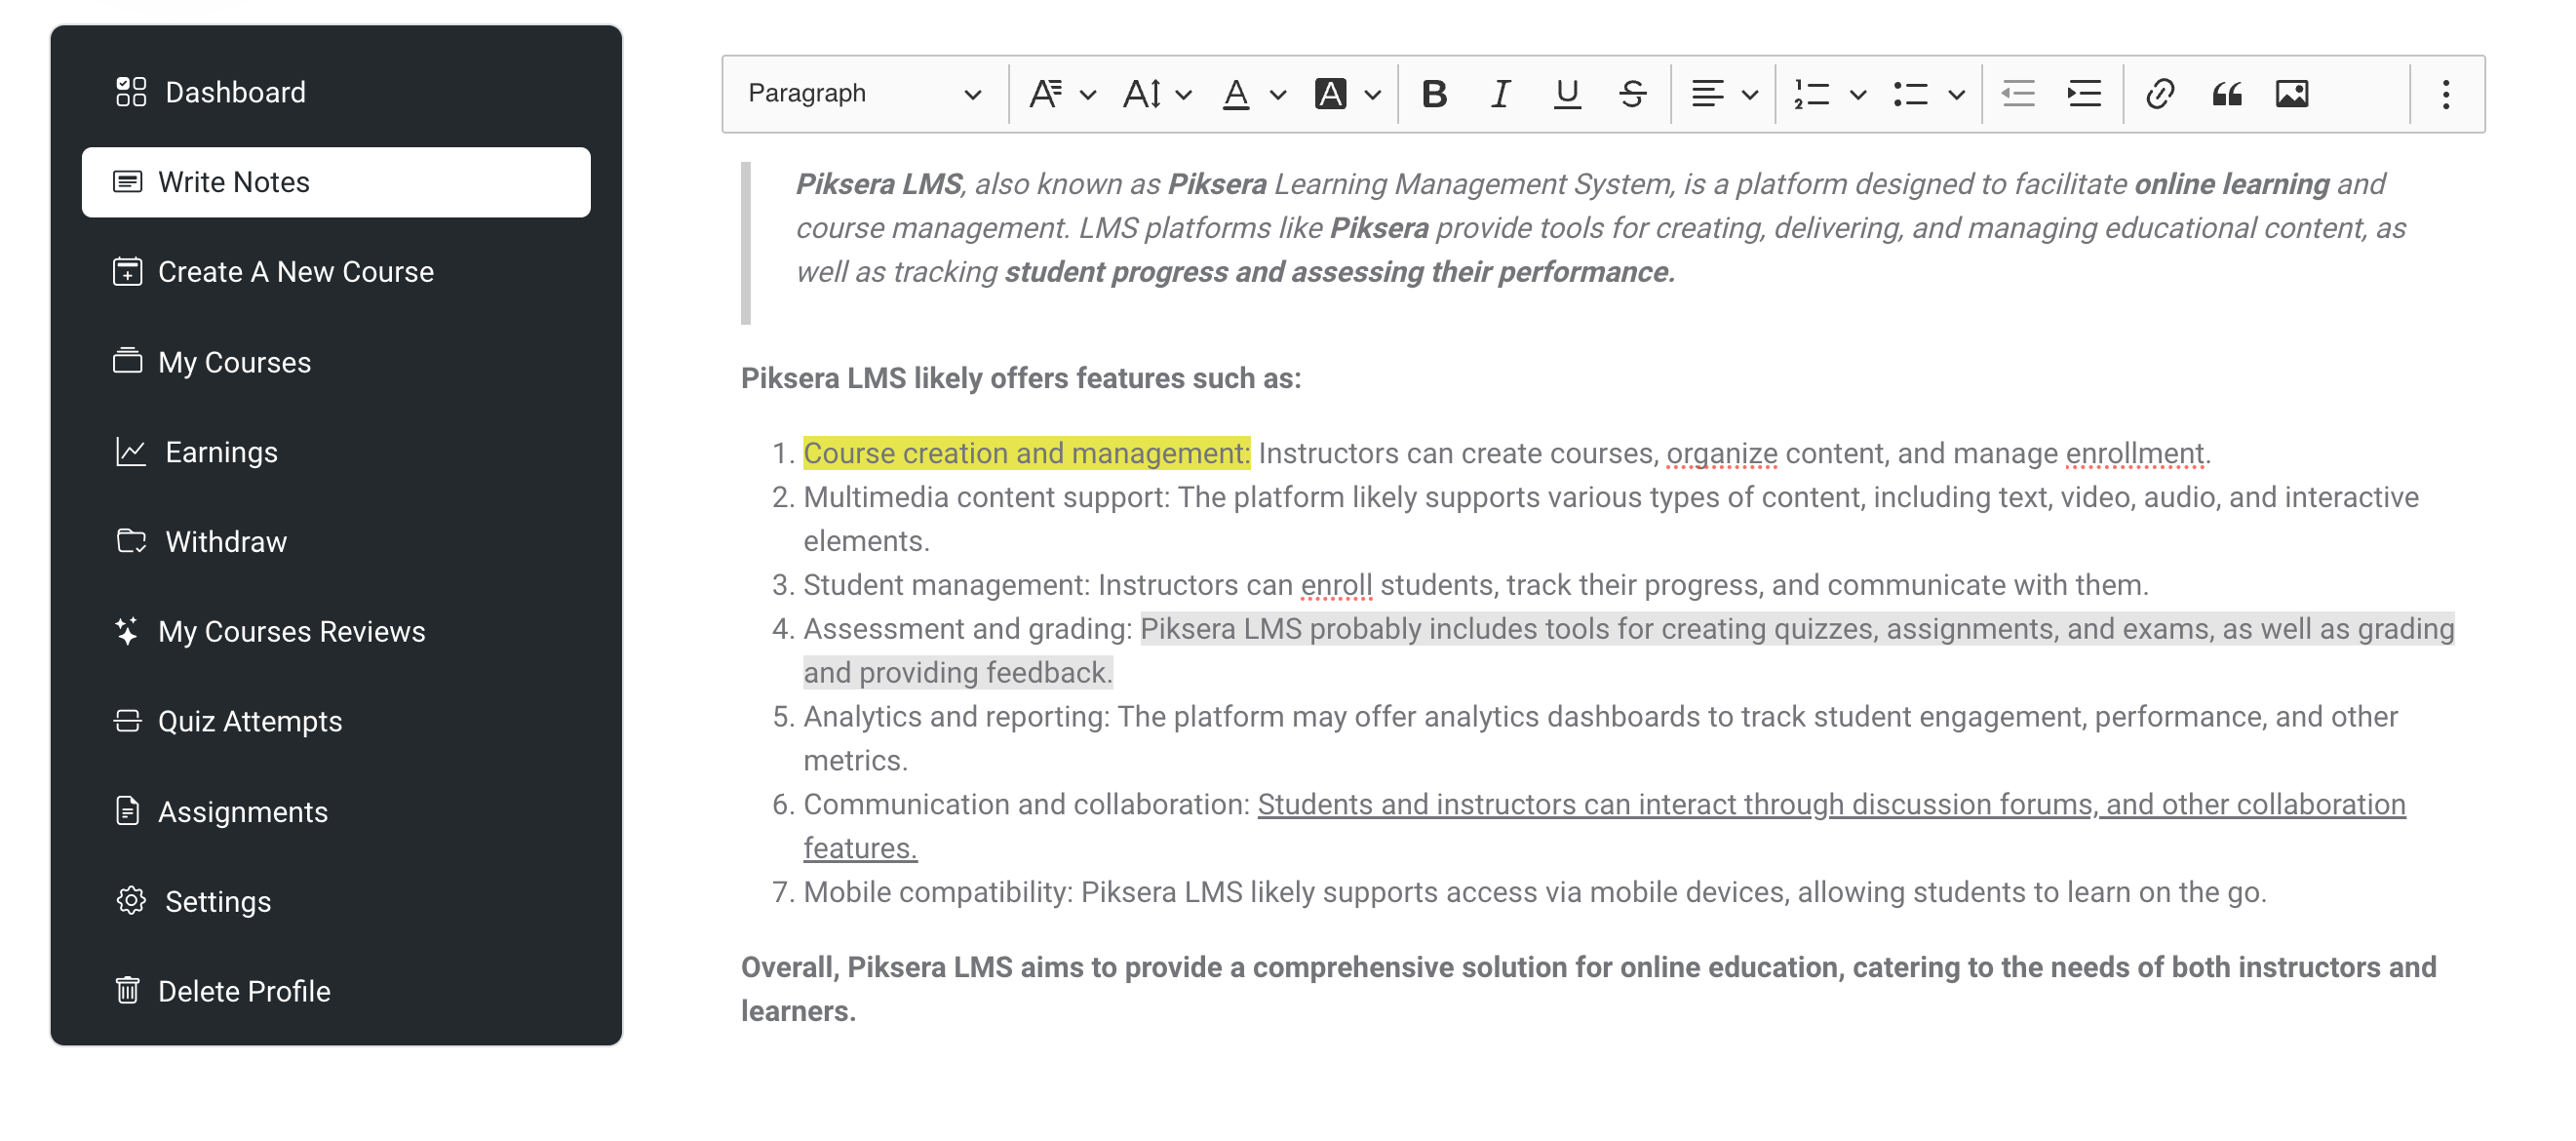
Write Notes
Instructors can write their notes as the notes page is desgined to be helpful to write all notes. The key feature of the notes is that it saves automatically without pressing a button every seccond.
Creating a course

Create a course on LMS is the biggest and most advanced tool that makes an lms lms. Piksera LMS gives one of the easiest tool to create and edit course, then publish and handle materials, students and payments amazingly.
To create a course in Piksera LMS, follow these steps:
Course Prerequisites:
Before creating a course, ensure you have the following prerequisites:
- Access to the Piksera LMS platform as an admin or instructor.
- Knowledge of the course content you want to create.
- Categories created by the admin to assign the course to.
Course Creation Page:
Once logged into Piksera LMS, navigate to the course creation page. Here, you'll find the following required fields:
- Name: Enter the name of the course.
- Short Description: Provide a brief description of the course. Remember, the short description must not exceed 191 characters.
- Course Category: Select the appropriate category for the course from the dropdown menu. If categories haven't been created yet, the admin needs to create them first.
Creating Categories:
As an admin, navigate to the category management section of the platform. Create relevant categories for organizing courses based on topics, subjects, or any other classification. Save the categories to make them available for course assignment during course creation.
Saving Course Information:
Once the required fields are filled out and the category is selected, save the course information. After saving, the course creation process will continue to the next step, where additional information about the course can be provided.
Course Creation Process Continues:
After saving the basic course information, the platform will prompt you to continue with the course creation process. You can then proceed to provide detailed information about the course, including objectives, syllabus, resources, and any other relevant content.
Editing the course
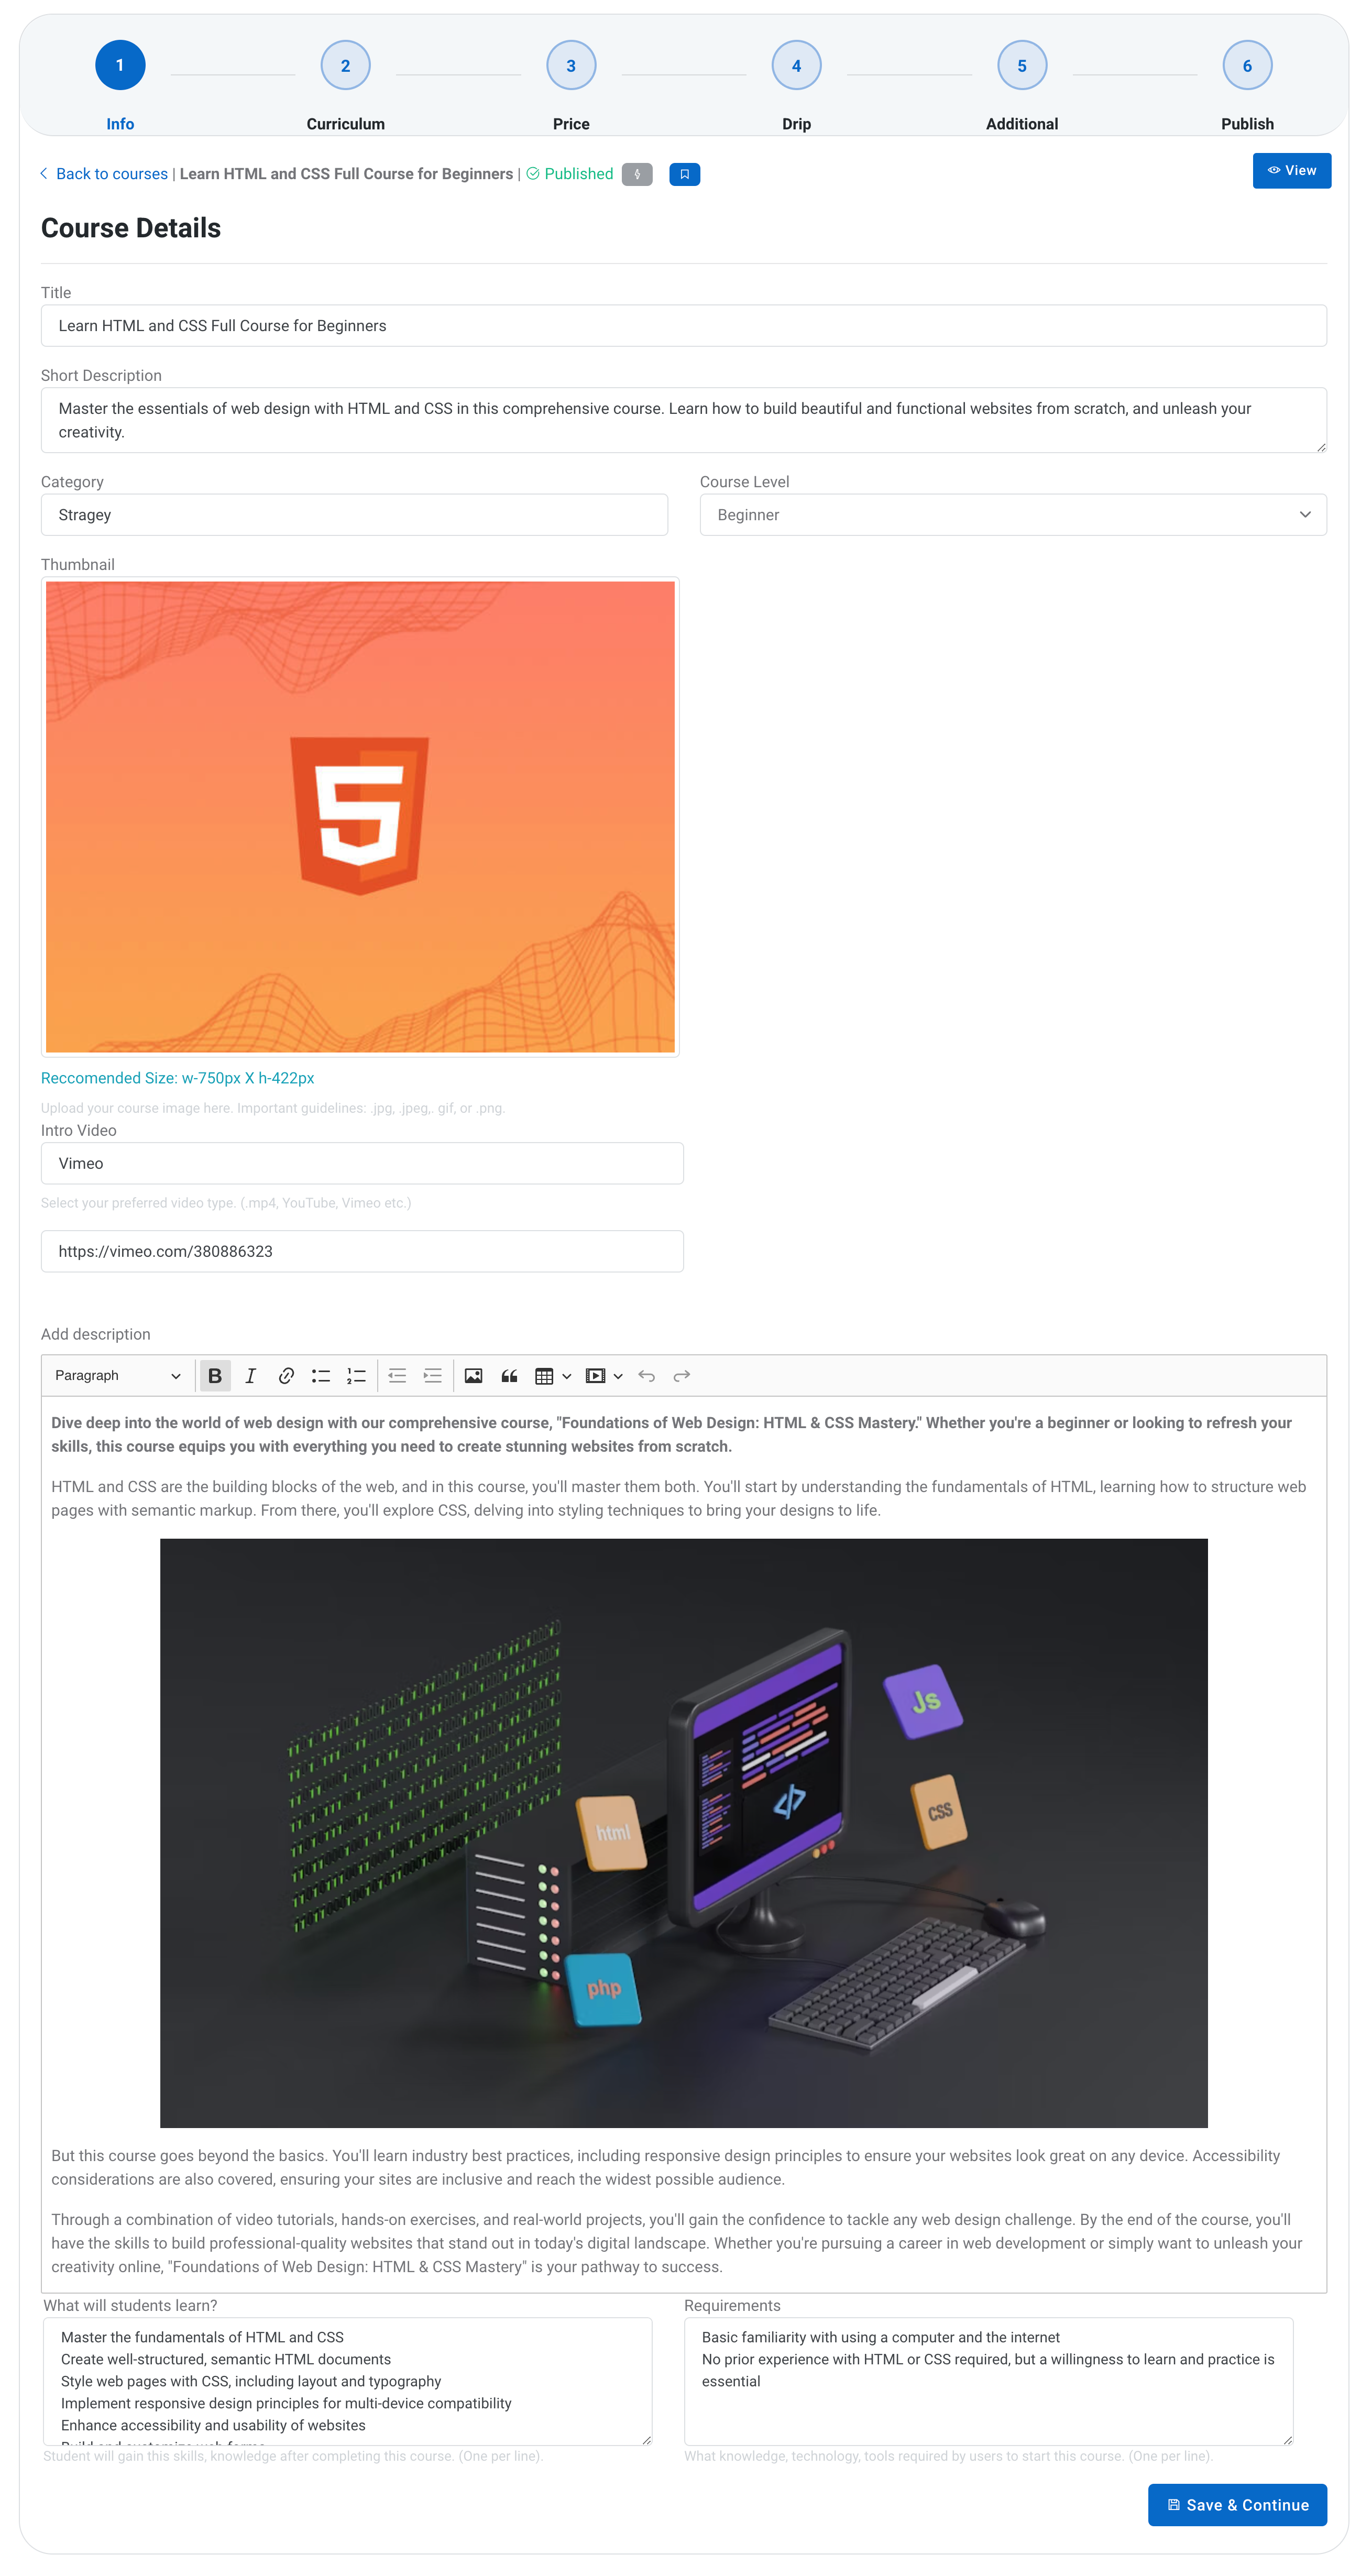
On the course information page, instructors have the ability to edit various aspects of the course. Here's a breakdown of the fields and options available:
- Course Title: Instructors can edit the existing course title if needed.
- Short Description: Instructors can modify the short description of the course, ensuring it remains within the 191-character limit.
- Category: Instructors can change the category to which the course belongs.
- Course Level: Instructors can specify the level of the course (e.g., beginner, intermediate, advanced).
- Course Thumbnail: Instructors can upload or select a course thumbnail image. The recommended size for the thumbnail is 600x450 pixels.
- Intro Video: Instructors can add an introductory video to the course by selecting the video type (YouTube, Vimeo, HTML5, Embedded, or URL) and providing the corresponding video URL or source.
- Add Description: Instructors can provide a long description that will appear on the front course page for public viewing. This description can include text and images.
- What Will Students Learn?: Instructors can list the skills and knowledge that students will gain upon completing the course. Each skill or knowledge point should be entered on a separate line.
- Requirements: Instructors can specify any prerequisites or requirements for taking the course, such as prior knowledge, technology, or tools. Each requirement should be entered on a separate line.
- Save & Continue: Once all necessary information has been entered or updated, instructors can save their changes and continue with the course creation process.
By utilizing these options, instructors can customize the course information to accurately reflect the content, objectives, and requirements of the course, providing students with clear expectations and guidance.
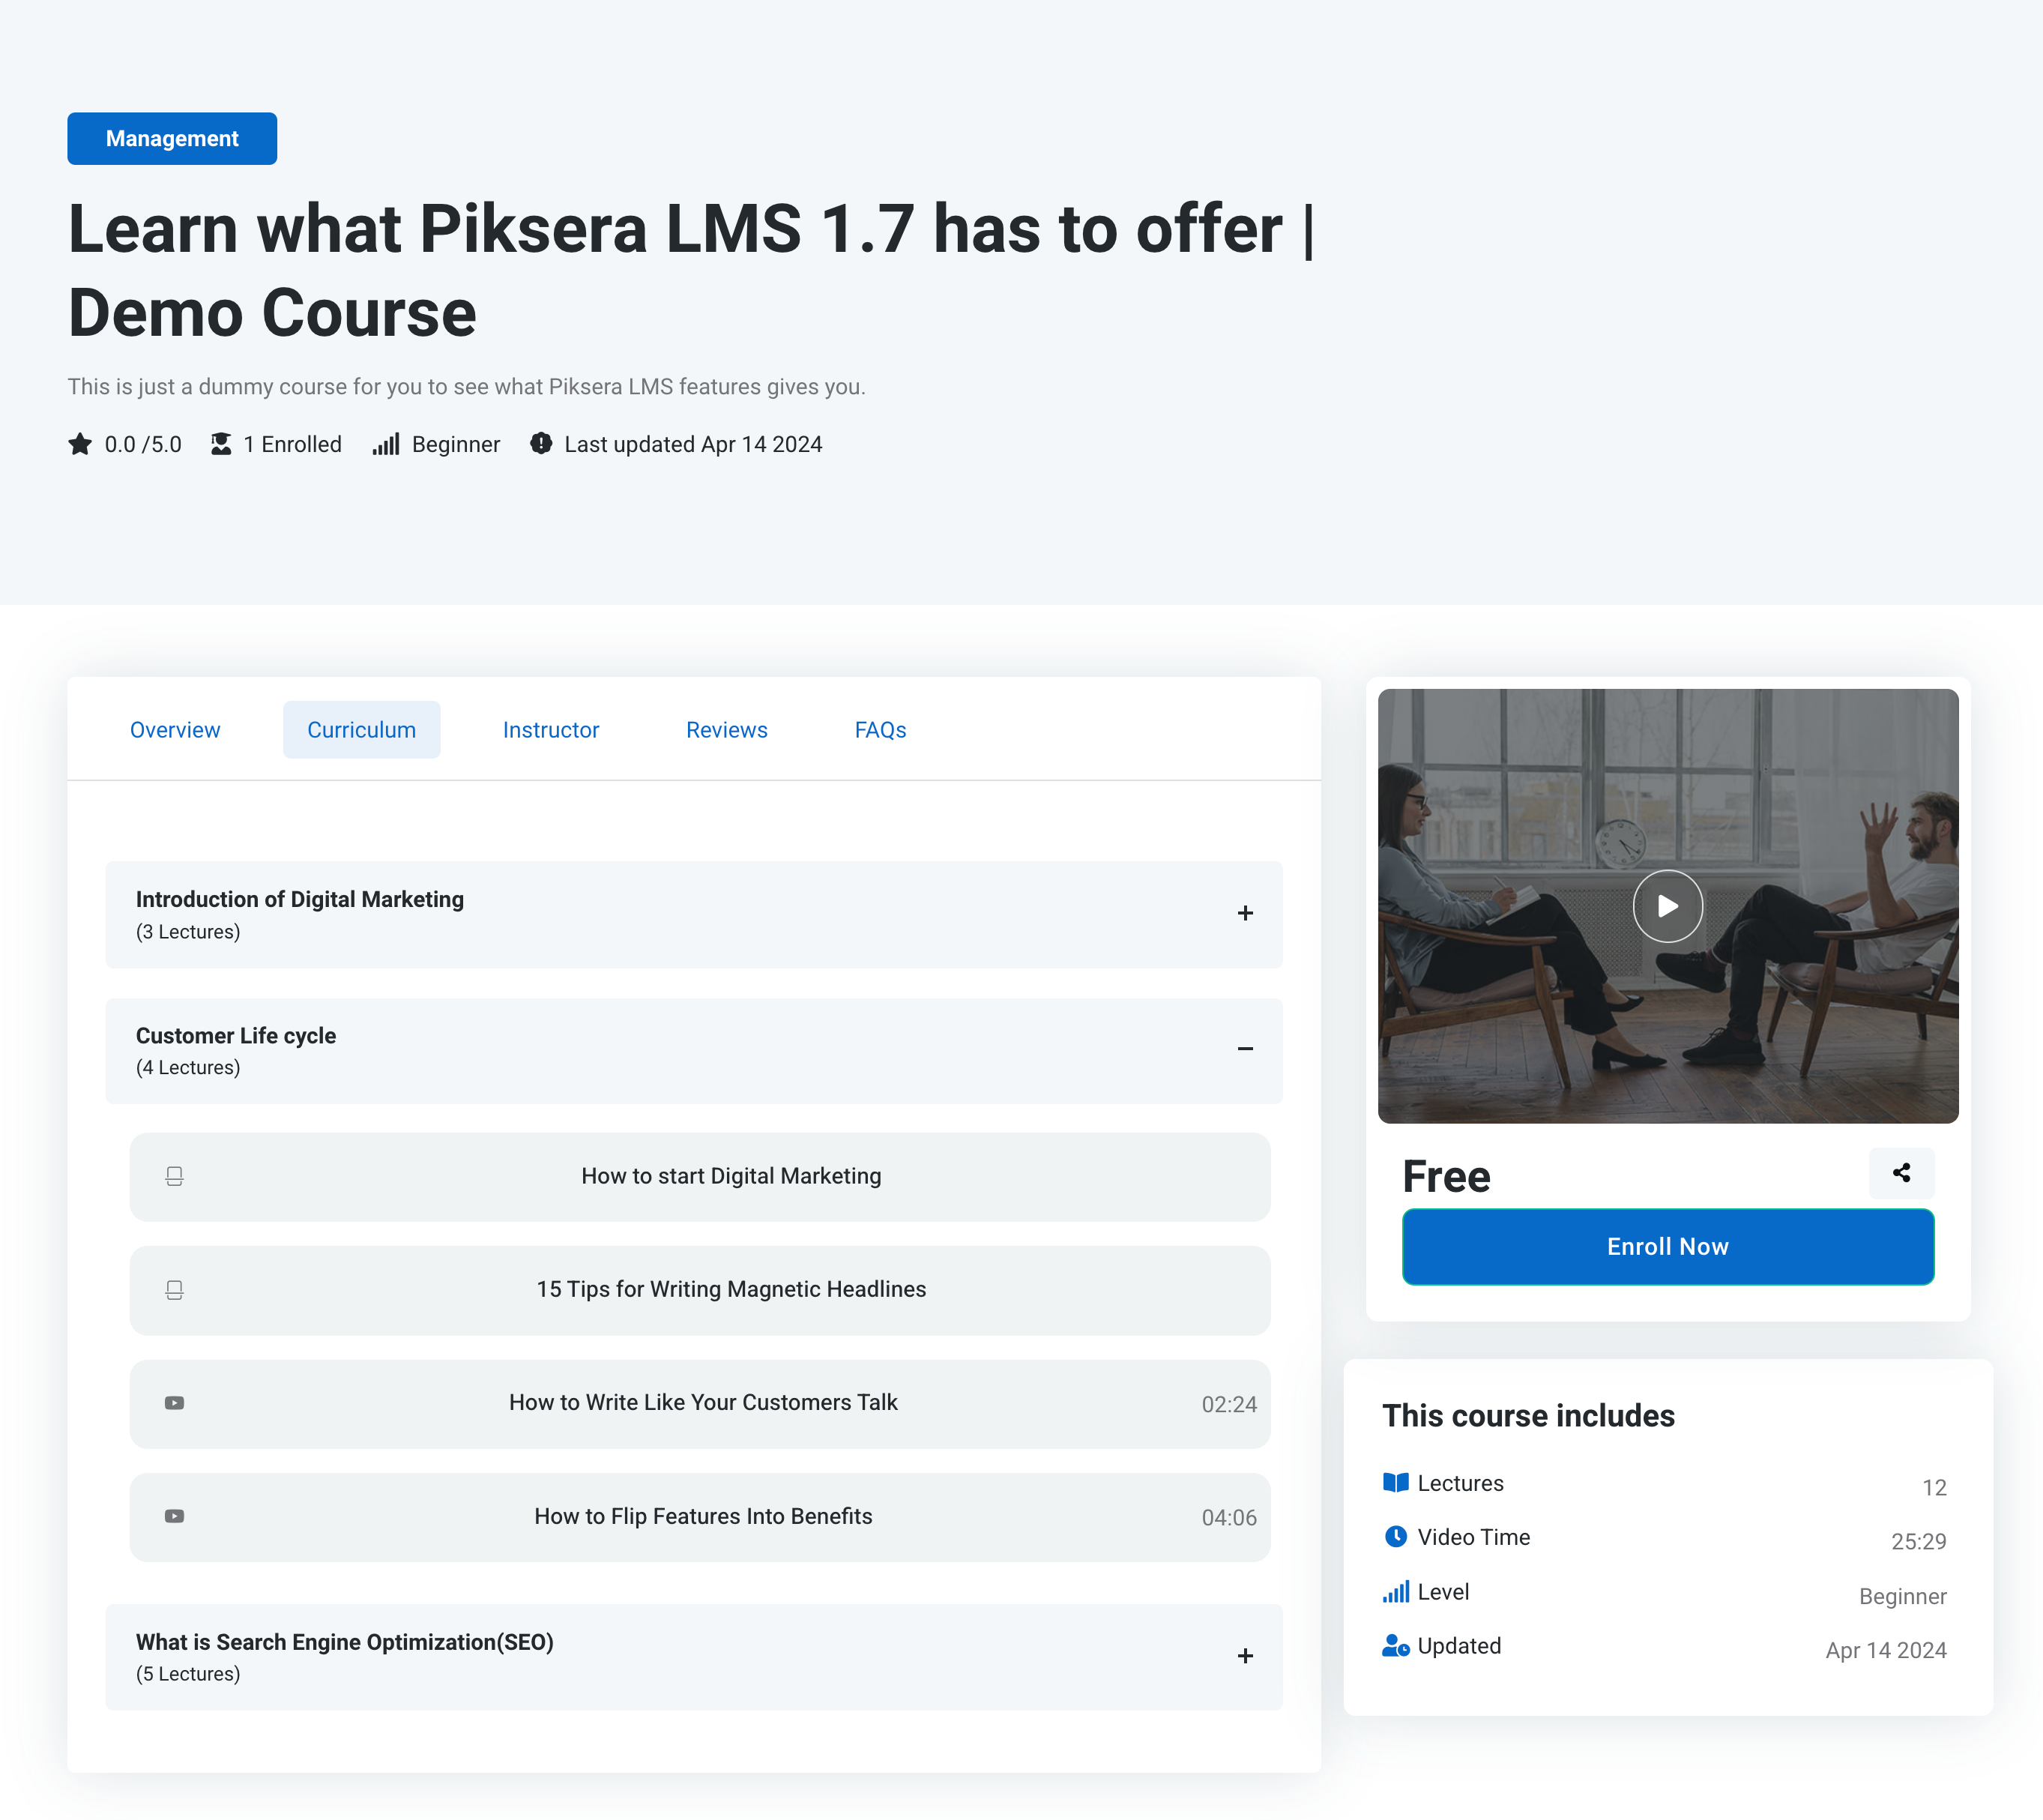
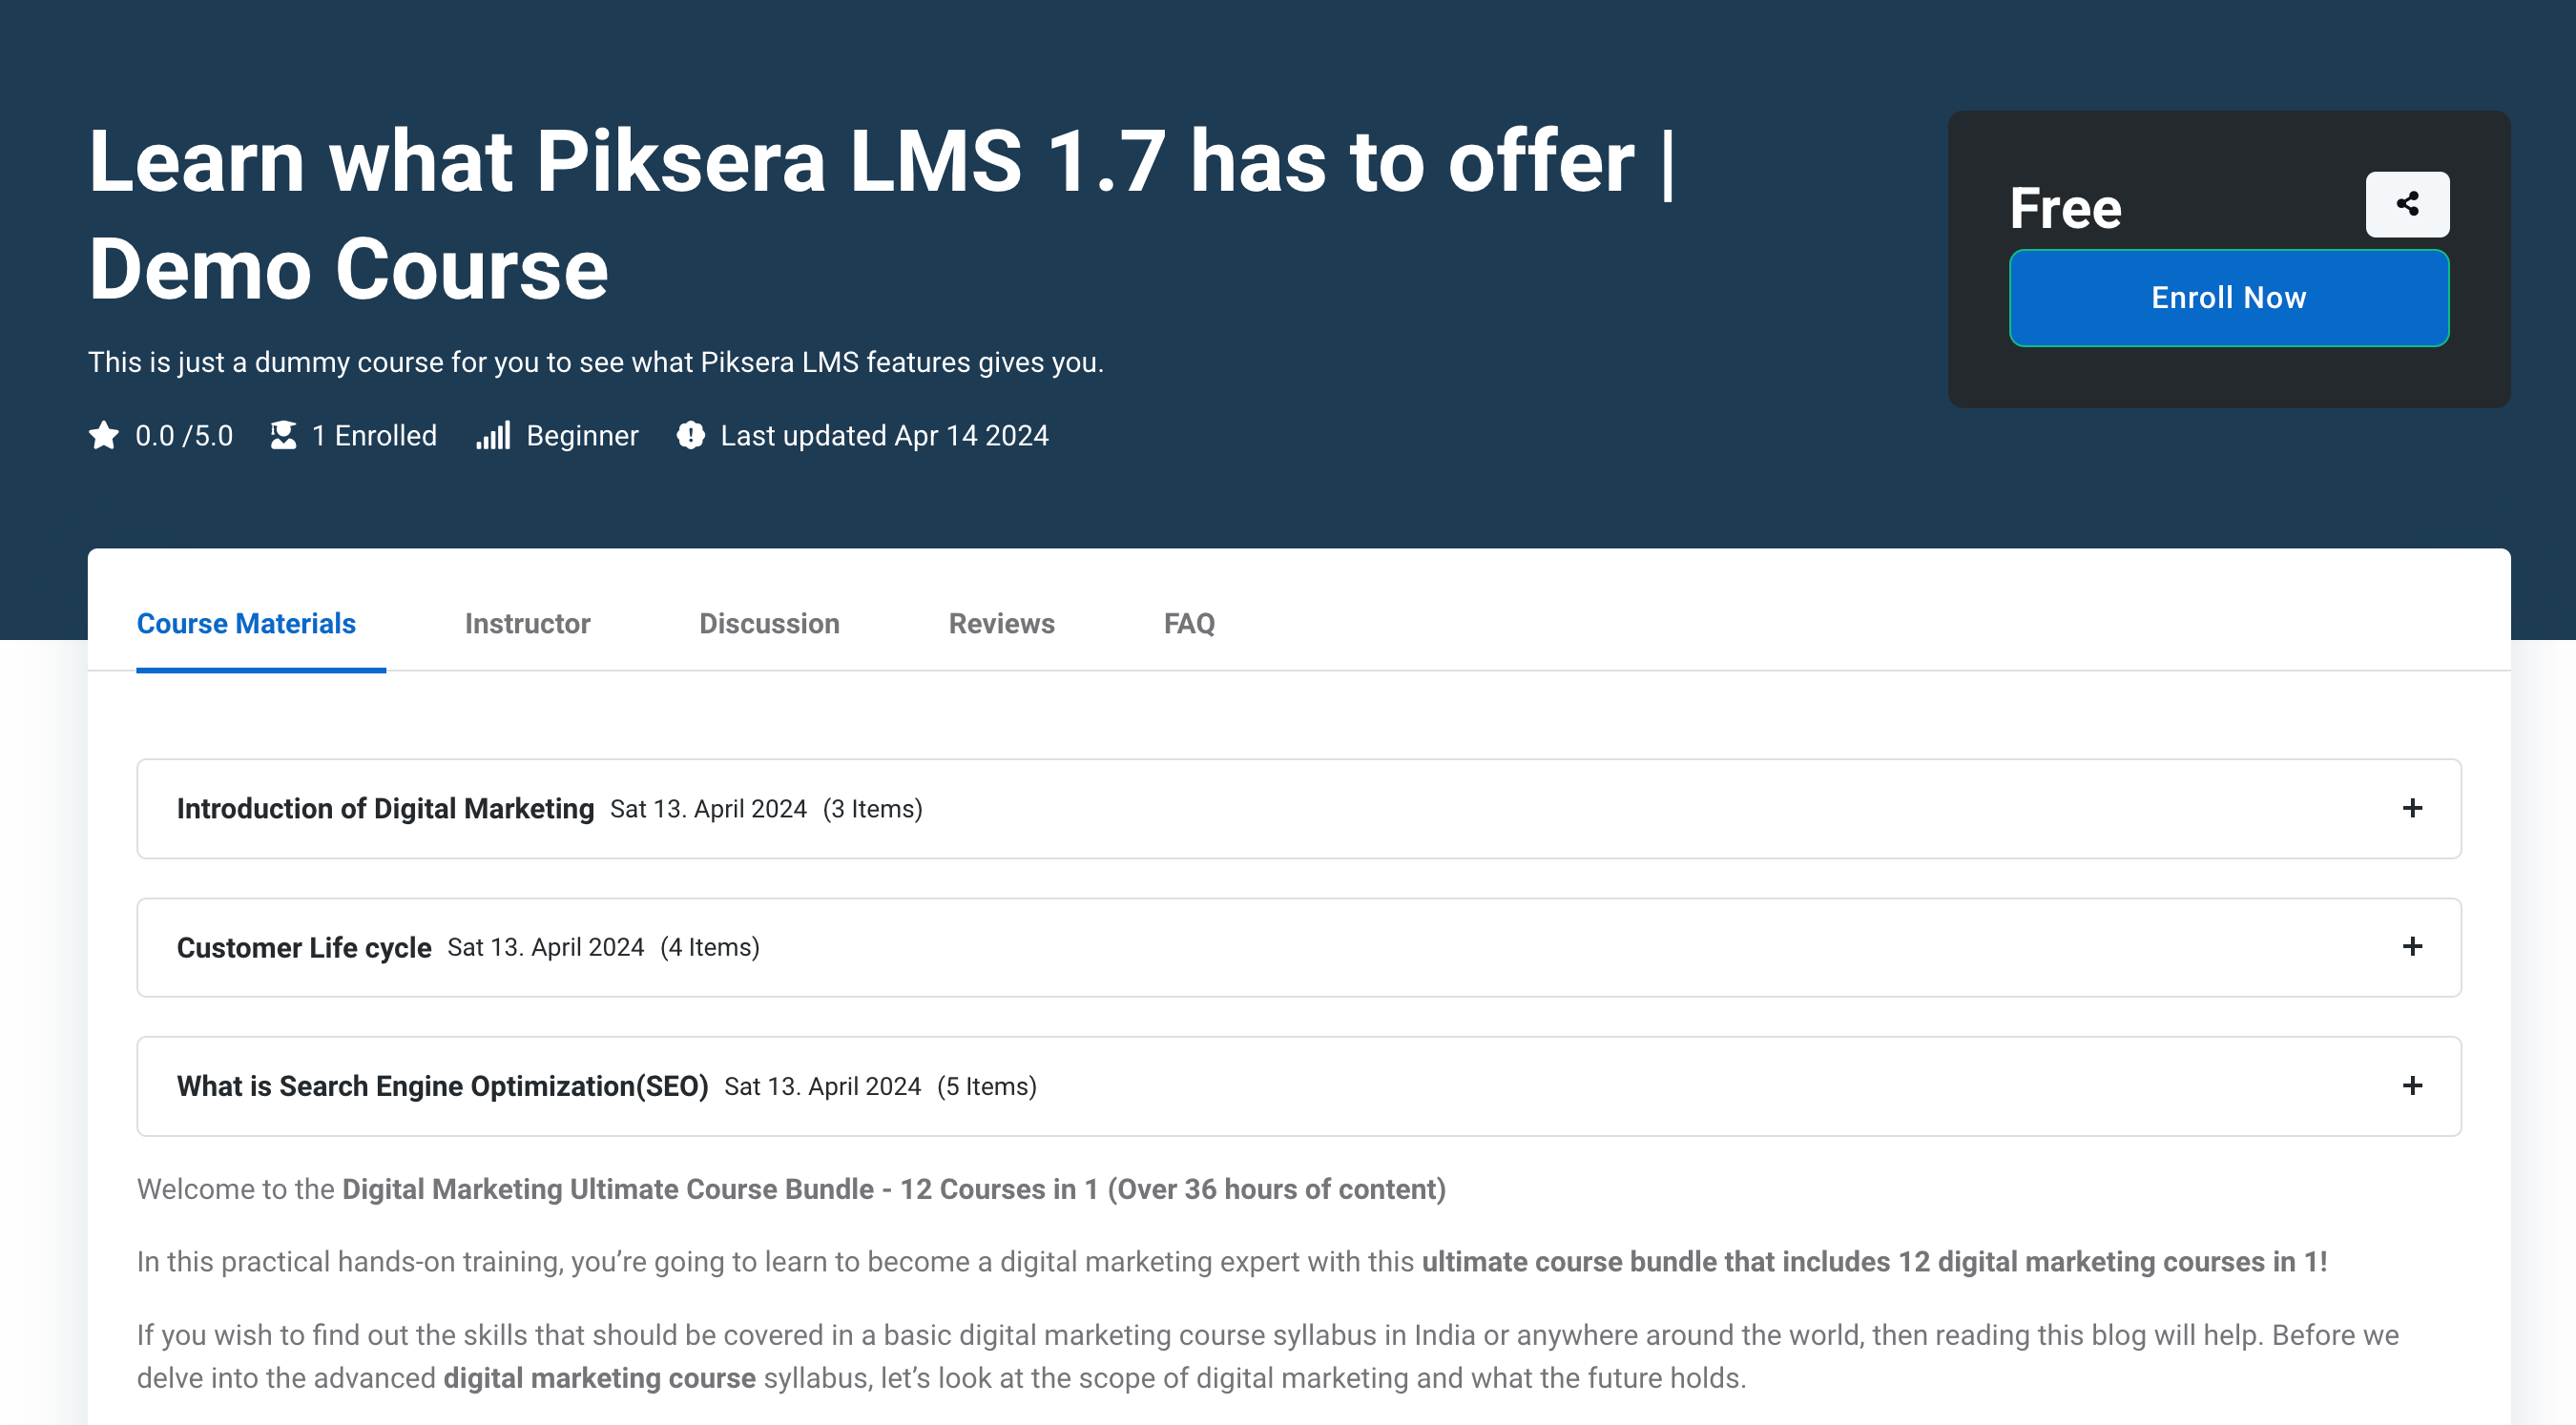
Course Curriculum
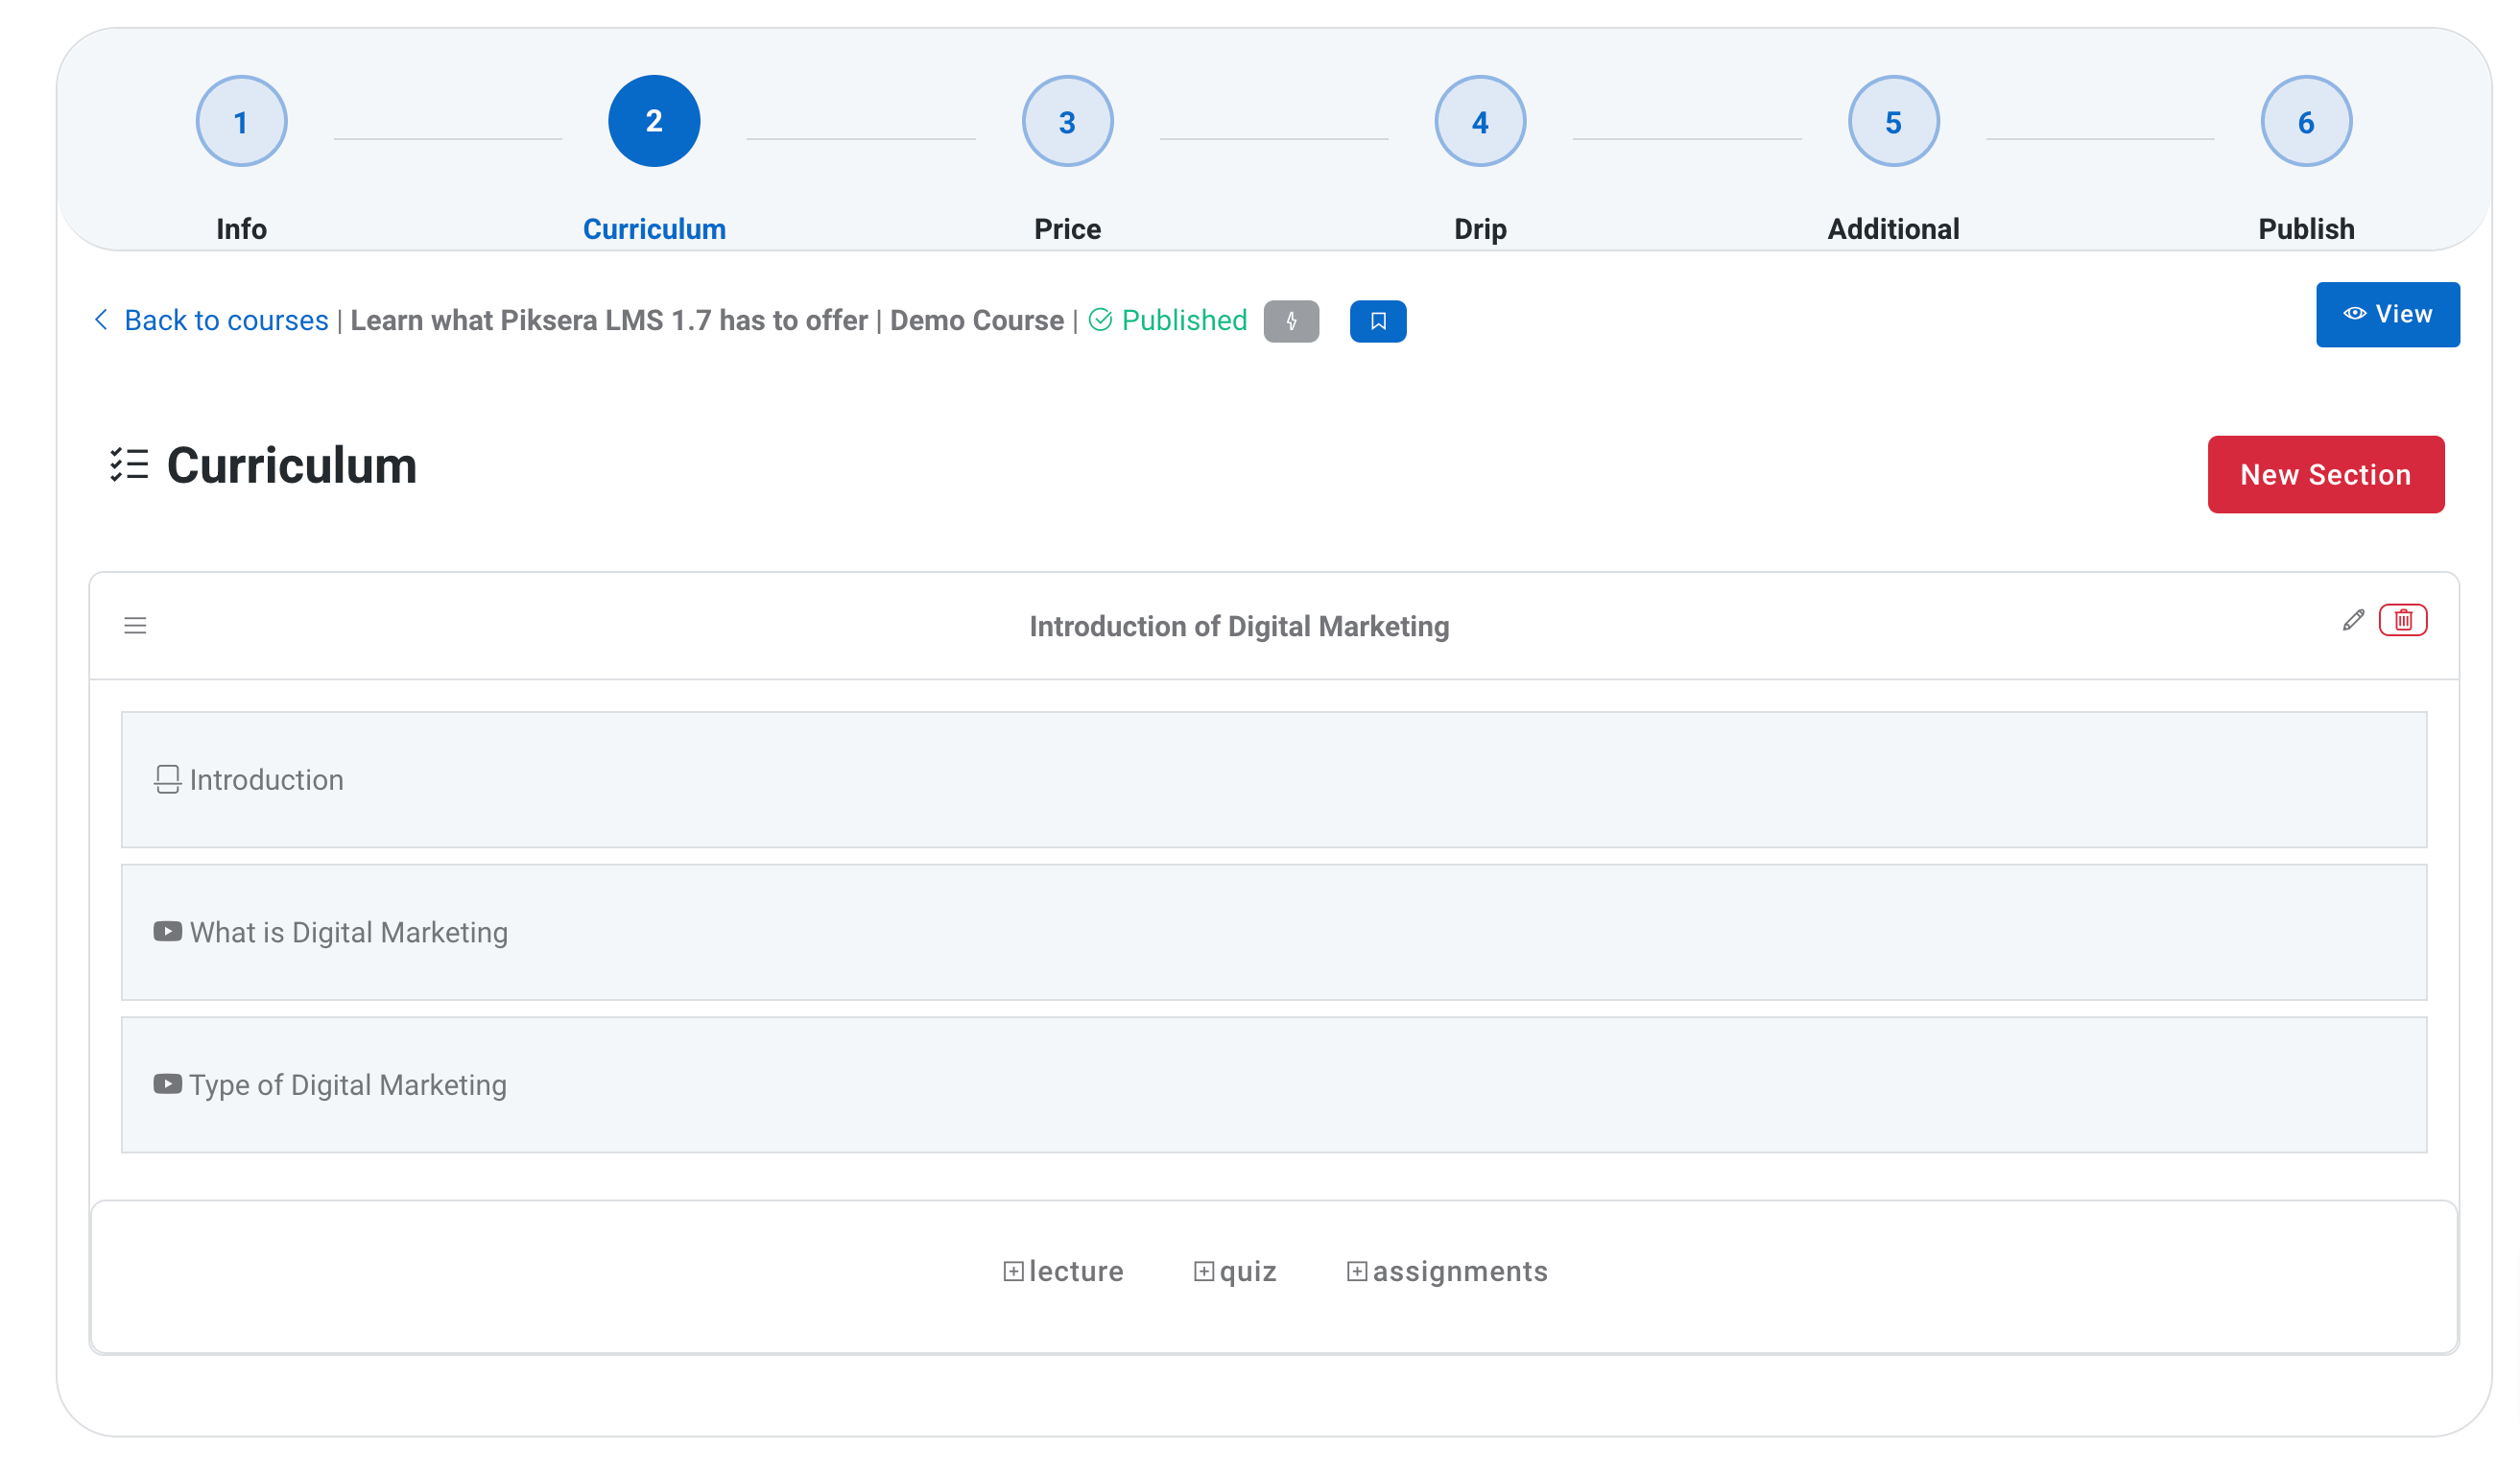
On course curriculum, you can add lectures, quizes and assigments to the curriculum. You need to add sections first, then you can choose to add lecture, quiz or assignment to the section.
Creating a section
To create a course section in Piksera LMS, follow these steps:
Navigate to Course Curriculum Step:
- Go to the course creation or editing process.
- Find the "Course Curriculum" step.
Create Section:
In the course curriculum step, locate the "Create Section" button.
- If the course is empty, the "Create Section" button will appear in the middle of the container.
- Click on the "Create Section" button.
Enter Section Title:
After clicking the "Create Section" button, you'll be prompted to add a title for the section.
Add a descriptive title that represents the content or theme of the section.
Edit Section Title (Optional):
You can edit the section title at any time later if needed.
Simply locate the section within the course curriculum and use the editing options to modify the title.
Delete Section:
If you wish to delete a section, locate the section within the course curriculum.
- Use the delete option provided.
- Be cautious when deleting a section, as it will remove all lectures, quizzes, and assignments assigned to that section.
- Deleting a section with content will permanently remove all associated content, so ensure you want to delete it before proceeding.
Creating a lecture
To create a lecture in Piksera LMS, follow these steps:
Requirements:
- You need to have a course already created.
- Navigate to the course curriculum where you want to add the lecture.
- Ensure you have a section within the curriculum where you want to place the lecture.
Navigate to Section:
Go to the section within the course curriculum where you want to add the lecture.
Create Lecture:
Within the chosen section, look for the "[+ Lecture]" button located at the bottom of the section container.
Click on the "[+ Lecture]" button to initiate the lecture creation process.
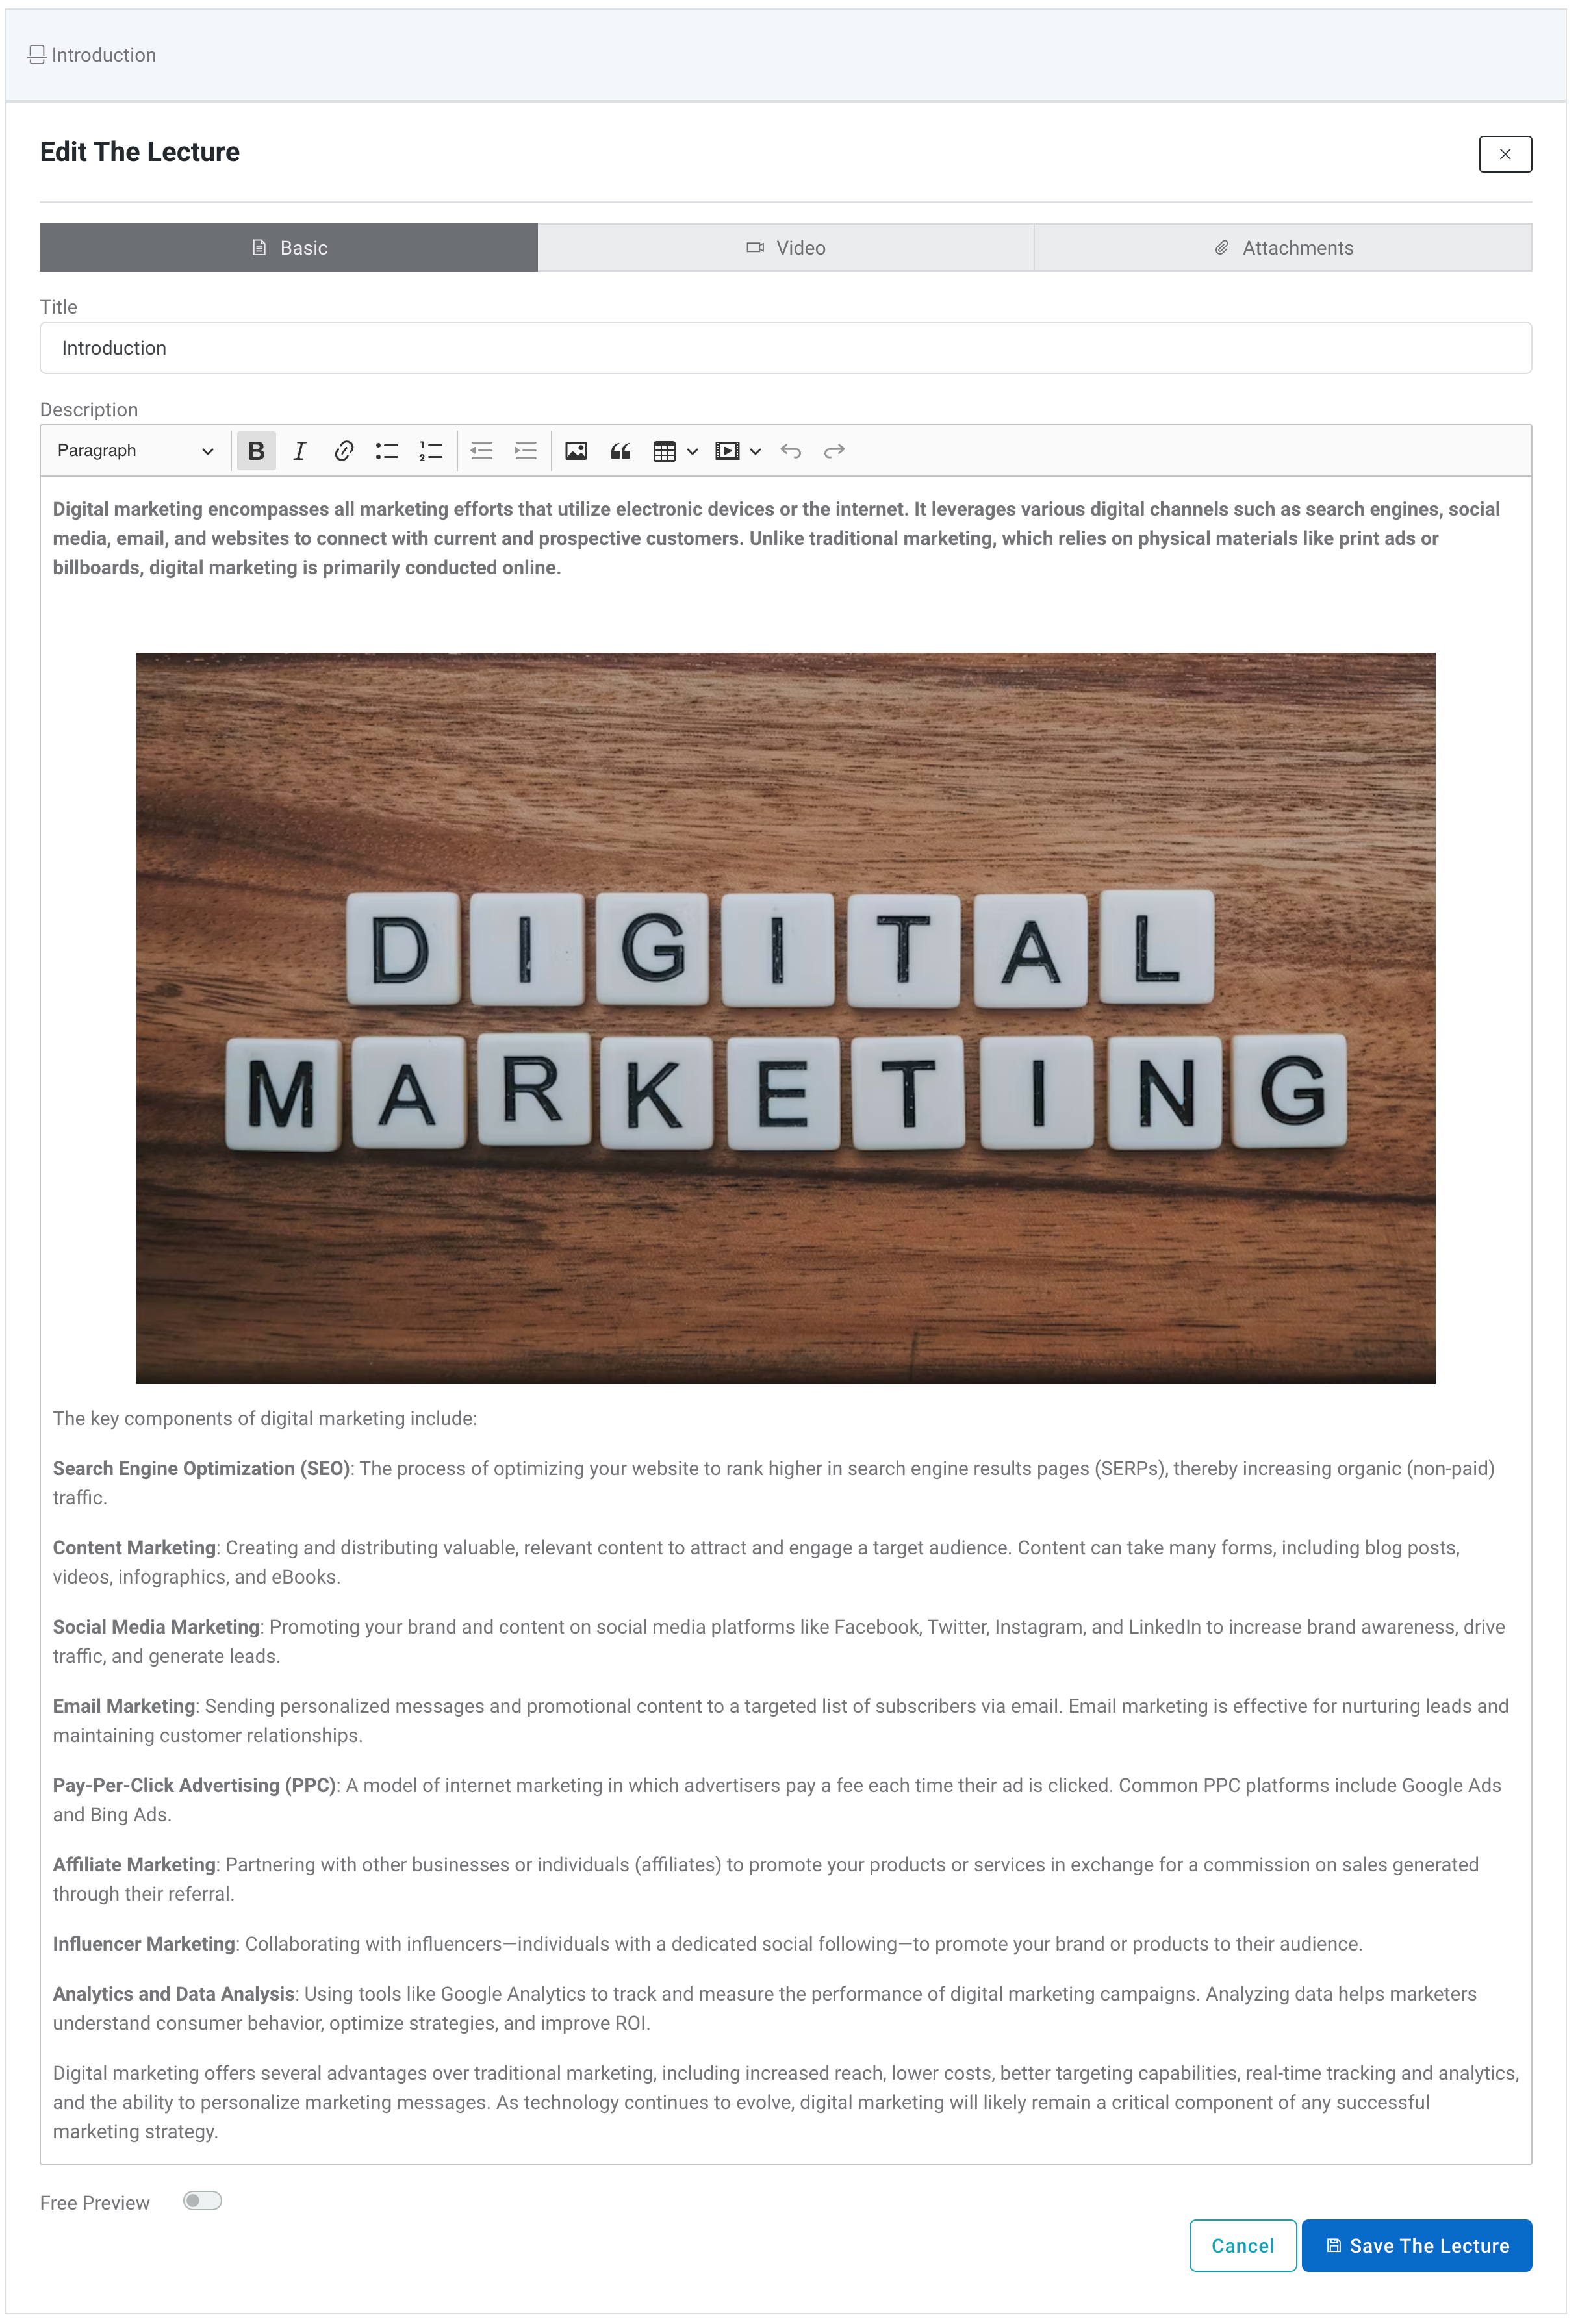
Provide Lecture Title and Content Description:
After clicking the button, a new container will appear with fields for "Lecture Title" and "Content Description."
- Enter a title for the lecture (required).
- Optionally, you can provide a basic text lesson in the content description field.
Expand Lecture Container:
After creating a new lecture, the container will expand to provide more tools for lecture creation.
Basic Text Tool:
Utilize the basic text editor to add text and images to your lecture.
- You can add as much text and as many pictures as you want.
- Photos can be pasted from online using a photo URL link or copied from the clipboard.
Video Tool:
Use the video tool to add video content to the lecture.
- Supported video types include YouTube, Vimeo, Uploaded videos, Embedded videos, or video URLs (.mp4).
- You can create a full video lecture by leaving the basic content description empty and only adding a video.
Attachments:
Include attachments to the lecture, selected from the file manager.
Attachments can supplement the lecture content with additional resources for students.
Free Preview:
At the bottom of the lecture container, you'll find a switch to enable/disable "Free Preview."
Enabling "Free Preview" allows students to preview the course for free, even if the course is paid or membership plan locked.
By following these steps, you can create engaging and multimedia-rich lectures in Piksera LMS, providing students with an interactive and comprehensive learning experience.
Creating a quiz
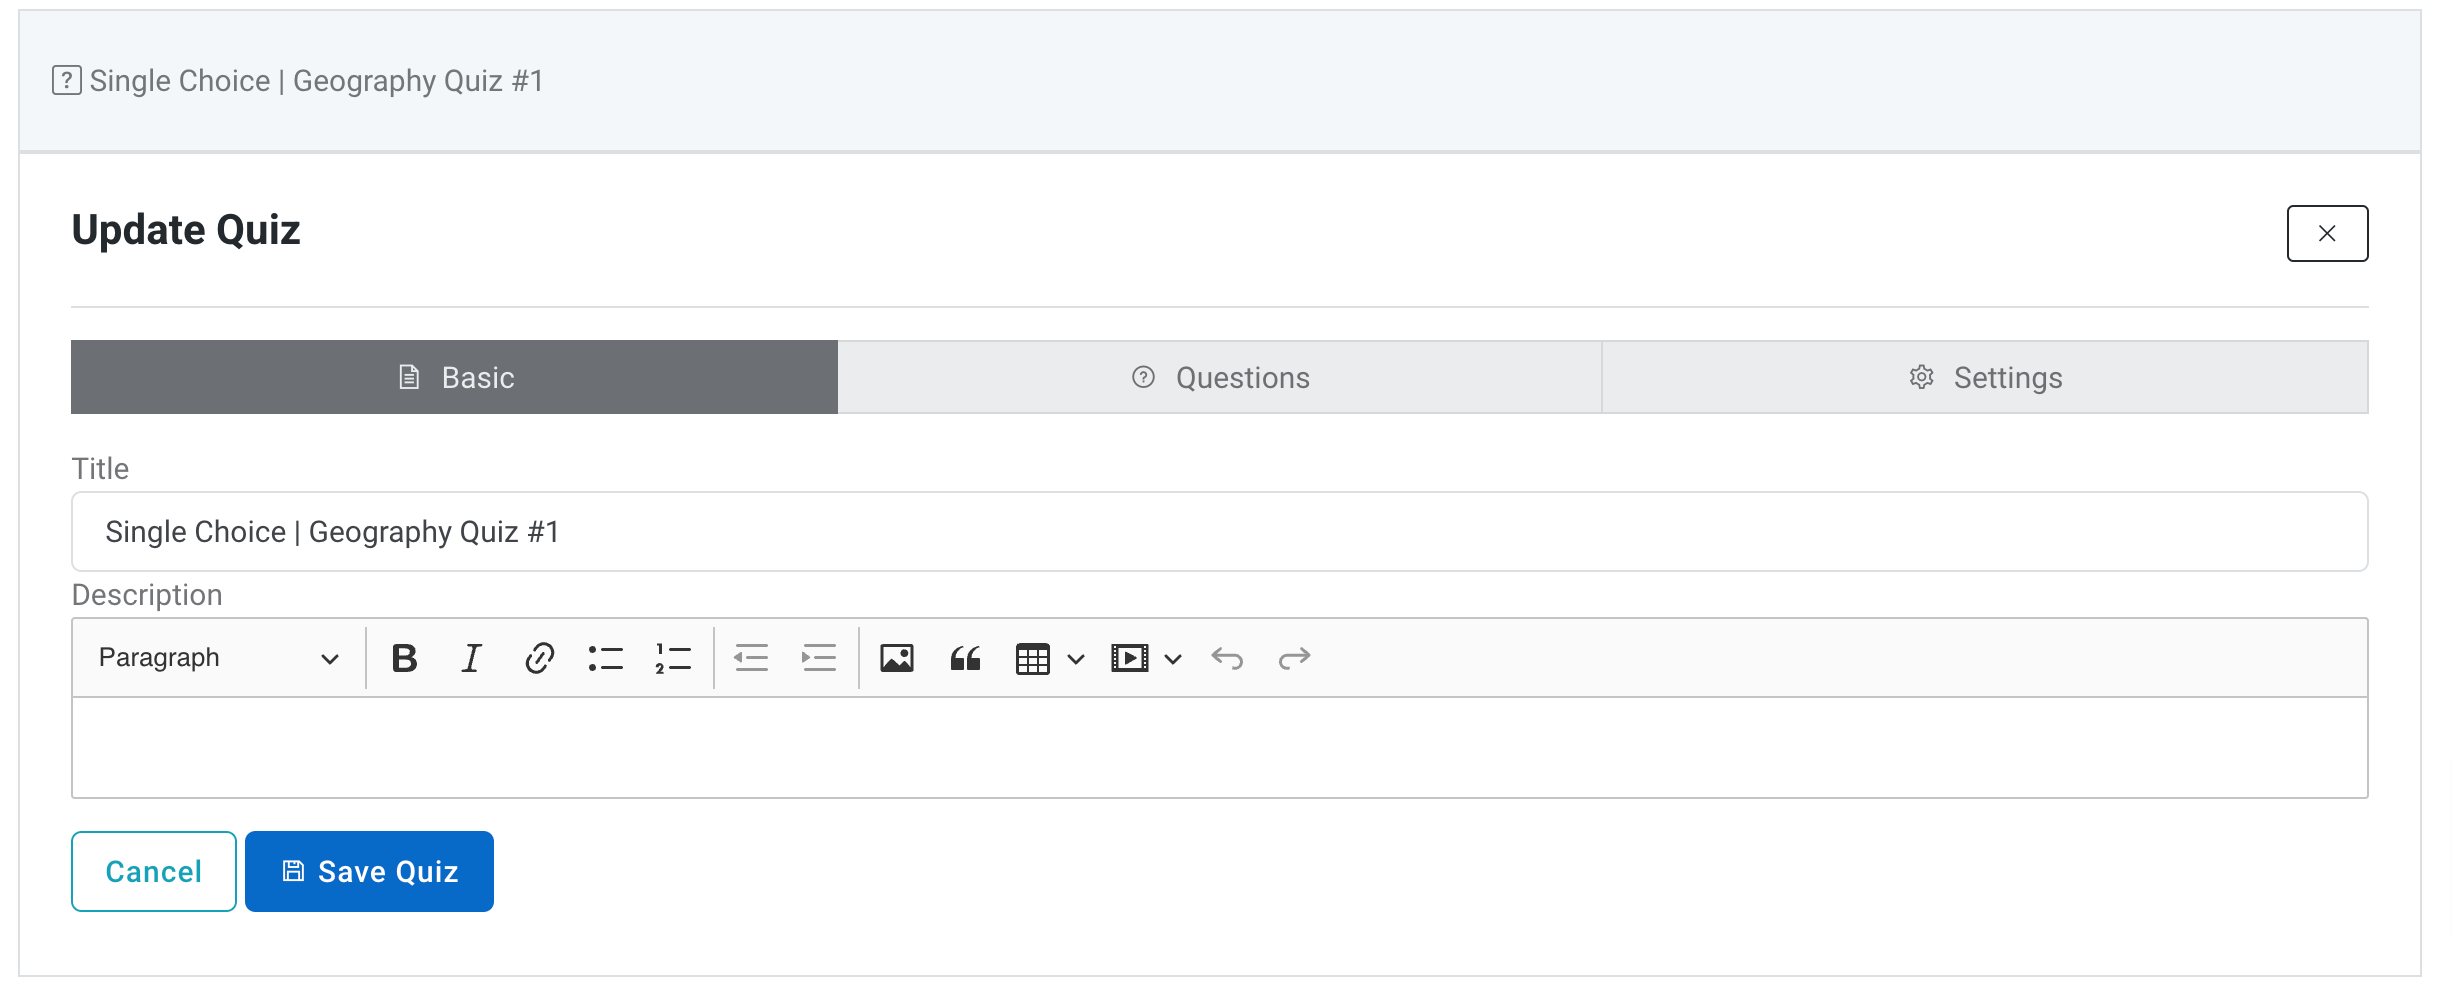
Quizzes serve as pivotal assessment tools, gauging understanding and reinforcing course material. Through this lecture, you'll gain insight into the meticulous process of quiz creation, ensuring clarity, engagement, and accuracy in assessing student knowledge.
Requirements:
- Before embarking on quiz creation, ensure that you have a structured course already established within Piksera LMS.
- Navigate to the designated course curriculum where you intend to integrate the quiz.
- Confirm the presence of a dedicated section within the curriculum to seamlessly accommodate the quiz.
Understanding Quiz Types:
Piksera LMS offers a versatile array of question types to cater to diverse learning objectives. These include:
- Single Choice: Craft questions requiring students to select a singular correct answer amidst several incorrect options. Ideal for precise assessment with automated review capabilities.
- Multiple Choices: Formulate questions necessitating the selection of multiple correct answers. Ensures comprehensive evaluation, with automated review functionalities.
- Text Input: Pose questions prompting students to provide answers within a single line. Requires manual review due to the varied nature of responses.
- Textarea: Present questions allowing students to furnish unrestricted responses. Mandates manual review owing to the open-ended nature of answers.
Step-by-Step Guide to Quiz Creation:
Accessing Quiz Creation Interface:
Initiate the quiz creation process by selecting the [+Quiz] button situated at the bottom of the section container within the curriculum.
Title and Description:
Furnish a concise yet descriptive title for the quiz, with the option to include additional context through a description, albeit optional.
Adding Questions:
Upon creating the quiz, expand the interface to incorporate questions. Utilize the "Add a New Question" button to prompt a modal offering the four question type options.
Question Types:
Select the desired question type and provide a clear title for the question. For single choice and multiple choice questions, include both correct and incorrect answers as applicable.
Configuring Quiz Settings:
- Quiz Gradability: Specify whether the quiz contributes to the student's grading system for the respective course.
- Remaining Time Display: Opt to display the remaining time during the quiz attempt to enhance time management awareness.
- Time Limit: Set a designated time limit for the quiz attempt, or disable it by setting the limit to zero.
- Passing Score (%): Define the minimum score percentage students must achieve to pass the quiz successfully.
- Questions Limit: Determine the number of questions students must answer within the quiz.
Crafting quizzes within Piksera LMS is a meticulous yet rewarding endeavor, offering invaluable insights into student comprehension and progress. By adhering to the outlined procedures and leveraging the diverse question types and configuration settings, you can create quizzes that foster learning, engagement, and academic excellence.
Save the Quiz: Upon completing the quiz setup and configuration, ensure to save the quiz to finalize the creation process.
Creating an Assignment
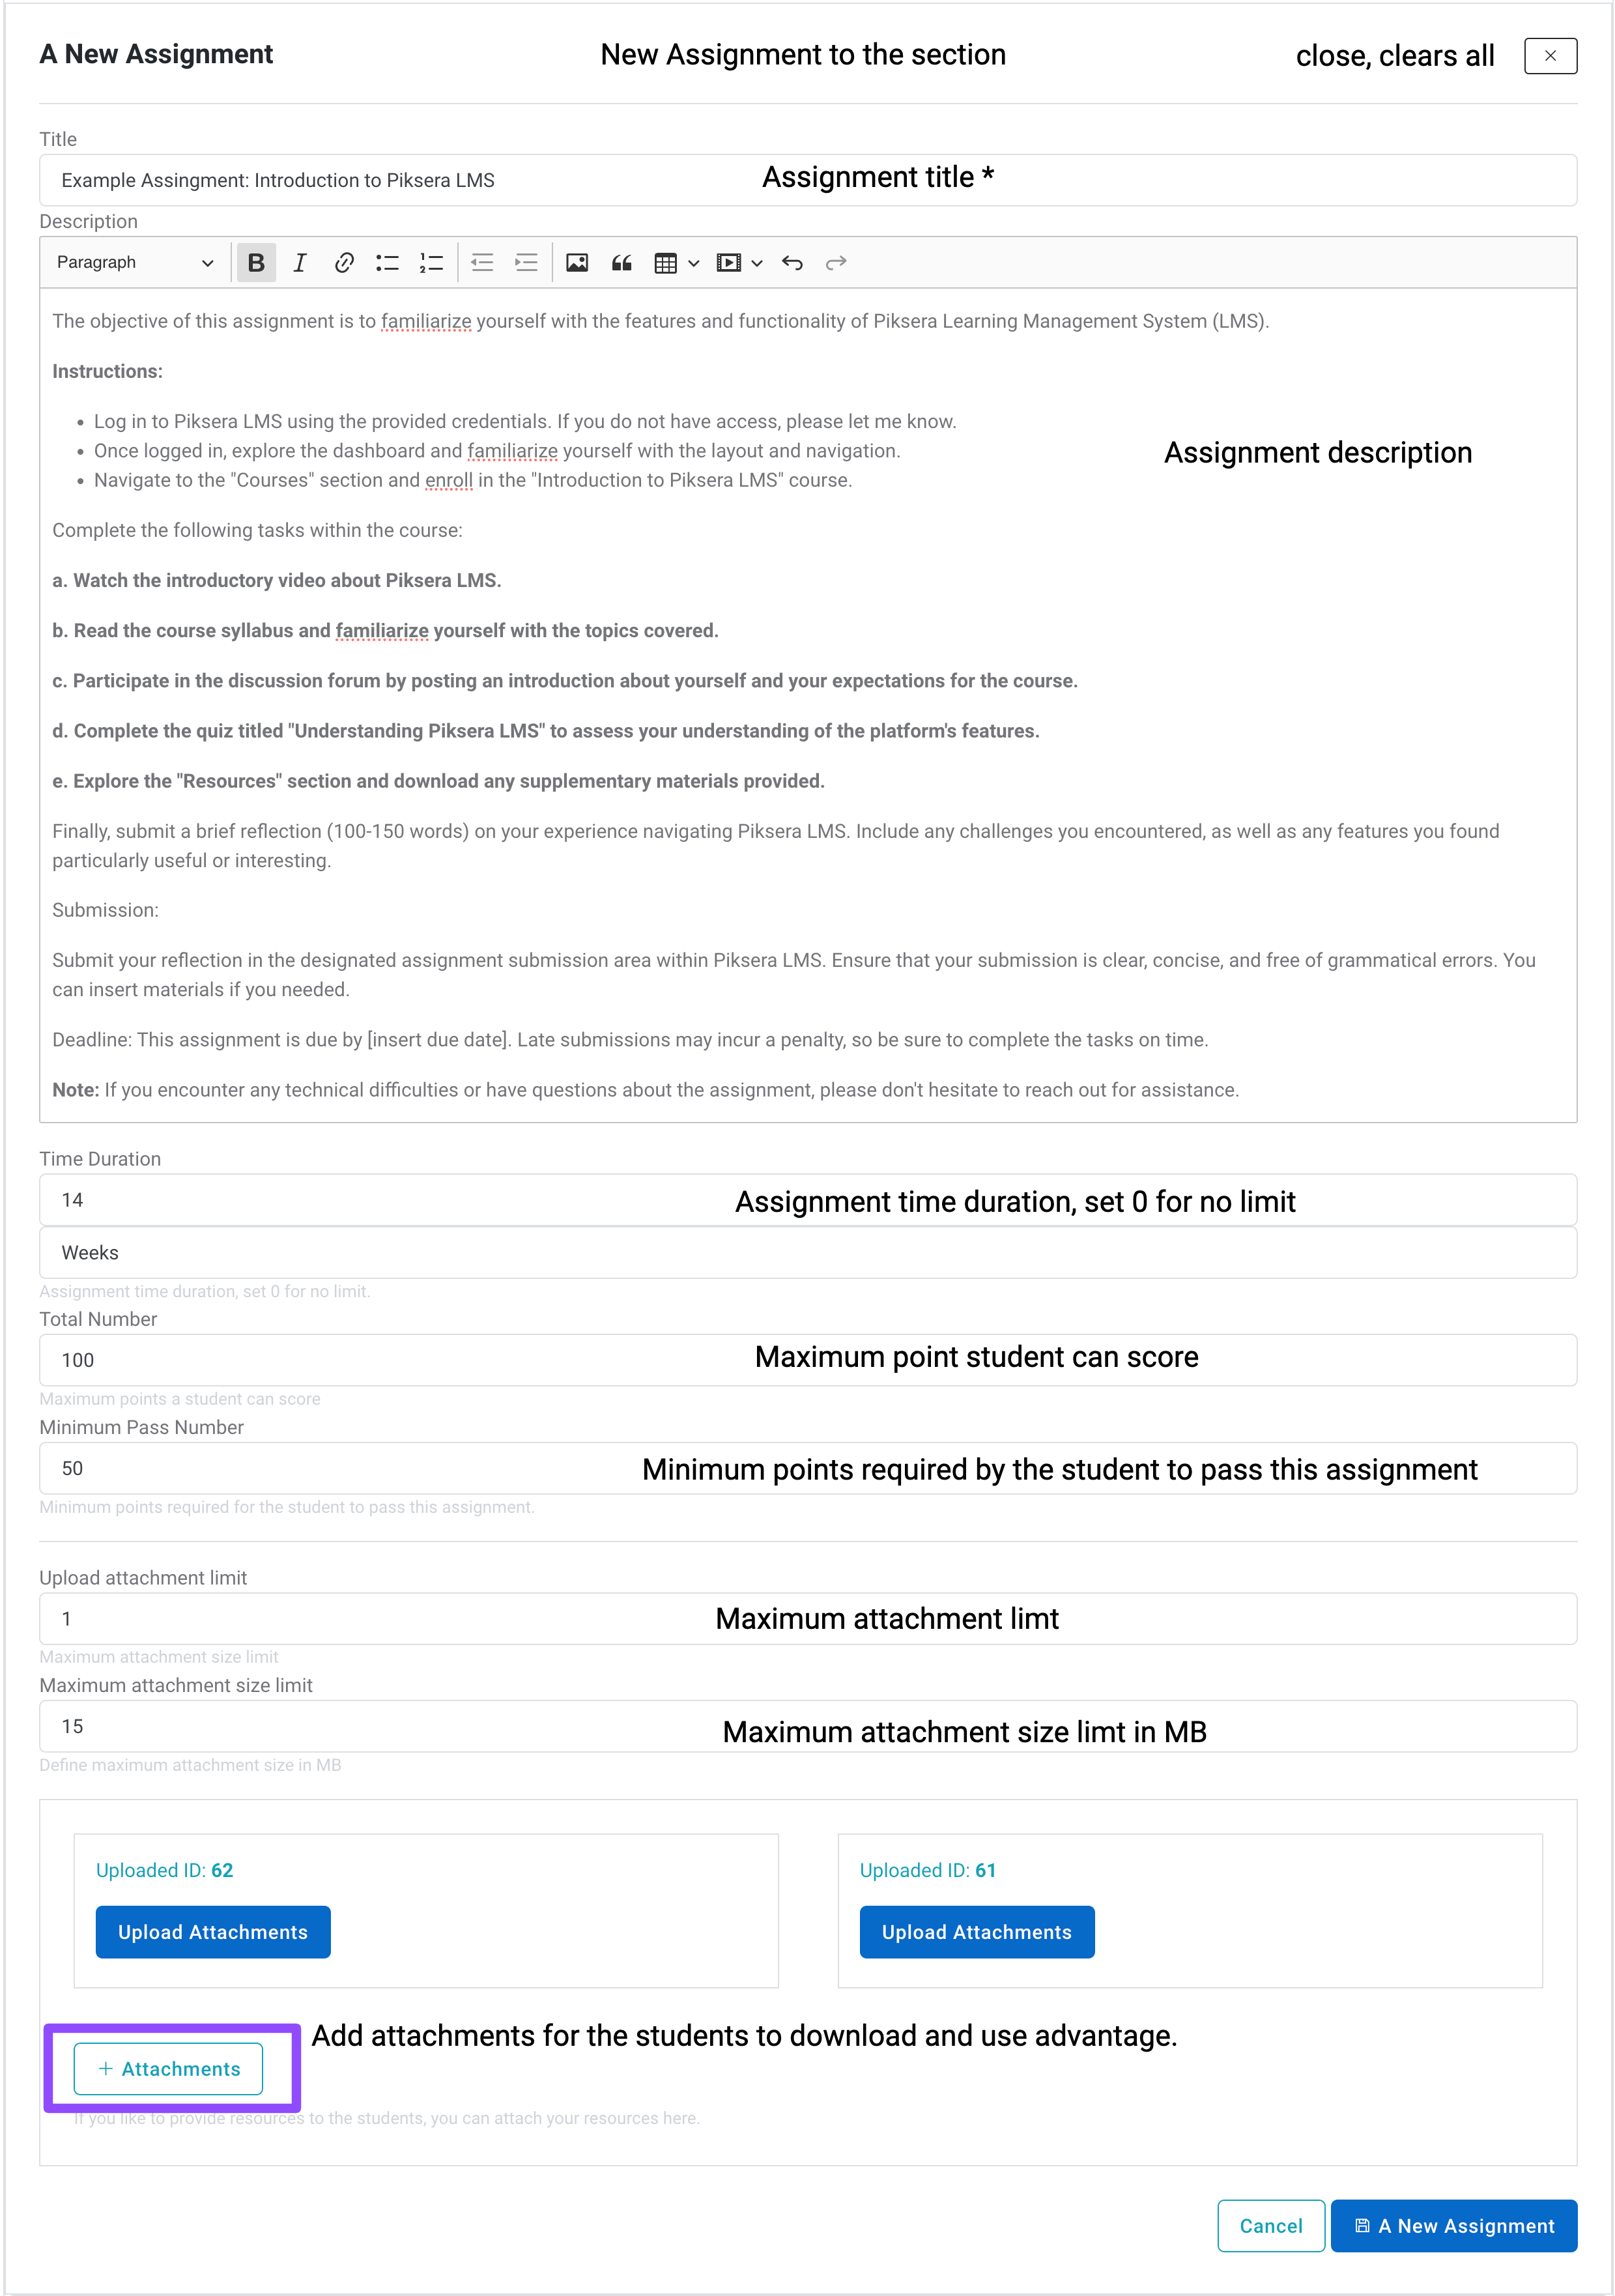
Creating an assignment can easily be done by pressing the "plus" assignment button on the bottom of the section container.
Then give the assignment:
- a title (required)
- a description (optional)
- time duration (assignment time duration, set 0 for no limit) in weeks
- total number (maximum points a student can score)
- minimum pass number (minimum points required for the student to pass this assignment)
- upload attachment limit (maximum attachment size limit)
- maximum attachment size limit (define maximum attachment size in MB)
You can attach attachments to the assignment. If you like to provide resources to the students, you can attach your resources here.
Instructors
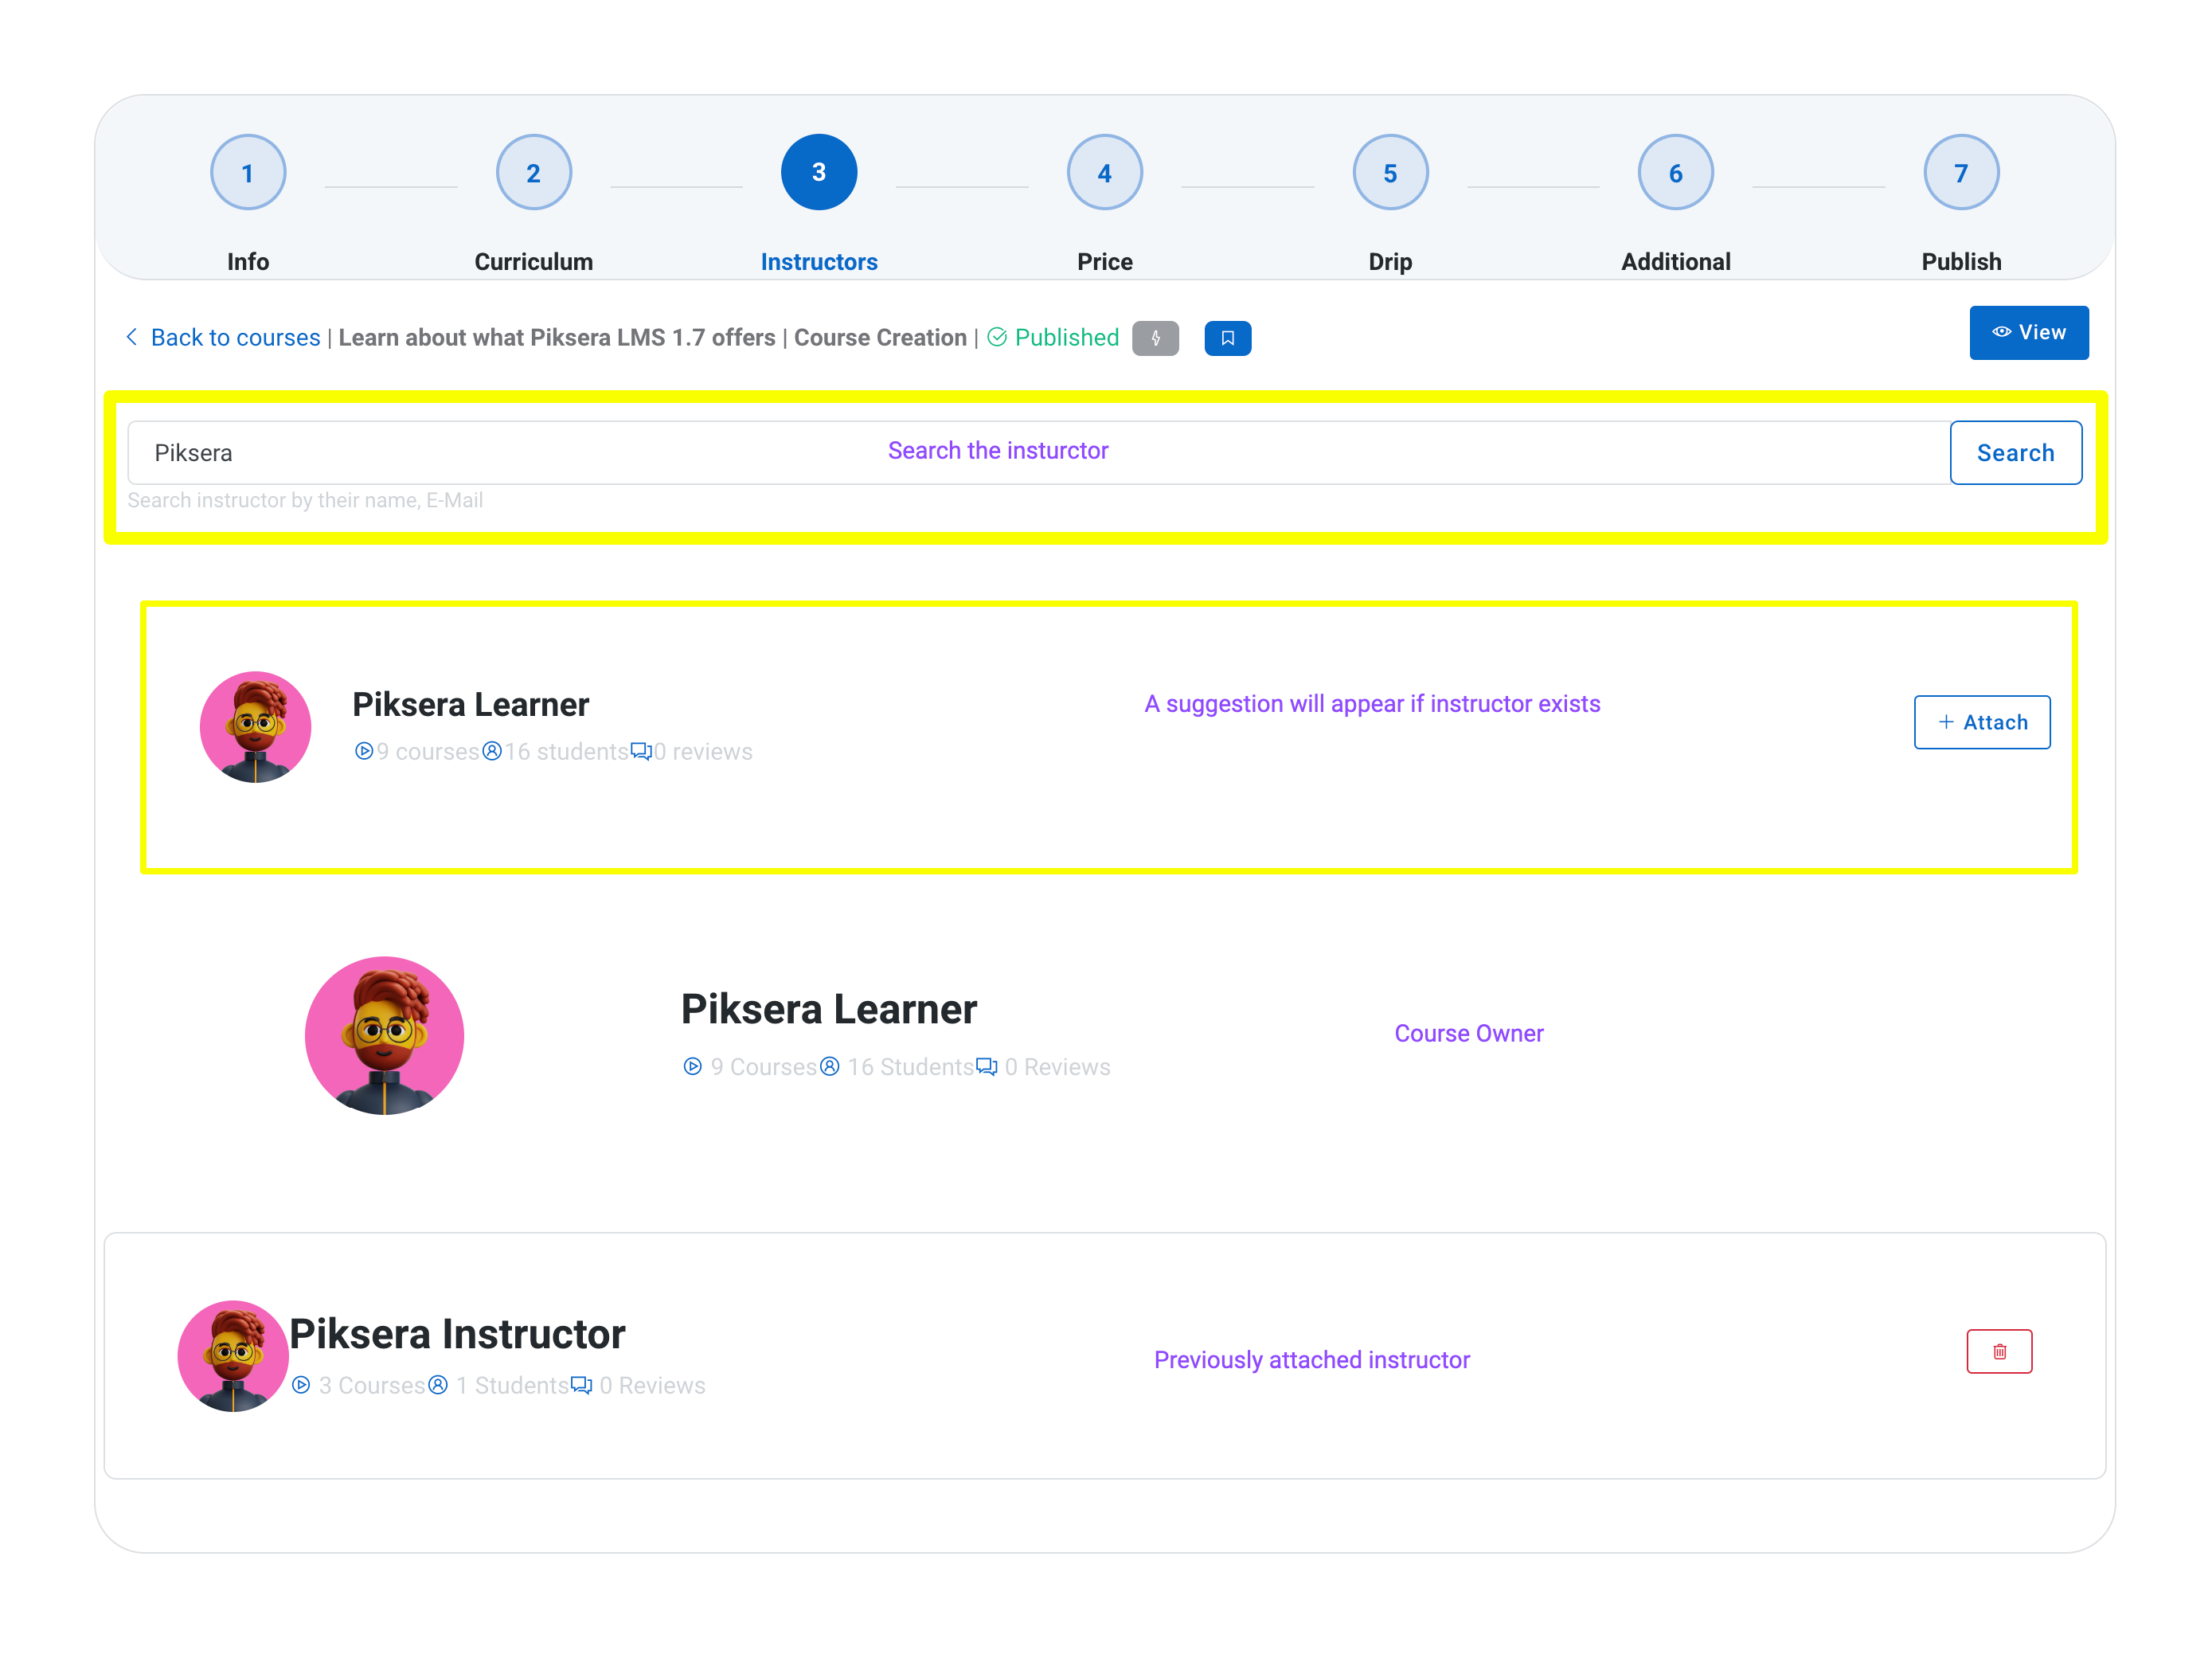
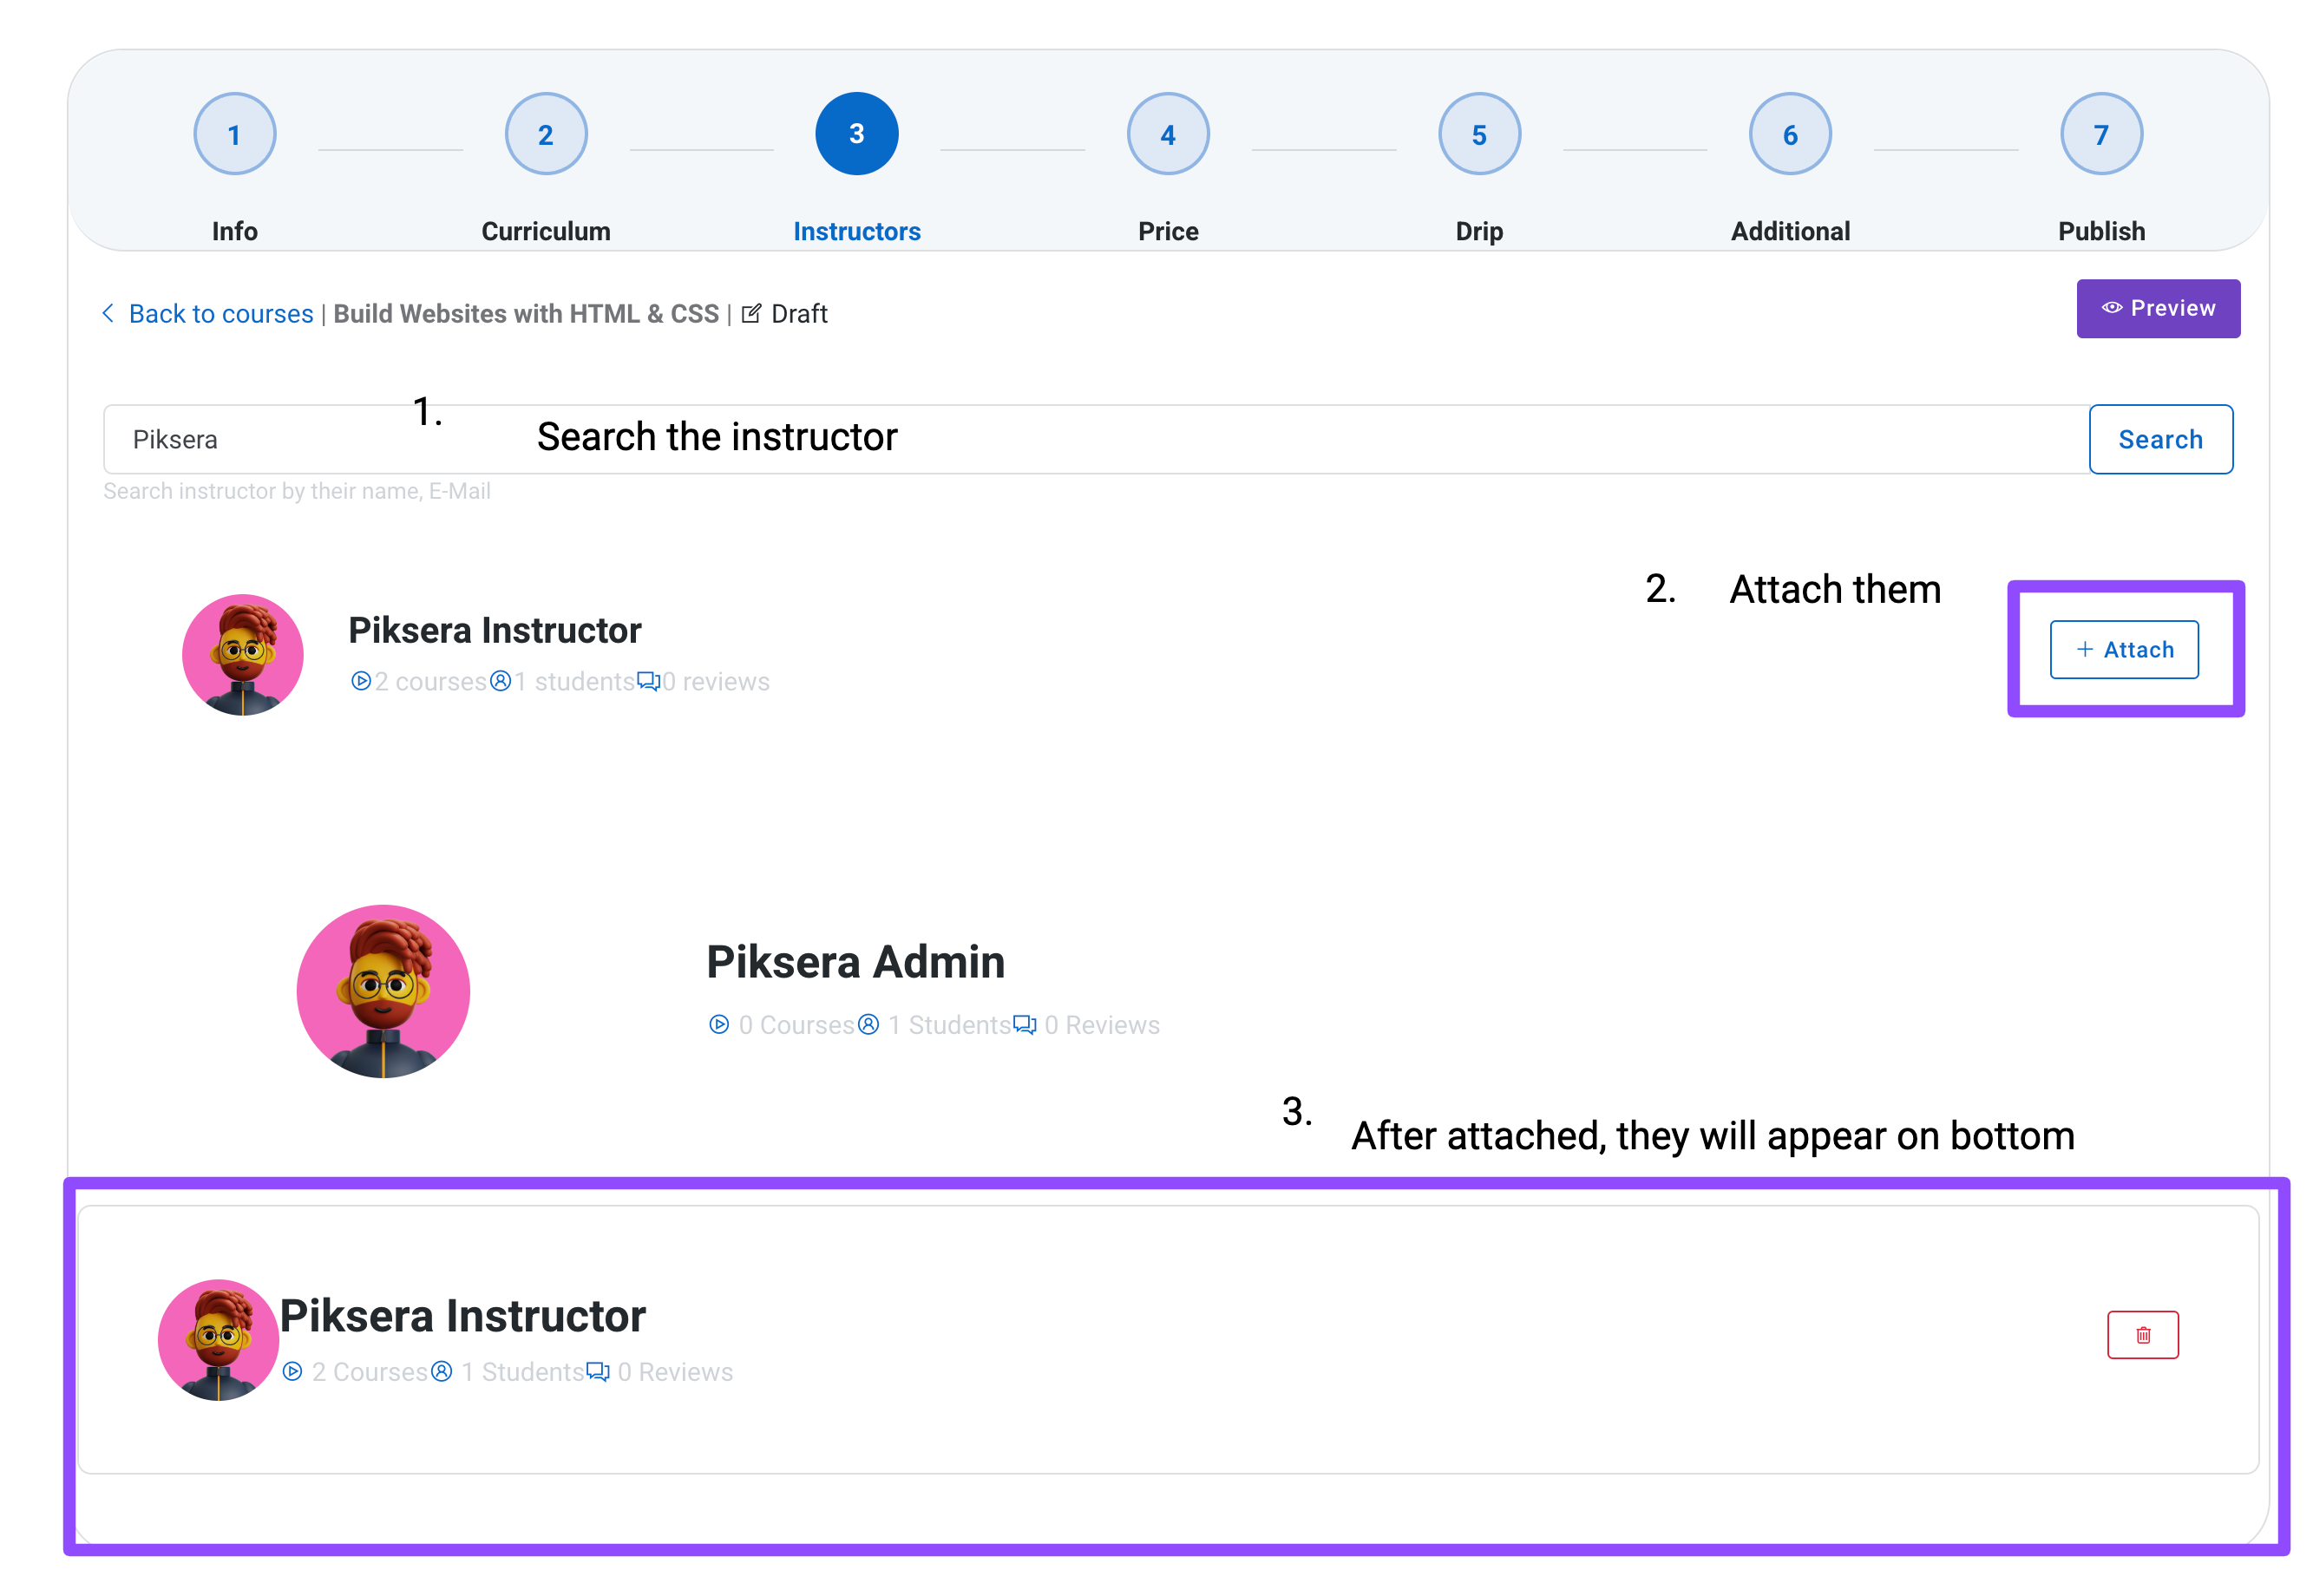
On the "Instructors" step while editing the course: If MultiInstructors plugin is activated
- Search for an instructor.
- A suggestion will appear if the instructor exists with the name or email you have given.
- Press the "+ Attach" button to add the instructor to the course.
- After successfully attaching, the added instructor card will appear behind the instructor that owns the course.
- You can remove the instructor after attaching.
- The course owner cannot be removed.
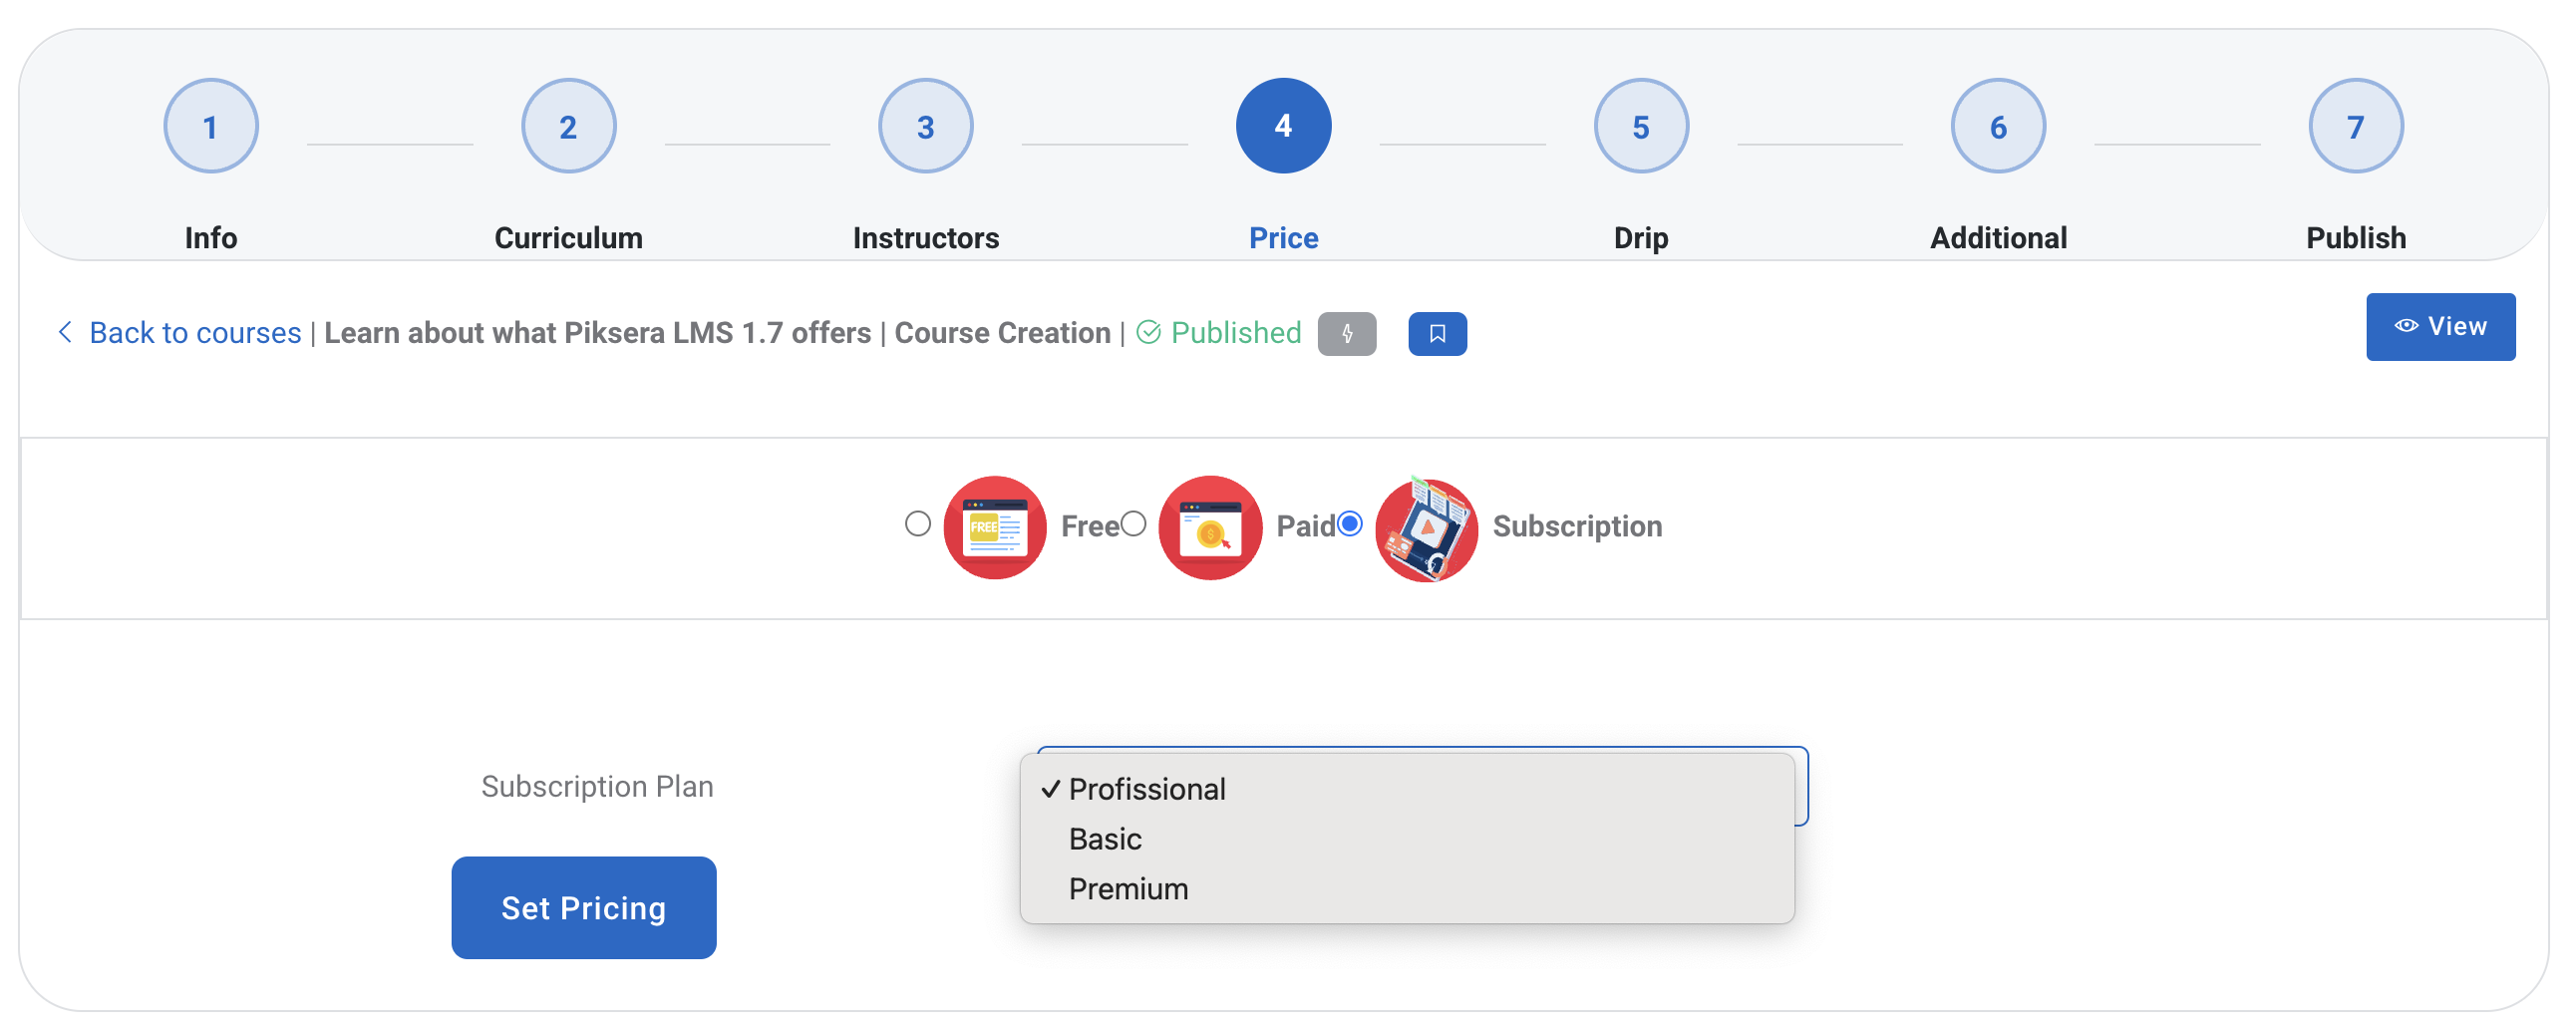
Pricing
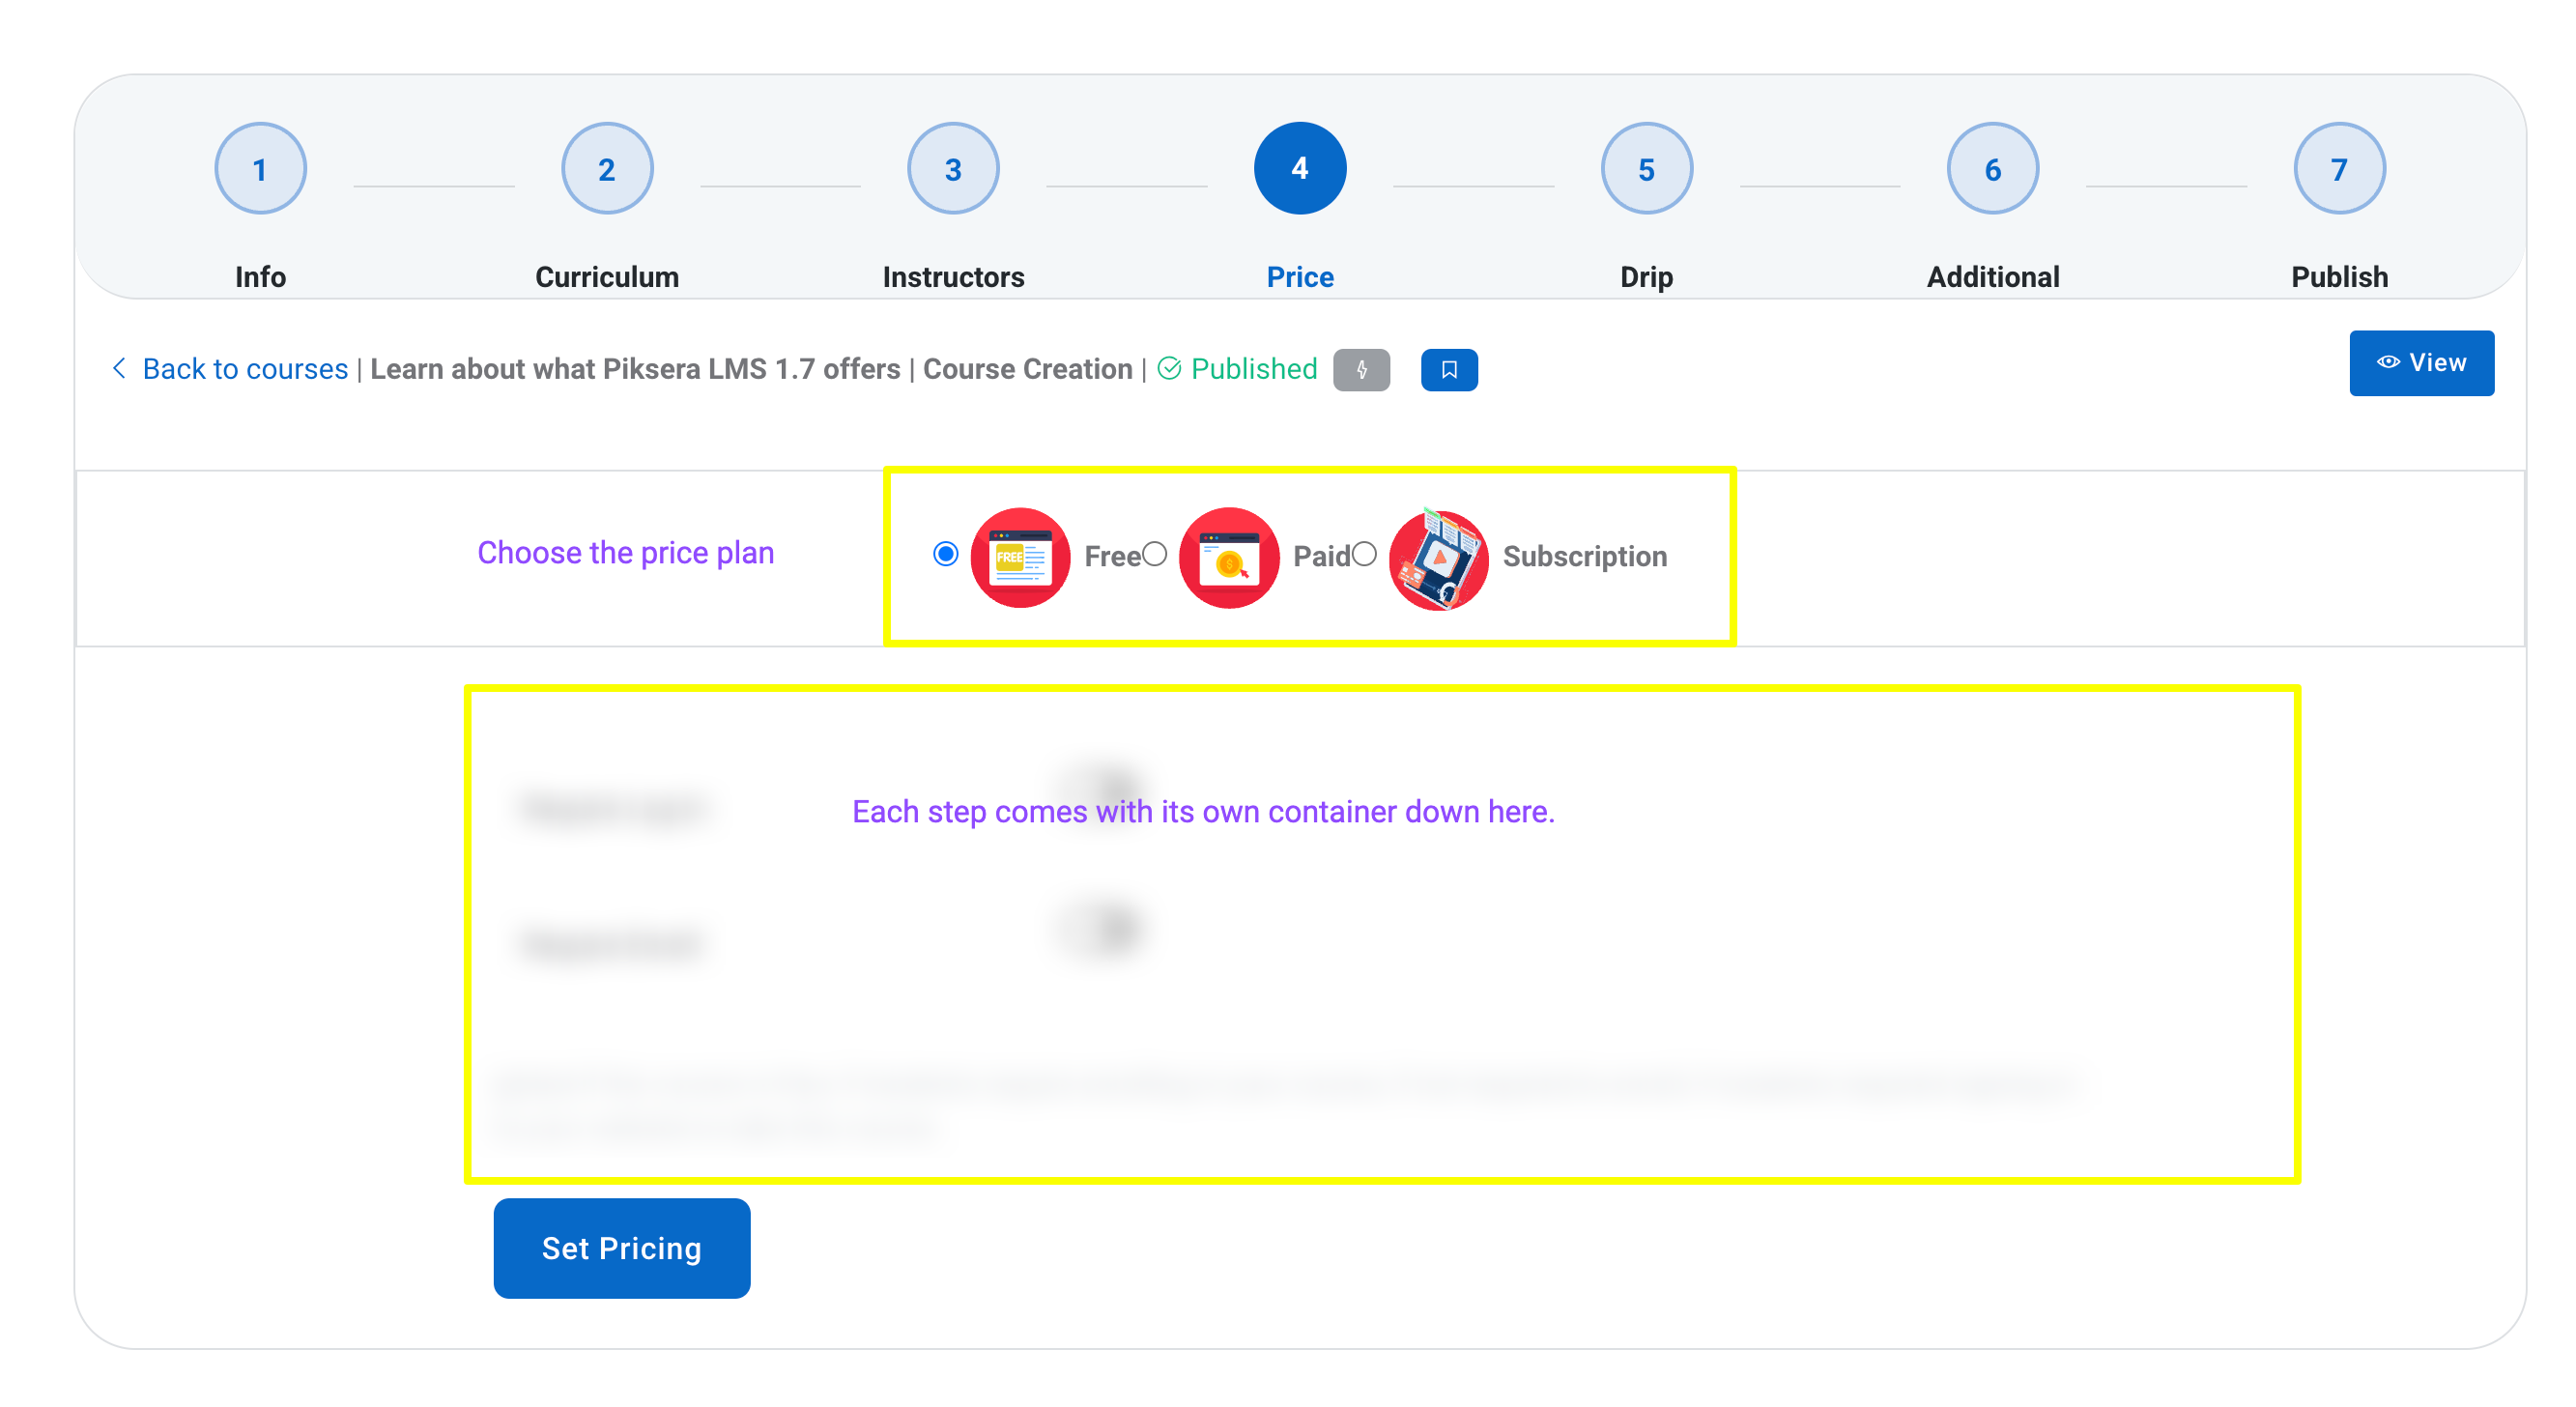
Course pricing: The LMS gives you 3 types of price plan options for the course (Free, Paid, or Subscription) one plan at a time.
Free Price Plan
Students can freely enroll in the course and view your course materials. They have full rights after they free enroll. Only if the instructor makes the course price plan subscription, it will require to subscribe to the course plan subscription plan. Students will get a certificate if they complete the course.
-
Free plan options you can set:
- Require Log In: Students must log in to see the contents.
- Require Enroll: Students must enroll first to see the course contents.
After finishing, remember to press the "set pricing" button to save.
Paid Price Plan
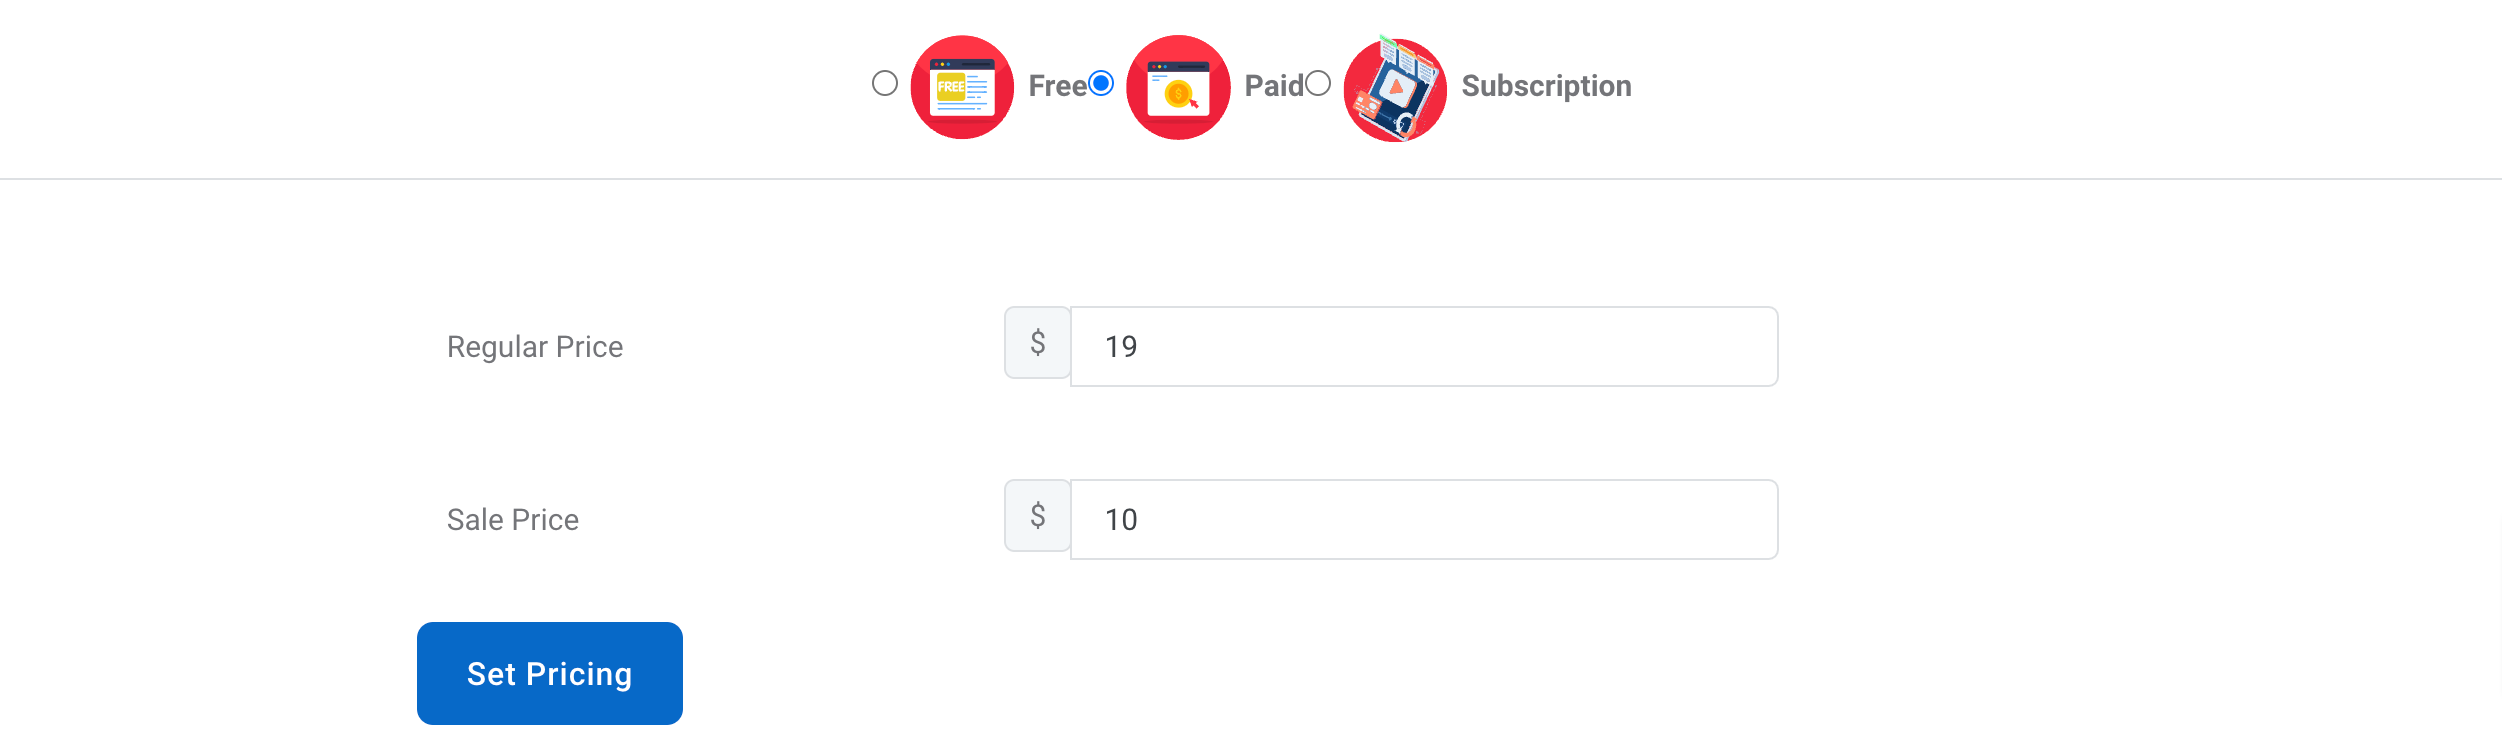
Instructors can make their course paid and demand students to pay for the course and its materials. Students will not be able to see the contents without paying for the course.
-
Paid plan options you can set:
- Regular Price: Course before sale price.
- Sale Price: Course after sale price. Keep empty to use regular price.
After finishing, remember to press the "set pricing" button to save.
Subscription Price Plan
Instructors can assign their courses to one of the subscription plans the admin has created. Students cannot view the course, cannot enroll, and will require purchuse the course subscription plan.
Drip Content
Instructor can drip and lock content just to be visible due to specific date or days after the student enrolls the course.
Additionals
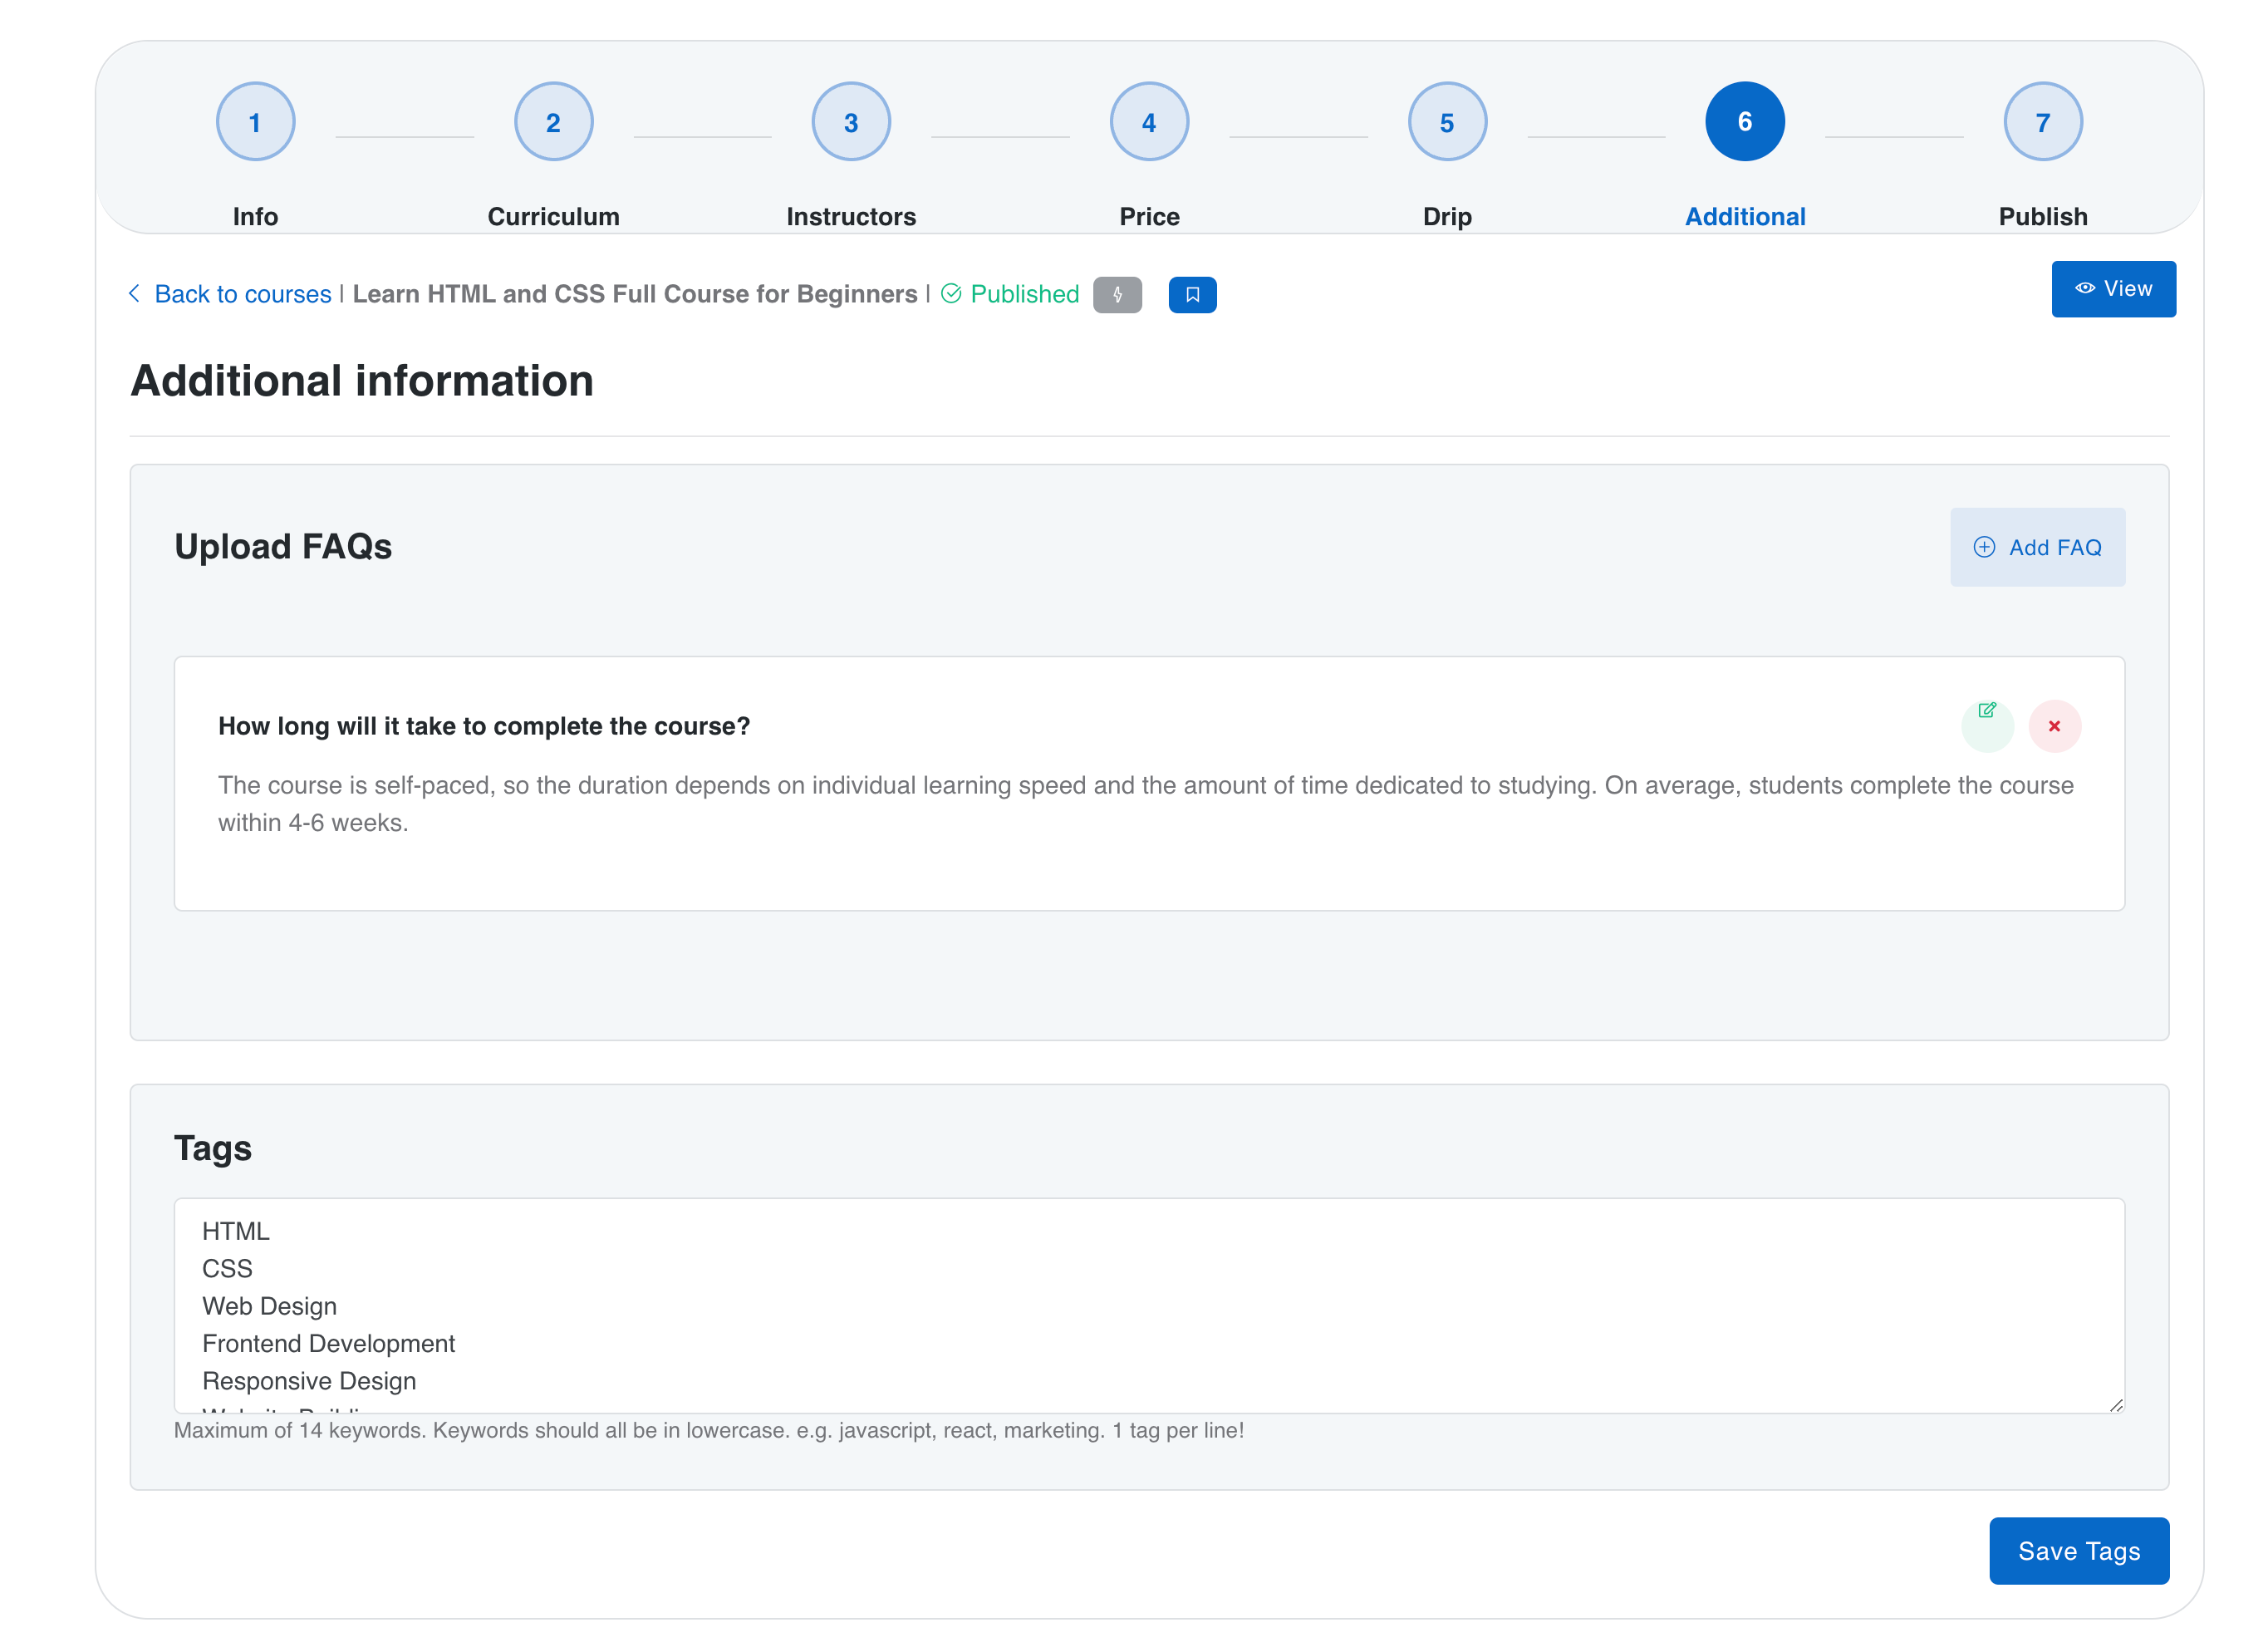
Add FAQs to the course and tags. Tags need to be saved.
Publish Course
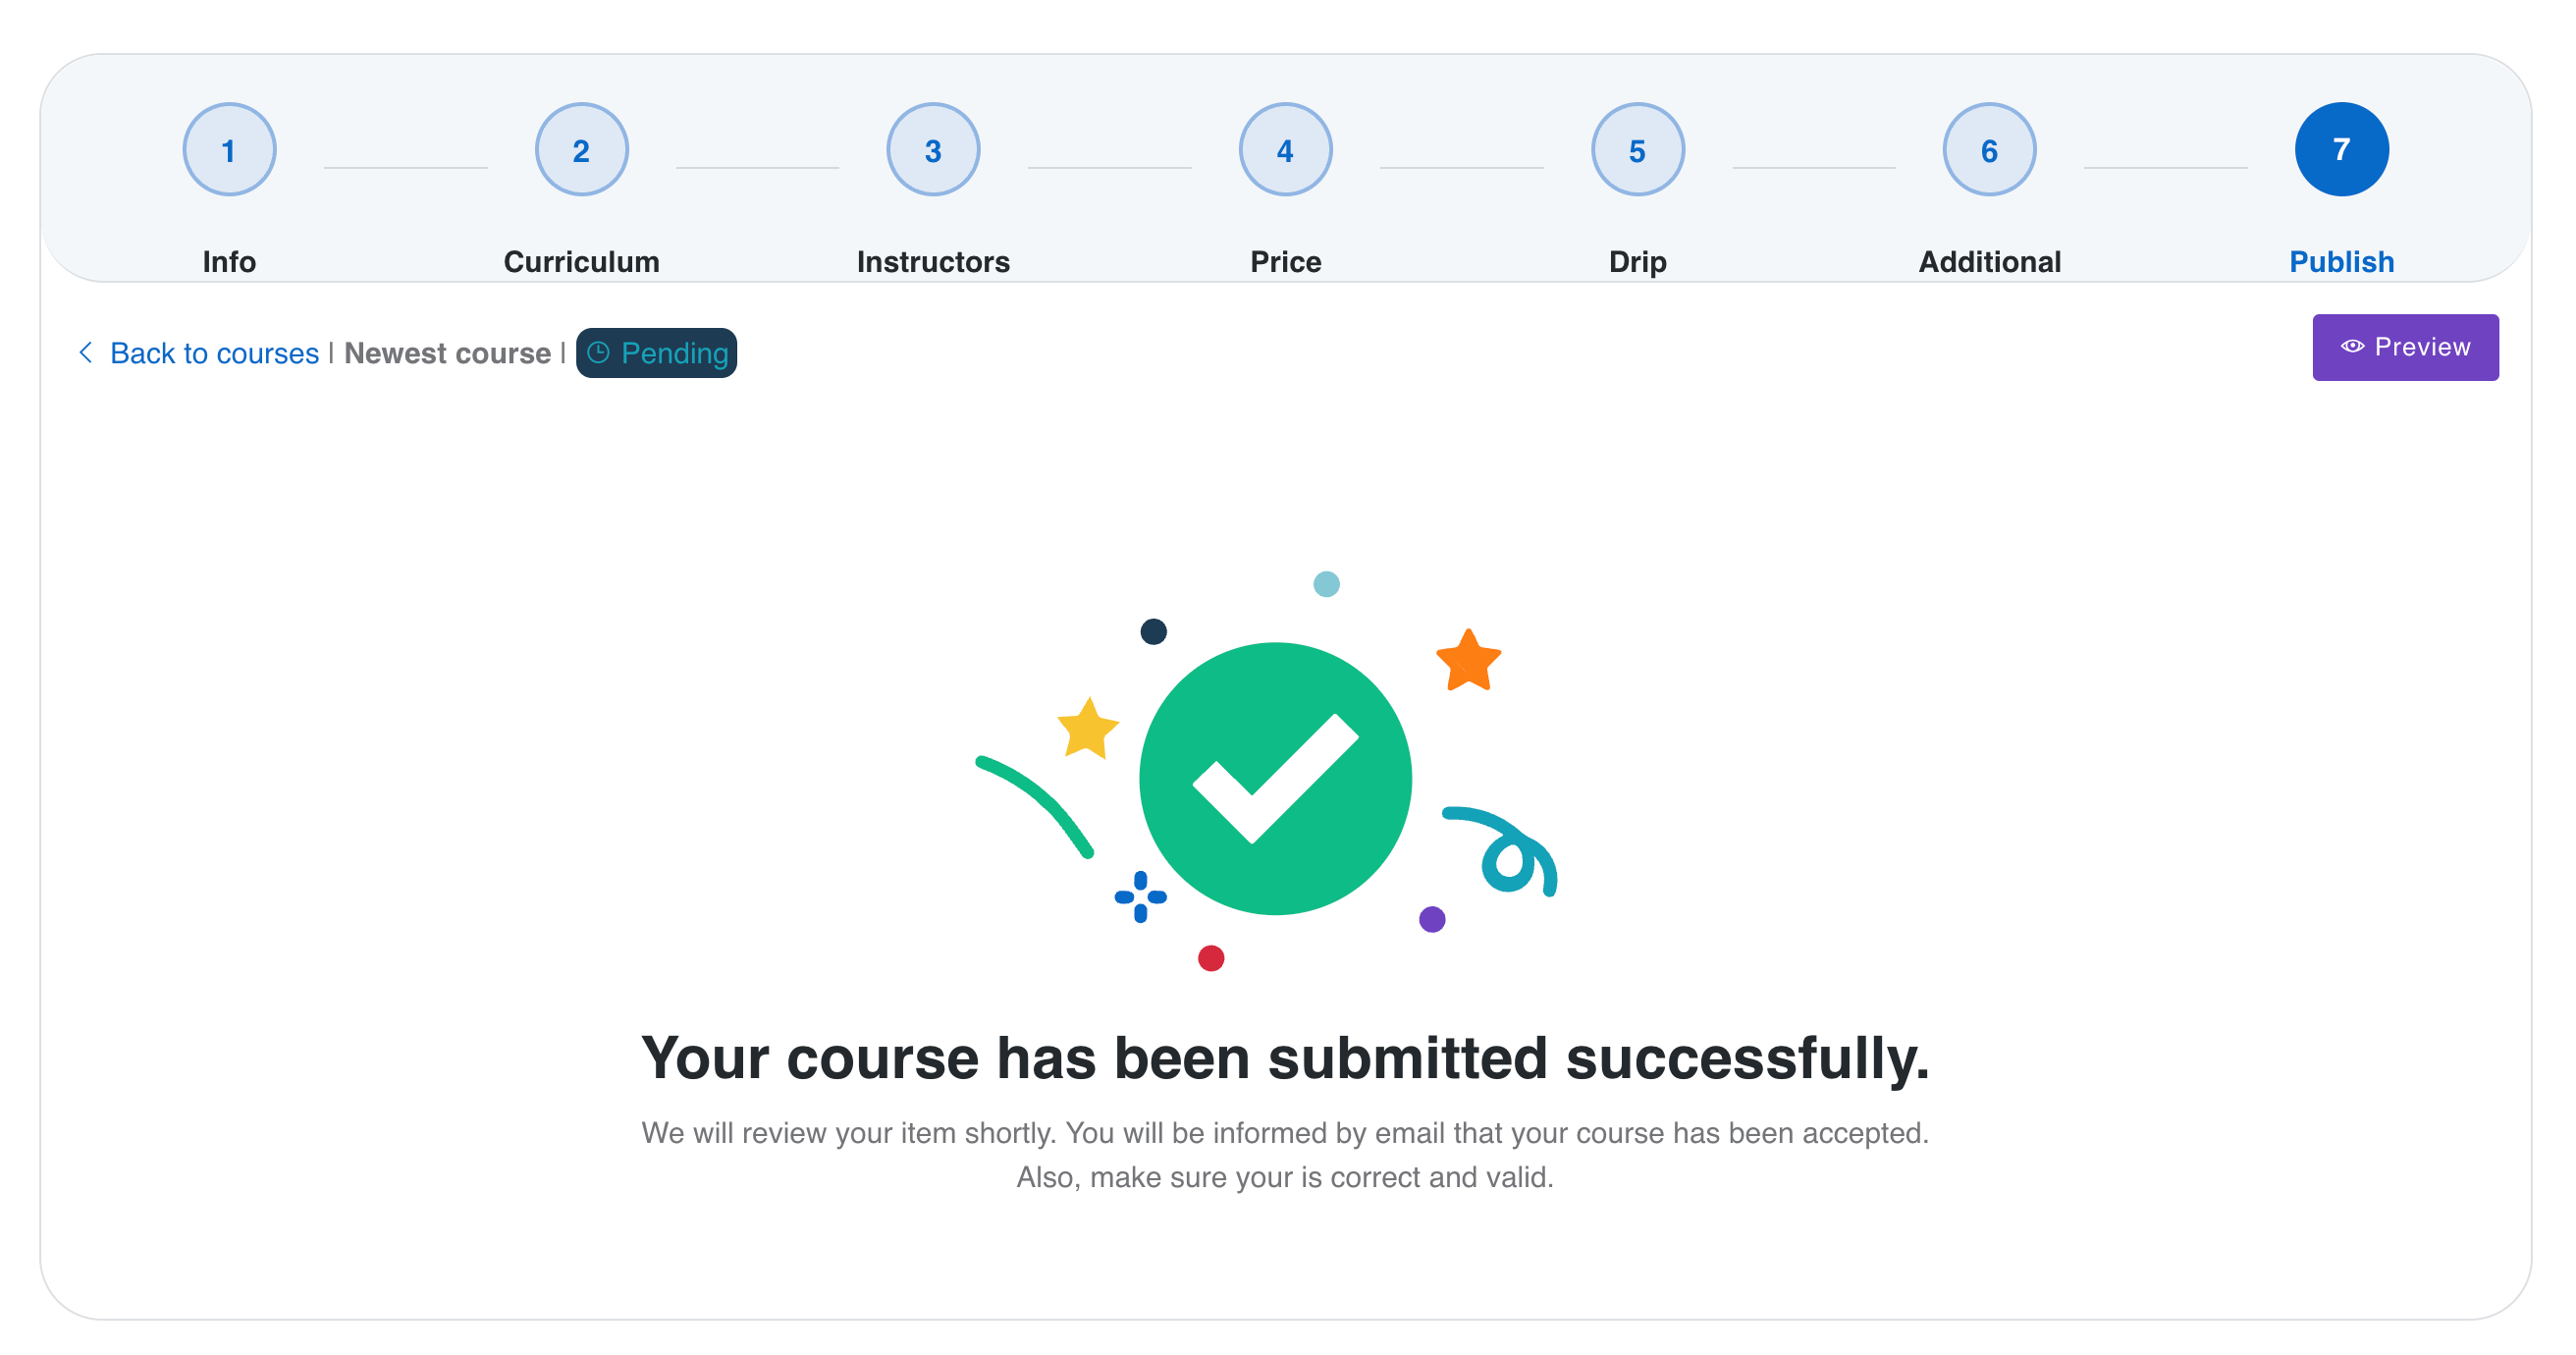
Instructors can request a review for theirs if self-publish option is not set is LMS settings
FAQ
A FAQ is a list of frequently asked questions (FAQs) and answers on a particular topic.
https://support.piksera.com/ and open your ticket.Sources and Credits
We would like to say big thanks to fabulous souls for their products which help us in our theme development!
While making this theme, we have used 3rd party plugins, icons, images, fonts, etc... Here is the list with the official website link. All Plugins are located in assets/vendor folder, while image sources in the assets/images folder.
Plugins
| Plugin name | URL |
|---|---|
| Bootstrap 5 | https://getbootstrap.com/docs/ |
| Tiny Slider | https://github.com/ganlanyuan/tiny-slider |
| imagesloaded | https://github.com/desandro/imagesloaded |
| GLightbox | https://github.com/biati-digital/glightbox |
| Isotope | https://isotope.metafizzy.co/ |
| Choices | https://github.com/Choices-js/Choices |
| Video plyr | https://github.com/sampotts/plyr |
| Stepper | https://github.com/Johann-S/bs-stepper |
| Sticky-js | https://github.com/rgalus/sticky-js |
| Apexchart | https://apexcharts.com/ |
| Animate | https://github.com/animate-css/animate.css |
| Purecounter | https://github.com/srexi/purecounterjs |
| Quill | https://quilljs.com/ |
| aos | https://github.com/michalsnik/aos/tree/v2 |
Images and logos
| Source name | URL |
|---|---|
| Freepik | https://www.freepik.com |
| Pexels | https://www.pexels.com |
| Storyset | https://storyset.com/ |
| Worldvectorlogo | https://worldvectorlogo.com/ |
| Blobmaker | https://www.blobmaker.app/ |
Fonts
| Source name | URL |
|---|---|
| Font Awesome | https://fontawesome.com/ |
| Bootstrap icons | https://icons.getbootstrap.com/ |
| Google fonts | https://fonts.google.com/ |
Support
If this documentation doesn't answer your questions, So, Please send us via Item Support Page
We are located in EEST time zone and we answer all questions within 12-24 hours in weekdays. In some rare cases the waiting time can be to 48 hours. (except holiday seasons which might take longer).
Included in Support:
- Guiding to fix issues related to the original .
- Answers to questions regarding the script.
- Providing updates on latest plugins update, bug fixes and client feedbacks.
Not Included in Support:
- Customization of the script.
- Specific support for third-party plugins integrated into the script.
Don’t forget to Rate this template
Go to your Codester > Piksera LMS > & then You can Rate & Review for our template.
Thank You.
More Templates
Checkout Our scripts on Piksera.com
Changelog
See what's new added, changed, fixed, improved or updated in the latest versions.
For Future Updates Follow Us @Codester / @facebook / @twitter / @Instagram
Version 1.7 (15 Apr, 2024)
- AddedMassive New Design from Scratch
- AddedCourse Subscription tool
- AddedProfile Delete request
- AddedBecome an Instructor request
- AddedNew Admin Panel Design
- AddedNew Dashboard Design
- AddedNew Layout
- AddedLight/Dark Modes
- AddedMultilanguage settings
- AddedTicket System
- AddedMenu Creation
- Added4 Home Type Designs
- Added4 Course Type Designs
- AddedEasy Installation Wizard
- Added Mailer Settings
- Added Adverts placements
- Added Admin Notifications
- Added MultiInstructors Plugin
- Added Certificate Plugin
- Added Student-progress Plugin
- FixedMajor fixes on learning page
- Fixed Some minor bugs for functionalities
- Updated Bootstrap to Latest Version
- Updated PHP version to 8.1 Version
- Updated Laravel version to 10.21 Version
- Updated User interface (UI) and user experience (UX) improvements.
Version 1.6 (26 Dec, 2023)
- Added Maintenance Mode
- Added Marketing Popups
- Added Advanced customization options
- Added Advanced Learning Design
- Fixed Some minor bugs for compatibility
- Fixed Some minor bugs for responsive
Version 1.5 (05 Oct, 2023)
- Added Find an Instructor page
- Added New Front Design
- Added New Profile Design
- Fixed Some minor bugs for compatibility
- Fixed Some minor bugs
Version 1.4 (16 Jul, 2023)
- Added Your information here for added new feature
- Fixed Improved performance and speed.
- Fixed Enrolled users getting content locked issue without content drip
- Fixed Some minor bugs
- Fixed responsive support for the payment page
- Fixed delete button on the quiz attempt review page
Version 1.3 (02 Feb, 2023
- Added Social Login
- Added Drip Content
- AddedIntuitive course builder
- Fixed Some minor bugs
- Updated FontAwesome to Latest Version
- Updated Bootstrap to Latest Version
- Updated Improvements in CSS and JS
Version 1.2 (20 Dec, 2022)
- Added Instructors Earnings and Report
- AddedCourse reviews and rating system
- AddedWithdraw Earning Module
- AddedWrite Notes Module
- AddedNew Major Design
- Fixed Some minor bugs
- Fixed Some minor bugs for responsive
Version 1.1 (12 Oct, 2022)
- Added RTL Feature
- Fixed Some minor bugs for responsive
- Updated Improvements in CSS and JS
Version 1.0 (2 Julay, 2022)
Initial Release